Documentation Index
Fetch the complete documentation index at: https://docs.windsurf.com/llms.txt
Use this file to discover all available pages before exploring further.
This feature is only available to Enterprise users.
This feature is not applicable to Cognition Platform plans. For Cognition Platform, SSO should be configured and managed in your Cognition Platform settings instead.
- Google SSO
- Microsoft Entra ID
- Okta SSO
- Azure SCIM
- Okta SCIM
- SCIM API
- Duo
- PingID
Windsurf now supports sign in with Single Sign-On (SSO) via SAML. If your organization uses Microsoft Entra, Okta, Google Workspaces, or some other identity provider that supports SAML, you will be able to use SSO with Windsurf.
Windsurf only supports SP-initiated SSO; IDP-initiated SSO is NOT currently supported.
Configure IDP Application
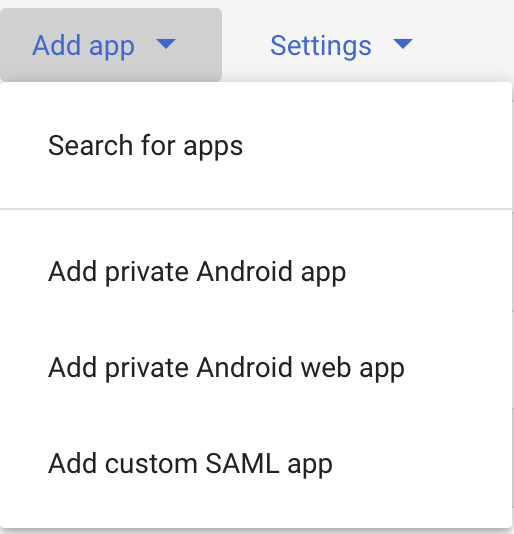
On the google admin console (admin.google.com) click Apps -> Web and mobile apps on the left.Windsurf, and click Next.The next screen (Google Identity Provider details) on Google’s console page has data you’ll need to copy to Windsurf’s SSO settings on https://windsurf.com/team/settings.- Copy SSO URL from Google’s console page to Windsurf’s settings under SSO URL
- Copy Entity ID from Google’s console page to Windsurf’s settings under Idp Entity ID
- Copy Certificate from Google’s console page to Windsurf’s settings under X509 Certificate
- Click Continue on Google’s console page
- Copy Callback URL from Codeium’s settings page to Google’s console page under ACS URL
- Copy SP Entity ID from Codeium’s settings page to Google’s console page under SP Entity ID
- Change Name ID format to EMAIL
- Click Continue on Google’s console page
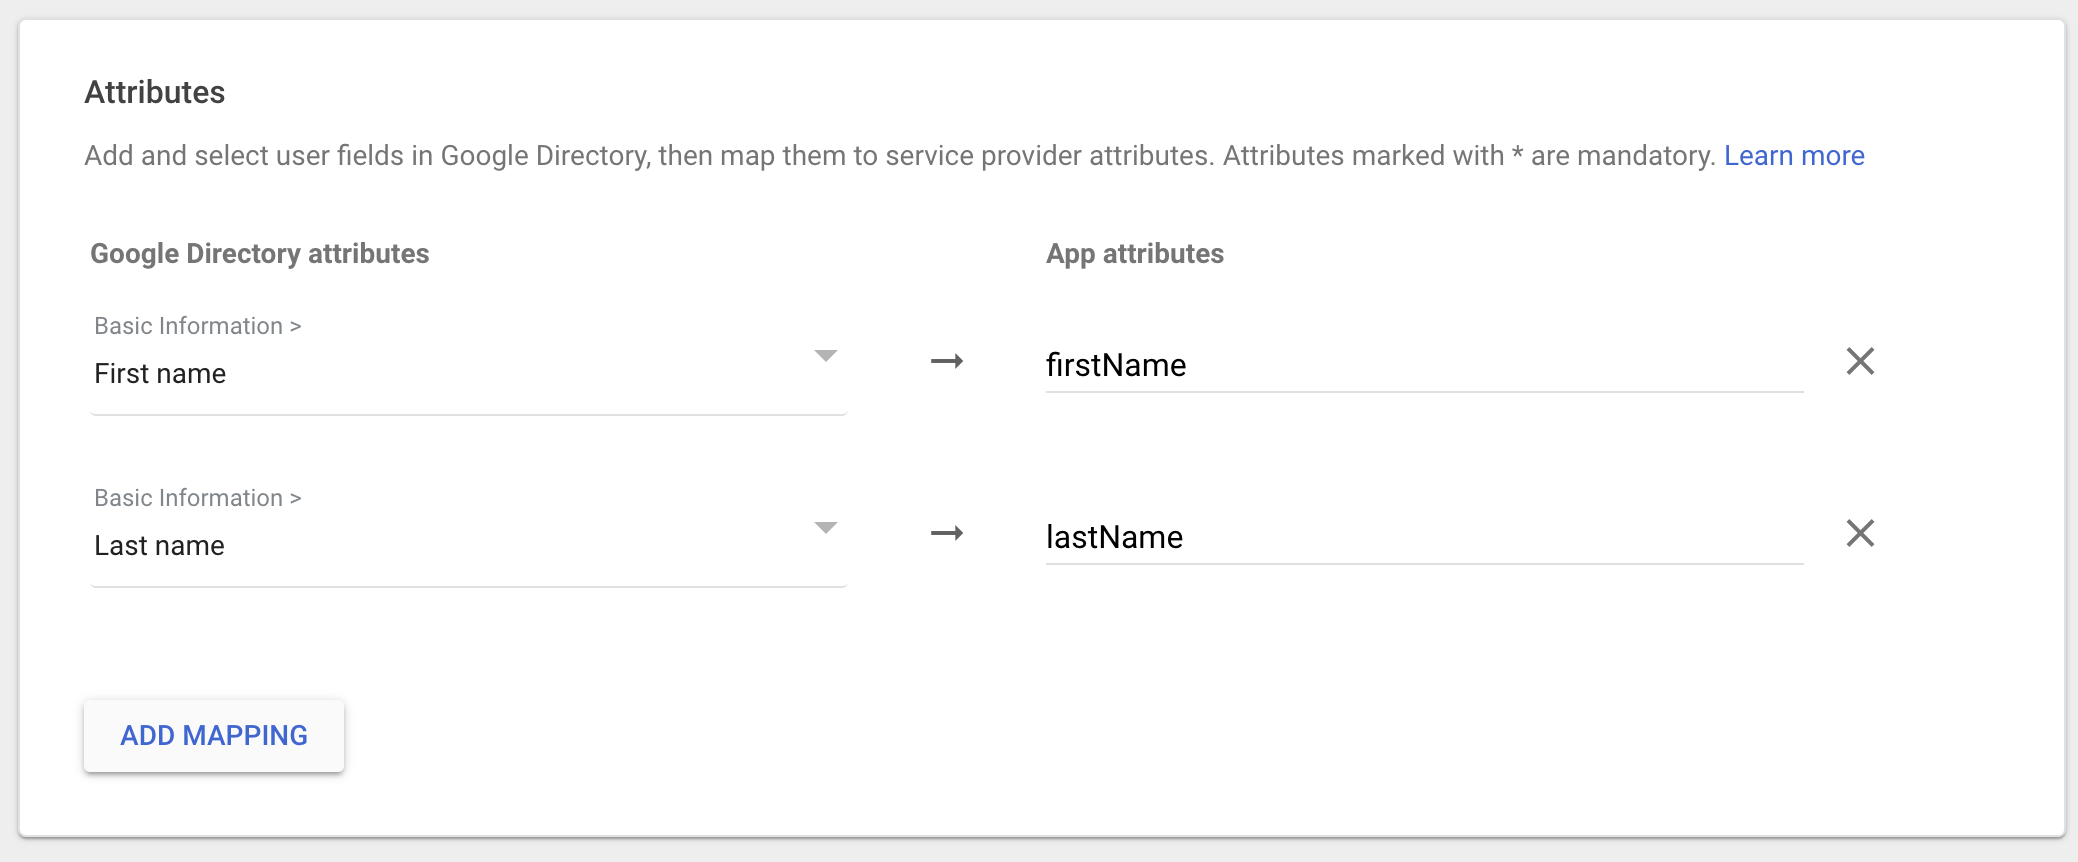
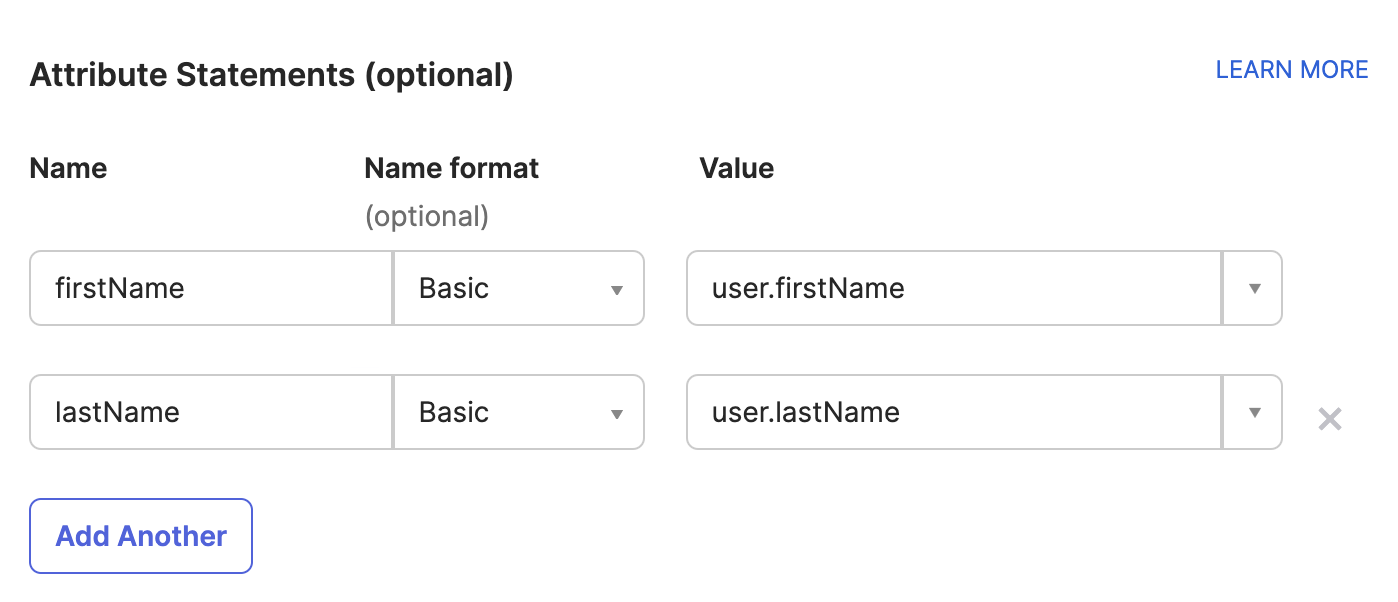
- Click on Add Mapping, select First name and set the App attributes to firstName
- Click on Add Mapping, select Last name and set the App attributes to lastName
- Click Finish
Windsurf Enterprise now supports sign in with Single Sign-On (SSO) via SAML. If your organization uses Microsoft Entra ID (formerly Azure AD), you will be able to use SSO with Windsurf.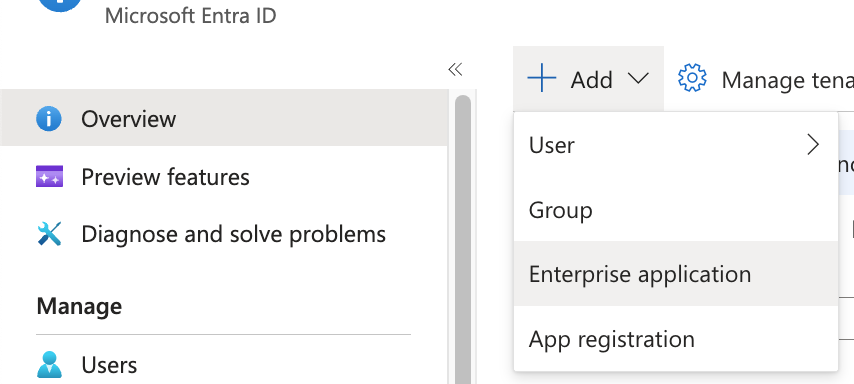

Windsurf only supports SP-initiated SSO; IDP-initiated SSO is NOT currently supported.
Part 1: Create Enterprise Application in Microsoft Entra ID
All steps in this section are performed in the Microsoft Entra ID admin center.
- In Microsoft Entra ID, click on Add, and then Enterprise Application.
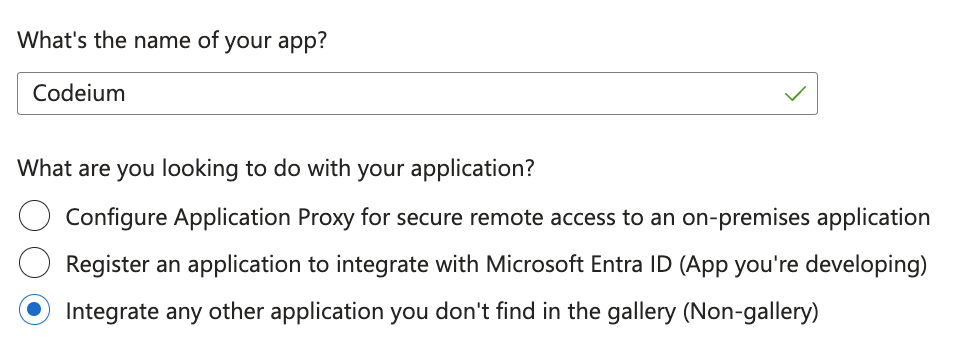
- Click on Create your own application.
- Name your application Windsurf, select Integrate any other application you don’t find in the gallery, and then click Create.
Part 2: Configure SAML and User Attributes in Microsoft Entra ID
All steps in this section are performed in the Microsoft Entra ID admin center.
- In your new Windsurf application, click on Set up single sign on, then click SAML.
- Click on Edit under Basic SAML Configuration.
- Keep this Entra ID tab open and open a new tab to navigate to the Windsurf Teams SSO settings at https://windsurf.com/team/settings.
-
In the Microsoft Entra ID SAML configuration form:
- Identifier (Entity ID): Copy the SP Entity ID value from the Windsurf SSO settings page
- Reply URL (Assertion Consumer Service URL): Copy the Callback URL value from the Windsurf SSO settings page
- Click Save at the top
- Configure user attributes for proper name display. In Microsoft Entra ID, under Attributes & Claims, click Edit.
-
Create 2 new claims by clicking Add new claim for each:
- First claim: Name =
firstName, Source attribute =user.givenname - Second claim: Name =
lastName, Source attribute =user.surname
- First claim: Name =
Part 3: Configure SSO Settings in Windsurf Portal
Complete the configuration in the Windsurf portal (https://windsurf.com/team/settings).
-
In the Windsurf SSO settings page:
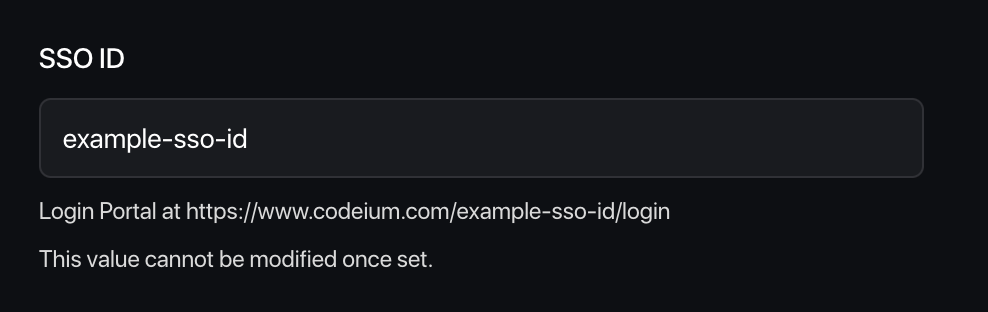
- Pick your SSO ID: Choose a unique identifier for your team’s login portal (this cannot be changed later)
- IdP Entity ID: Copy the value from Microsoft Entra ID under Set up Windsurf → Microsoft Entra Identifier
The IdP Entity ID URL must end with a trailing
/(e.g.,https://sts.windows.net/{tenant-id}/). If the URL does not include the trailing slash, add it manually. - SSO URL: Copy the Login URL value from Microsoft Entra ID
- X509 Certificate: Download the SAML certificate (Base64) from Microsoft Entra ID, open the file, and paste the text content here
- In the Windsurf portal, click Enable Login with SAML, then click Save.
- Test the configuration: Click Test Login to verify the SSO configuration works as expected.
Important: Do not log out or close the Windsurf settings page until you’ve successfully tested the login. If the test fails, you may need to troubleshoot your configuration before proceeding.
Windsurf Enterprise now supports sign in with Single Sign-On (SSO) via SAML. If your organization uses Microsoft Entra, Okta, Google Workspaces, or some other identity provider that supports SAML, you will be able to use SSO with Windsurf.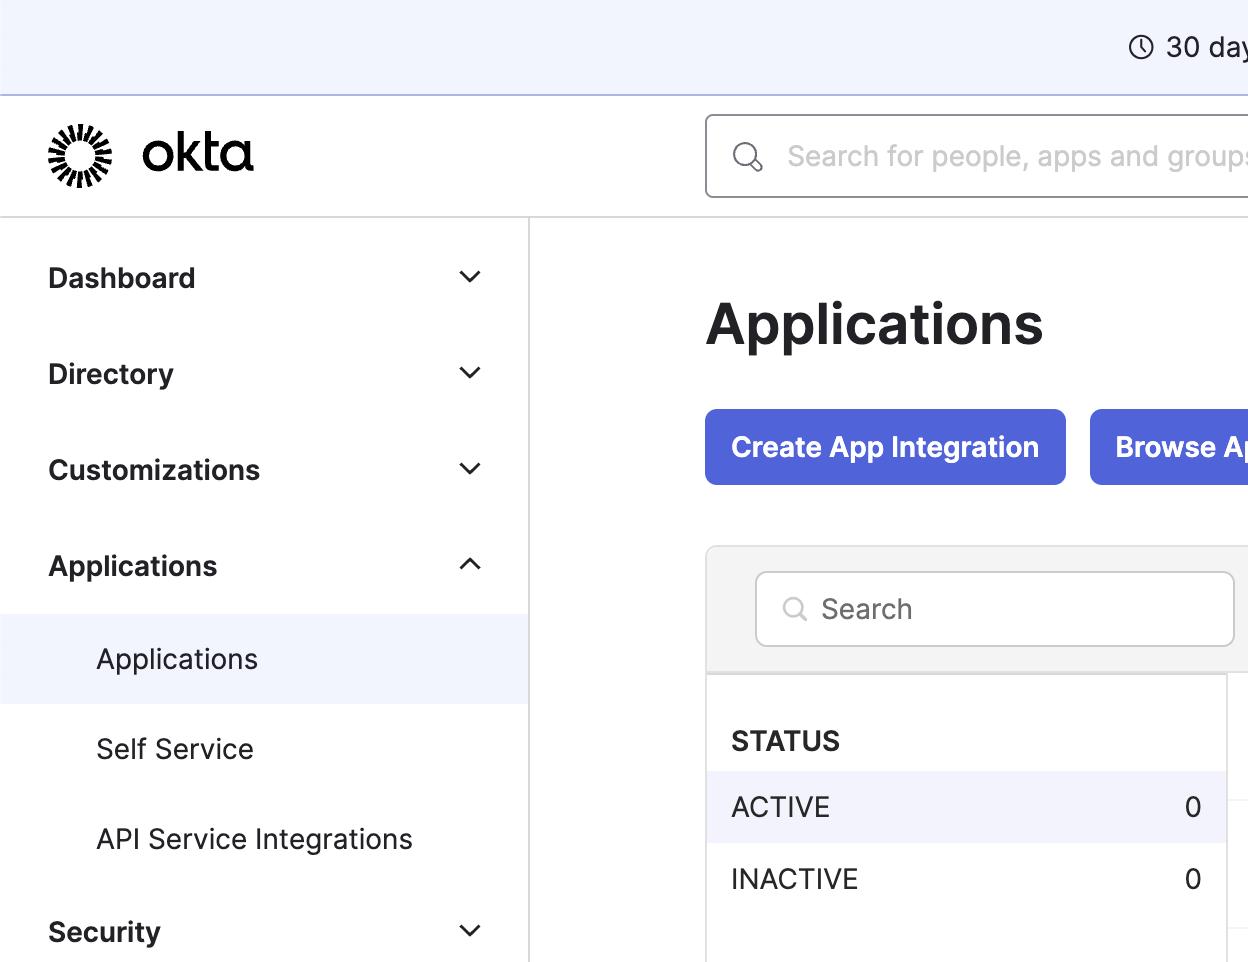


Windsurf only supports SP-initiated SSO; IDP-initiated SSO is NOT currently supported.
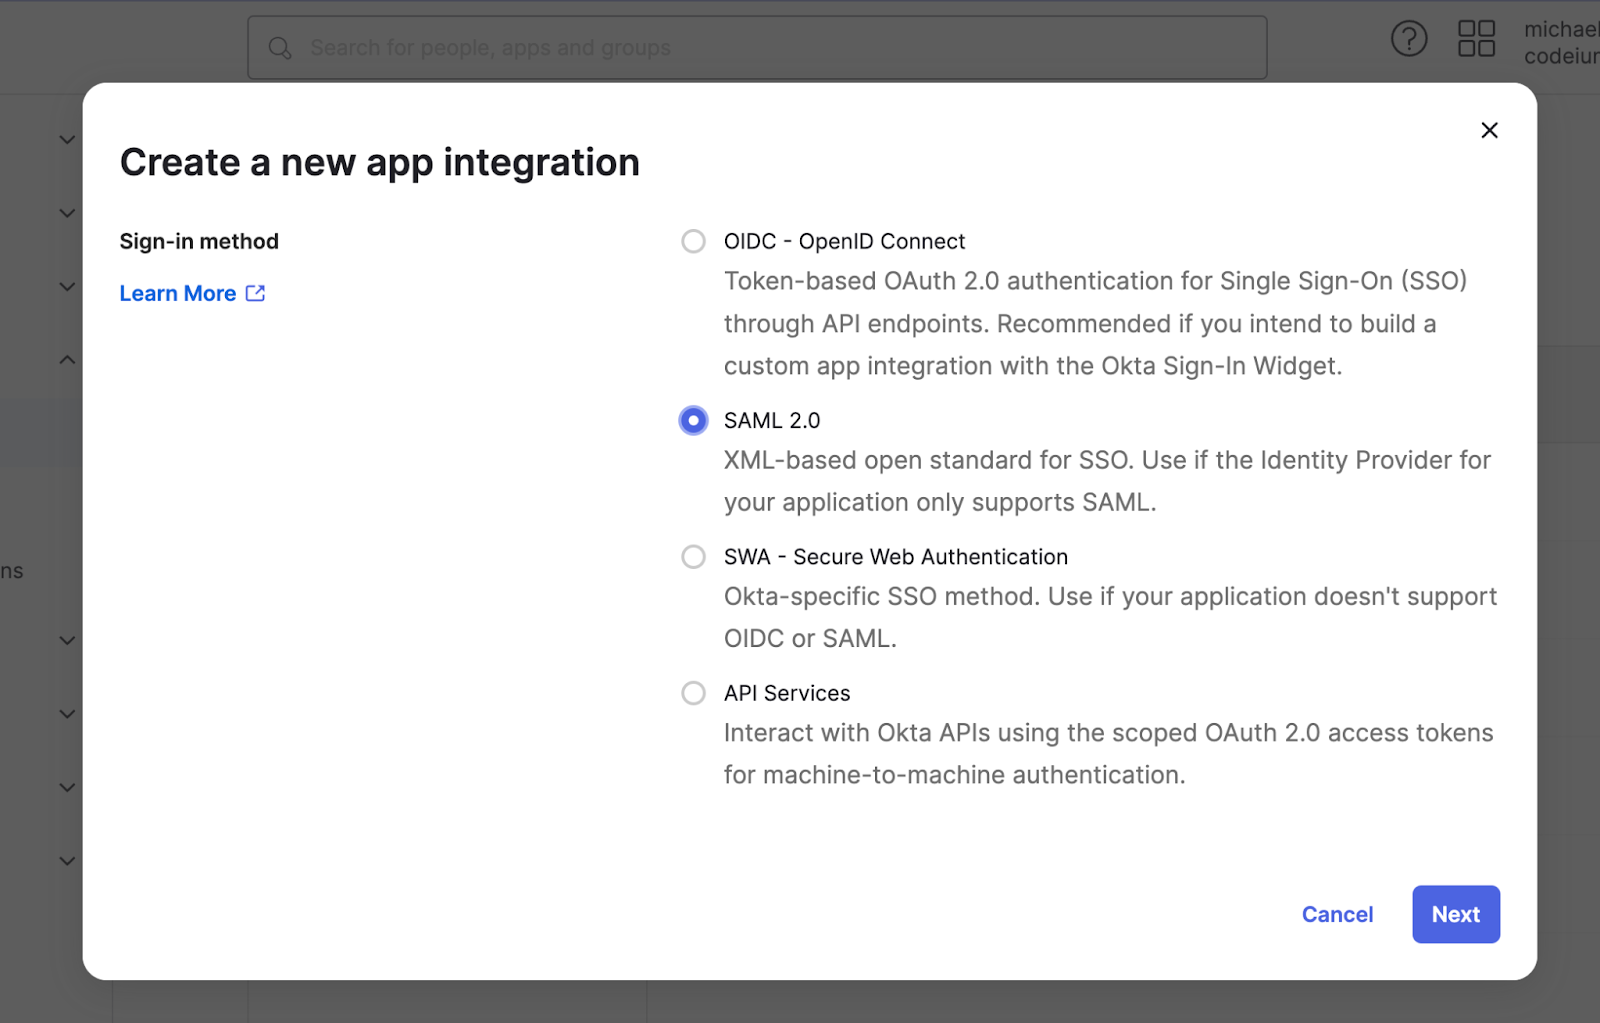
Configure IDP Application
Click on Applications on the left sidebar, and then Create App Integration- Single sign-on URL to https://auth.windsurf.com/__/auth/handler
- Audience URI (SP Entity ID) to www.codeium.com
- NameID format to EmailAddress
- Application username to Email
Register Okta as a SAML provider
You should be redirected to the Sign on tab under your custom SAML application. Now you’ll want to take the info in this page and fill it out in Windsurf’s SSO settings.- Open https://windsurf.com/team/settings, and click on Configure SAML
- Copy the text after ‘Issuer’ in Okta’s application page and paste it under Idp Entity ID
- Copy the text after ‘Sign on URL’ in Okta’s application page and paste it under SSO URL
- Download the Signing Certificate and paste it under X509 certificate
- Check Enable Login with SAML and then click Save
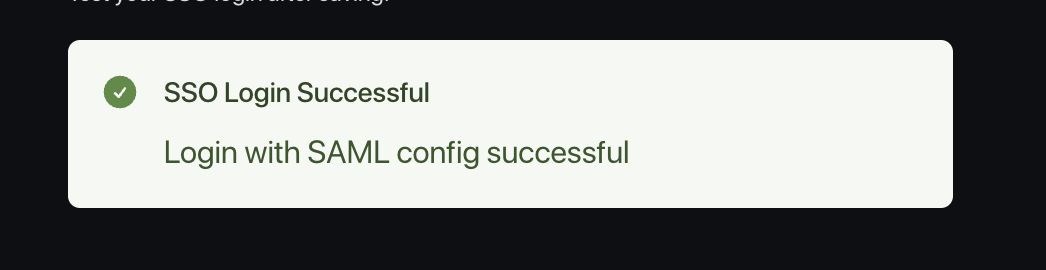
- Test the login with the Test Login button. You should see a success message:
Caveats
Note that Windsurf does not currently support IDP-initiated login flows.We also do not yet support OIDC.Troubleshooting
Login with SAML config failed: Firebase: Error (auth/operation-not-allowed)
Login with SAML config failed: Firebase: SAML Response <Issuer> mismatch. (auth/invalid-credential)
Failed to verify the signature in samlresponse
This points to an incorrect value of your X509 certificate, please make sure you copy the correct key, and that it is formatted as:-----BEGIN CERTIFICATE-----
value
------END CERTIFICATE------
Windsurf supports SCIM synchronization for users and groups with Microsoft Entra ID / Azure AD. It isn’t necessary to setup SSO to use SCIM synchronization, but it is highly recommended.You’ll need: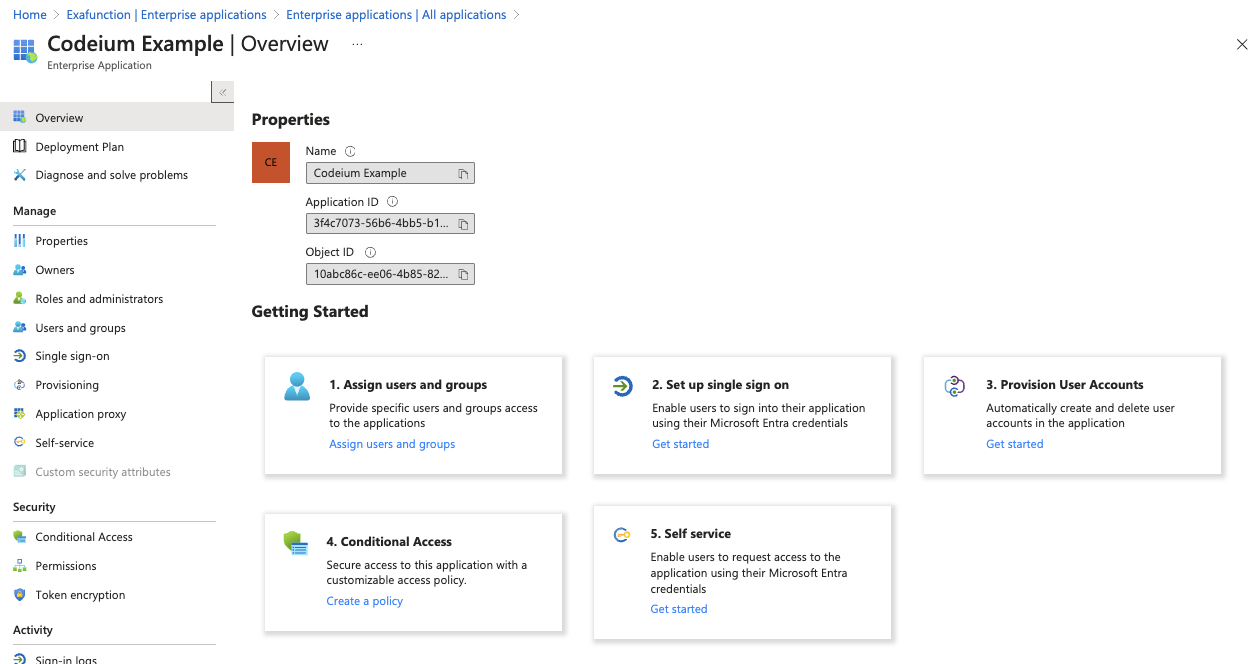


- Admin access to Microsoft Entra ID / Azure AD
- Admin access to Windsurf
- An existing Windsurf Application on Entra ID (normally from your existing SSO application)
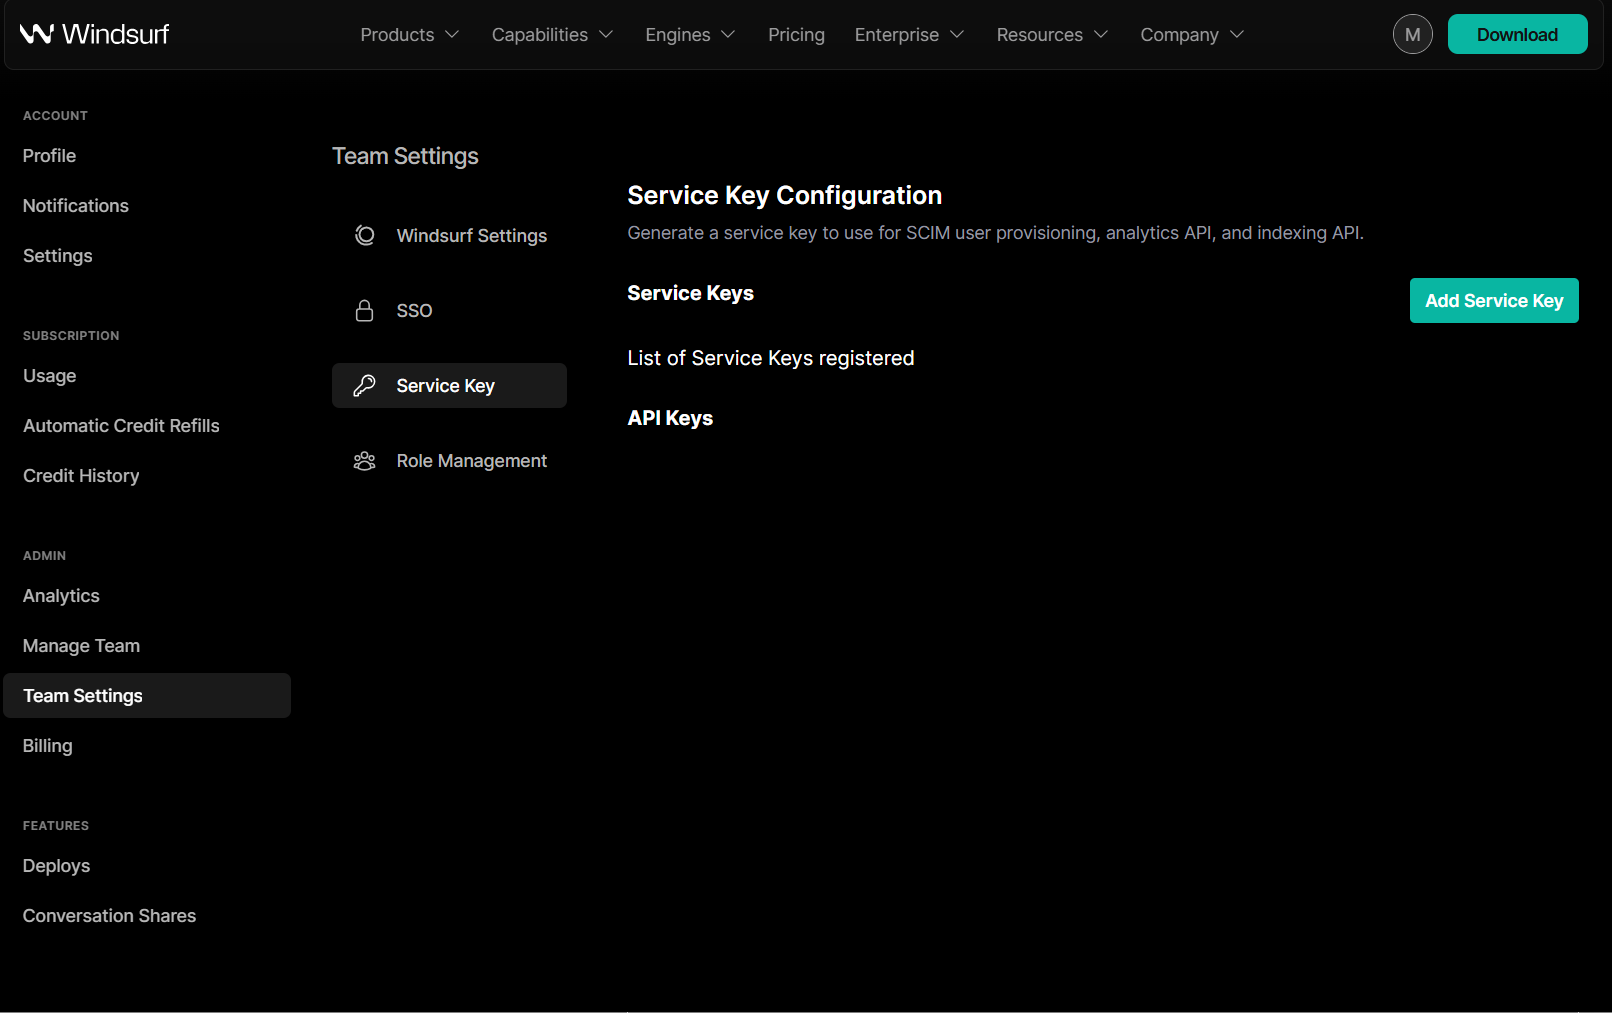
Service Key Permissions RequiredThe service key used for SCIM provisioning must have the following permissions:
- Team User Read - Required to read user and group information
- Team User Update - Required to create and update users and groups
- Team User Delete - Required to deactivate/delete users and groups
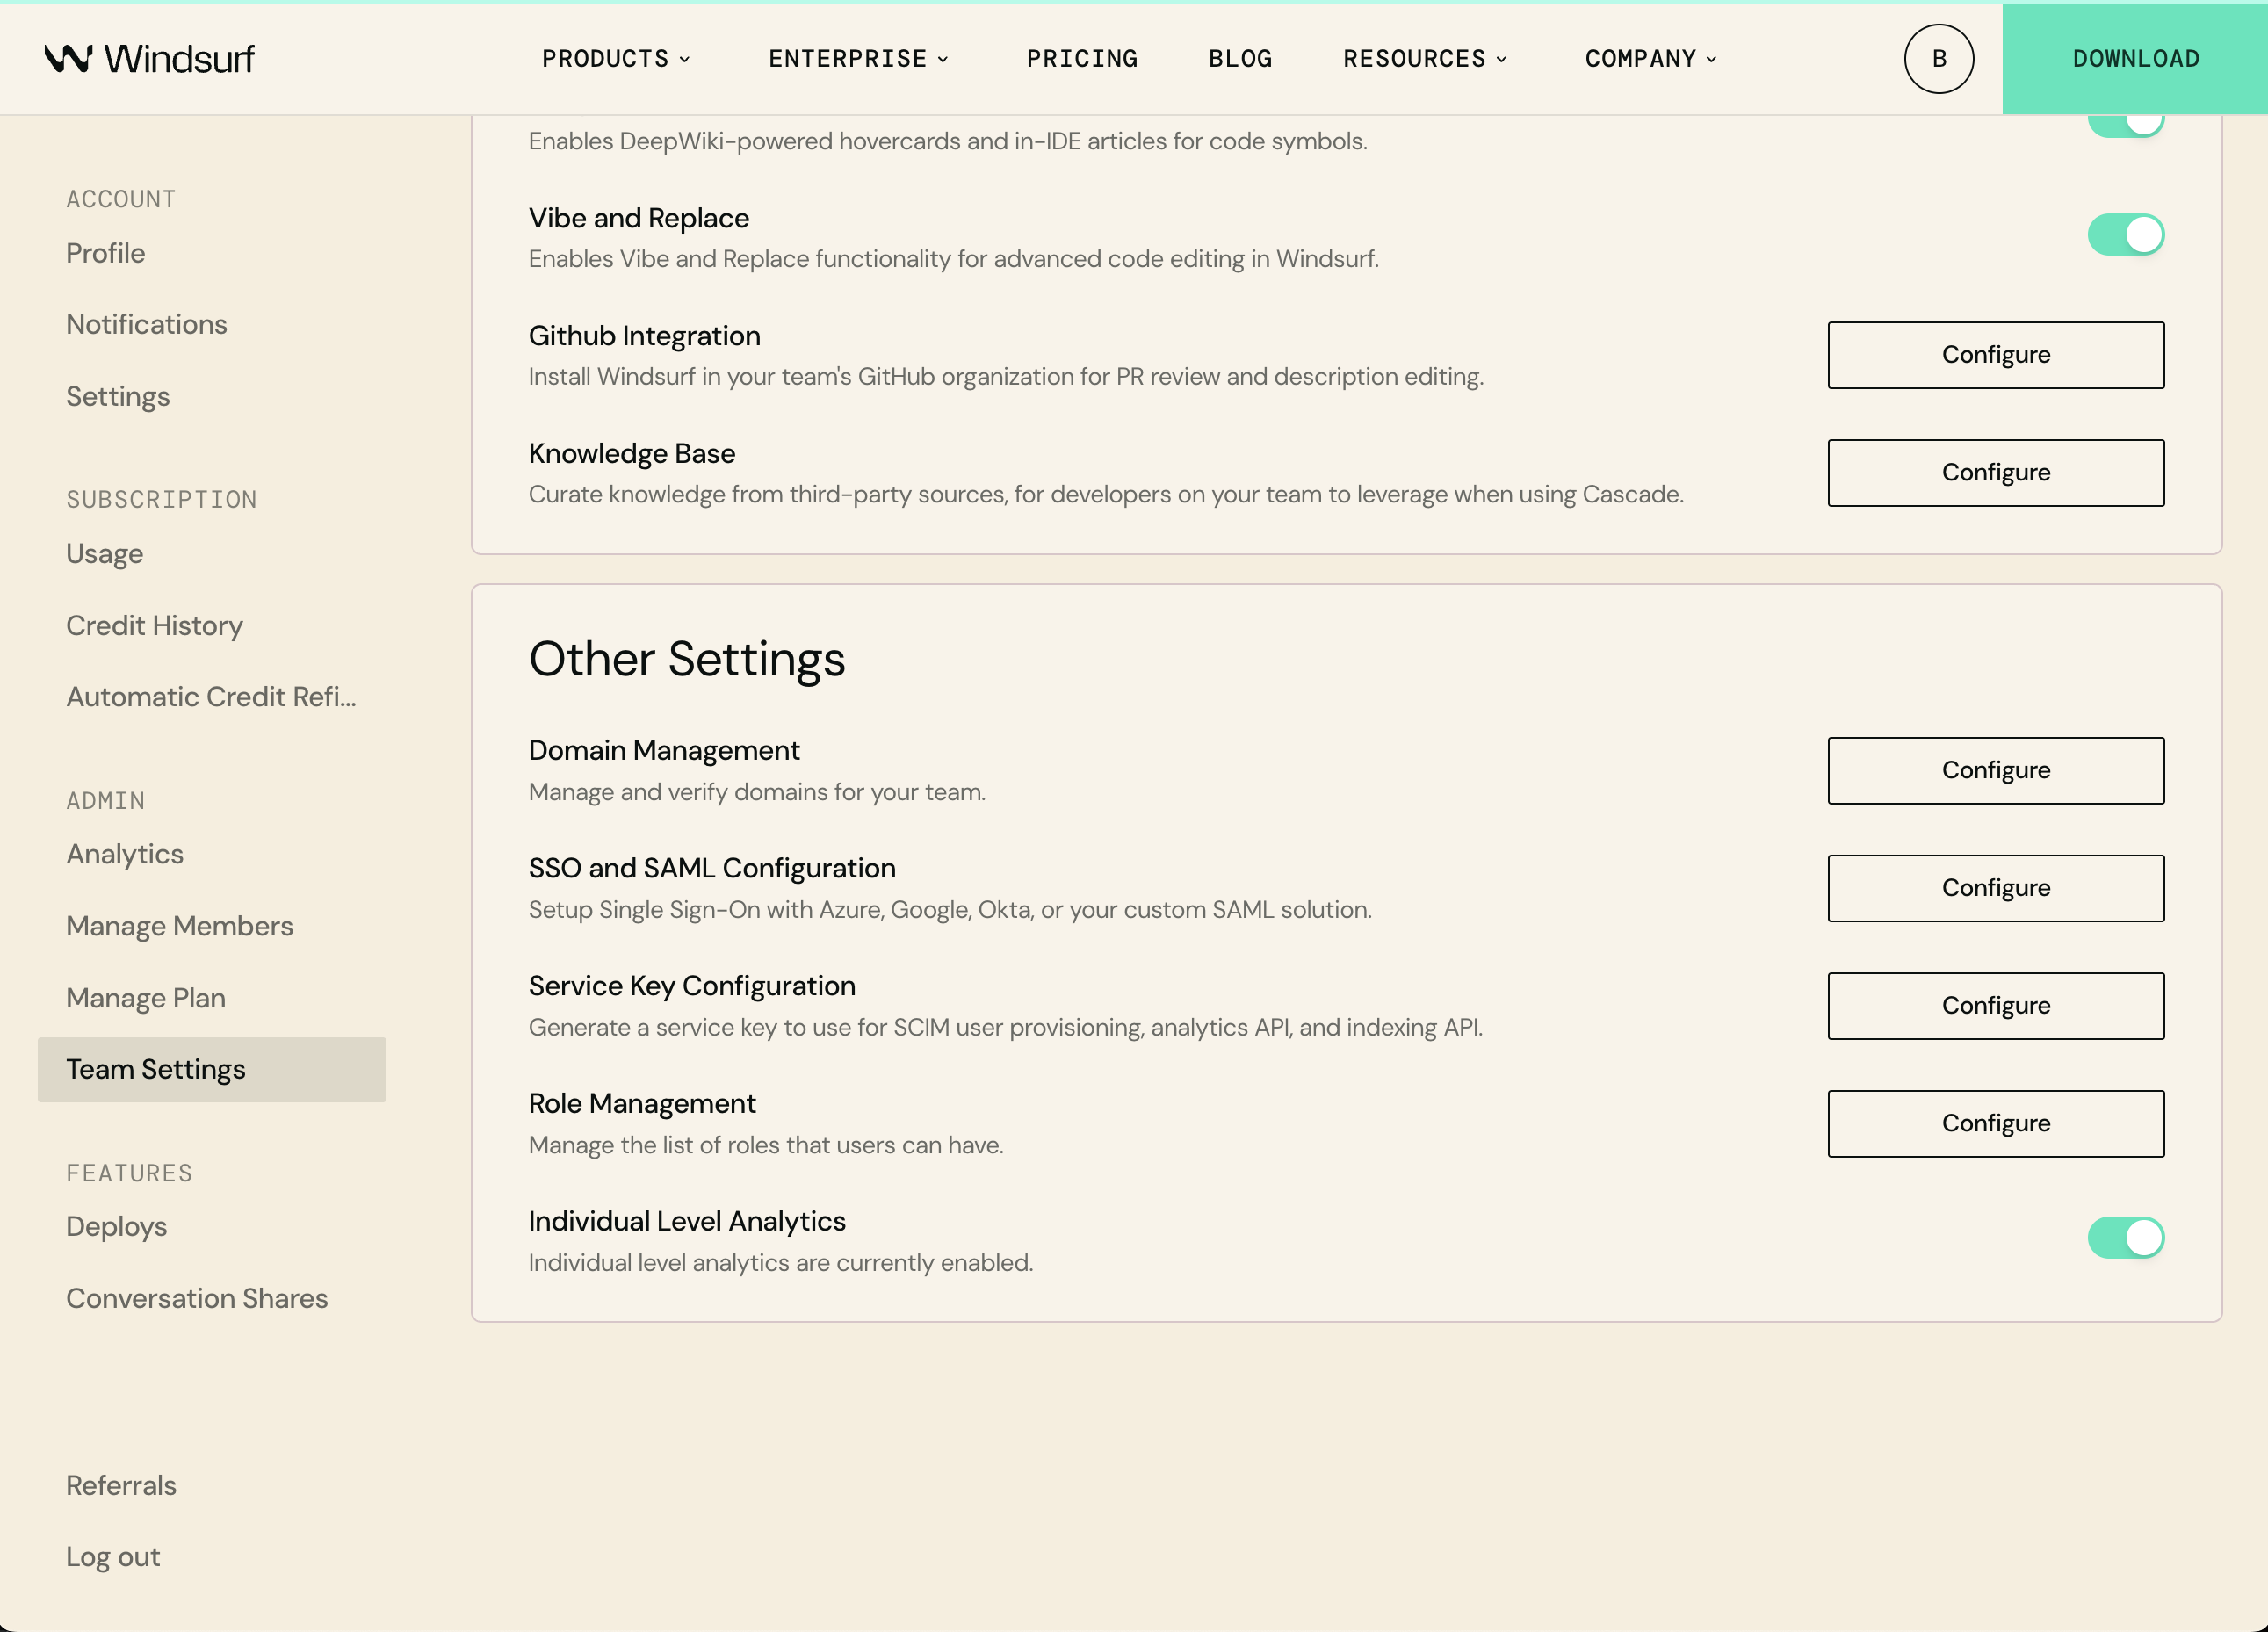
Step 1: Create a Role with SCIM Permissions
Before setting up SCIM provisioning, you need to create a role with the required permissions.- Go to Windsurf Team Settings
- Under “Other Settings”, click Configure next to Role Management
- Click Add Role and name it “SCIM Provisioning”
- Add the following permissions:
- Team User Read
- Team User Update
- Team User Delete
- Click Save
Step 2: Navigate to the existing Windsurf Application
Go to Microsoft Entra ID on Azure, click on Enterprise applications on the left sidebar, and then click on the existing Windsurf application in the list.Step 3: Setup SCIM provisioning
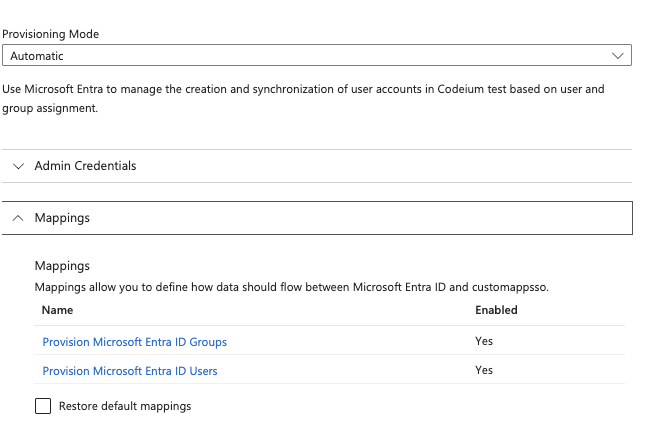
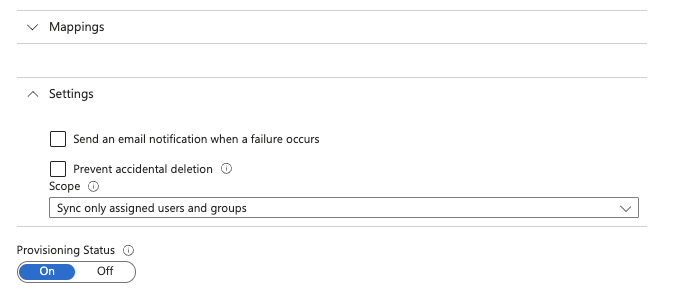
Click on Get started under Provision User Accounts in the middle (step 3), and then click on Get started again.Step 4: Configure SCIM Provisioning
After clicking on Save, a new option Mappings should have appeared in the Provisioning page. Expand Mappings, and click on Provision Microsoft Entra ID UsersNOT([IsSoftDeleted])
Windsurf supports SCIM synchronization for users and groups with Okta. It isn’t necessary to setup SSO to use SCIM synchronization, but it is highly recommended.You’ll need:
- Admin access to Okta
- Admin access to Windsurf
- An existing Windsurf Application on Okta (normally from your existing SSO application)
Step 1: Navigate to the existing Windsurf Application
Go to Okta, click on Applications, Applications on the left sidebar, and then click on the existing Windsurf application in the application list.Step 2: Enable SCIM Provisioning
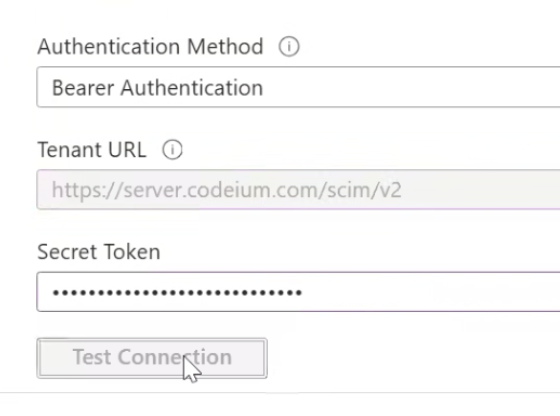
Under the general tab, App Settings click on Edit on the top right. Then tick the ‘Enable SCIM Provisioning’ checkbox, then click Save. A new provisioning tab should have showed up on the top.Now go to provisioning, click Edit and input in the following fields:SCIM connector base URL: https://server.codeium.com/scim/v2Unique identifier field for users: emailSupported provisioning actions: Push New Users, Push Profile Updates, Push GroupsAuthentication Mode: HTTP HeaderFor HTTP Header - Authorization, you can generate the token from- https://windsurf.com/team/settings and go to the Service Key Configuration
- Click on Configure, then Add Service Key, and give your API key a name
- Copy the API key, go back to Okta and paste it to HTTP Header - Authorization
Step 3: Setup Provisioning
Under the provisioning tab, on the left there should be two new tabs. Click on To App, and Edit Provisioning to App. Tick the checkbox for Create Users, Update User Attributes, and Deactivate Users, and click Save.After this step, all users assigned to the group will now be synced to Windsurf.Step 4: Setup Group Provisioning (Optional)
In order to sync groups to Windsurf, you will have to specify which groups to push. Under the application, click on the Push Groups tab on top. Now click on + Push Groups -> Find Groups by name. Filter for the group you would like to add, make sure Push group memberships immediately is checked, and then click Save. The group will be created and group members will be synced to Windsurf. Groups can then be used to filter for group analytics in the analytics page.This guide shows how to create and maintain groups in Windsurf with the SCIM API.There are reasons one may want to provision groups manually rather than with their Identity Provider (Azure/Okta). Companies may want Groups provisioned from a different internal source (HR website, Sourcecode Management Tool etc.) that Windsurf doesn’t have access to, or companies may finer control to Groups than what their Idendity Provider provides. Groups can thus be created with an API via HTTP request instead. The following provides examples on the HTTP request via CURL.There are 5 main APIs here, Create Group, Add group members, Replace group members, Delete Group, and List Users in a Group.You’ll have to at least create the group first, and then replace group to create a group with members in them. You’ll also need to URL encode the group names if your group name has a special character like space, so a Group name such as ‘Engineering Group’ will have to be ‘Engineering%20Group’ in the URL.Note that users need to be created in Windsurf (through SCIM or manually creating the account) before they can be added to a group.Disable CLI access for a user (set The Update name:
Create Group
curl -k -X POST https://server.codeium.com/scim/v2/Groups -d '{
"displayName": "<group name>",
"schemas": ["urn:ietf:params:scim:schemas:core:2.0:Group"]
}' -H "Authorization: Bearer <api secret key>" -H "Content-Type: application/scim+json"
Add Group Members
curl -X PATCH https://server.codeium.com/scim/v2/Groups/<group name> -d '{"schemas": ["urn:ietf:params:scim:api:messages:2.0:PatchOp"],
"Operations":[
{
"op": "add",
"path":"members",
"value": [{"value": "<email 1>"}, {"value": "<email 2>"}]
}]}' -H "Authorization: Bearer <api secret key>" -H "Content-Type: application/scim+json"
Replace Group Members
curl -X PATCH https://server.codeium.com/scim/v2/Groups/<group name> -d '{"schemas": ["urn:ietf:params:scim:api:messages:2.0:PatchOp"],
"Operations":[
{
"op": "replace",
"path":"members",
"value": [{"value": "<email 1>"}, {"value": "<email 2>"}]
}]}' -H "Authorization: Bearer <api secret key>" -H "Content-Type: application/scim+json"
Delete Group
curl -X DELETE https://server.codeium.com/scim/v2/Groups/<group name> -H "Authorization: Bearer <api secret key>" -H "Content-Type: application/scim+json"
List Group
curl -X GET -H "Authorization: Bearer <api secret key>" "https://server.codeium.com/scim/v2/Groups"
List Users in a Group
curl -X GET -H "Authorization: Bearer <api secret key>" "https://server.codeium.com/scim/v2/Groups/<group_id>"
User APIs
There are also APIs for users as well. The following are some of the common SCIM APIs that Windsurf supports.Disable a user (Enable by replacing false to true):curl -X PATCH \
https://server.codeium.com/scim/v2/Users/<user api key> \
-H 'Content-Type: application/scim+json' \
-H 'Authorization: Bearer <api secret key>' \
-d '{
"schemas": ["urn:ietf:params:scim:api:messages:2.0:PatchOp"],
"Operations": [
{
"op": "replace",
"path": "active",
"value": false
}
]
}'
cliActive to true to re-enable):curl -X PATCH \
https://server.codeium.com/scim/v2/Users/<user api key> \
-H 'Content-Type: application/scim+json' \
-H 'Authorization: Bearer <api secret key>' \
-d '{
"schemas": ["urn:ietf:params:scim:api:messages:2.0:PatchOp"],
"Operations": [
{
"op": "replace",
"path": "cliActive",
"value": false
}
]
}'
cliActive attribute controls whether a user can access Devin for Terminal (CLI). It is independent of the active attribute — disabling CLI access does not affect the user’s seat or their access to other Windsurf products. If cliActive is not set for a user, they follow the team’s default CLI access policy.Create a user:curl -X POST \
https://server.codeium.com/scim/v2/Users \
-H 'Content-Type: application/scim+json' \
-H 'Authorization: Bearer <api secret key>' \
-d '{
"schemas": ["urn:ietf:params:scim:schemas:core:2.0:User"],
"userName": "<email>",
"displayName": "<full name>",
"active": true
}'
curl -X PATCH \
  'https://<enterprise portal url>/_route/api_server/scim/v2/Users/<user api key>' \
    -H 'Authorization: Bearer <service key>' \
    -H 'Content-Type: application/scim+json' \
    -d '{
      "schemas": ["urn:ietf:params:scim:api:messages:2.0:PatchOp"],
      "Operations": [
        {
          "op": "Replace",
          "path": "displayName",
          "value": "<new name>"
        }
      ]
   }'
Creating Api Secret Key
Go to https://windsurf.com/team/settings. Under Service Key Configuration, click on Add Service Key. Enter any key name (such as ‘Azure Provisioning Key’) and click Create Service Key. Copy the output key and save it, you can now use the key to authorize the above APIs.Prerequisites
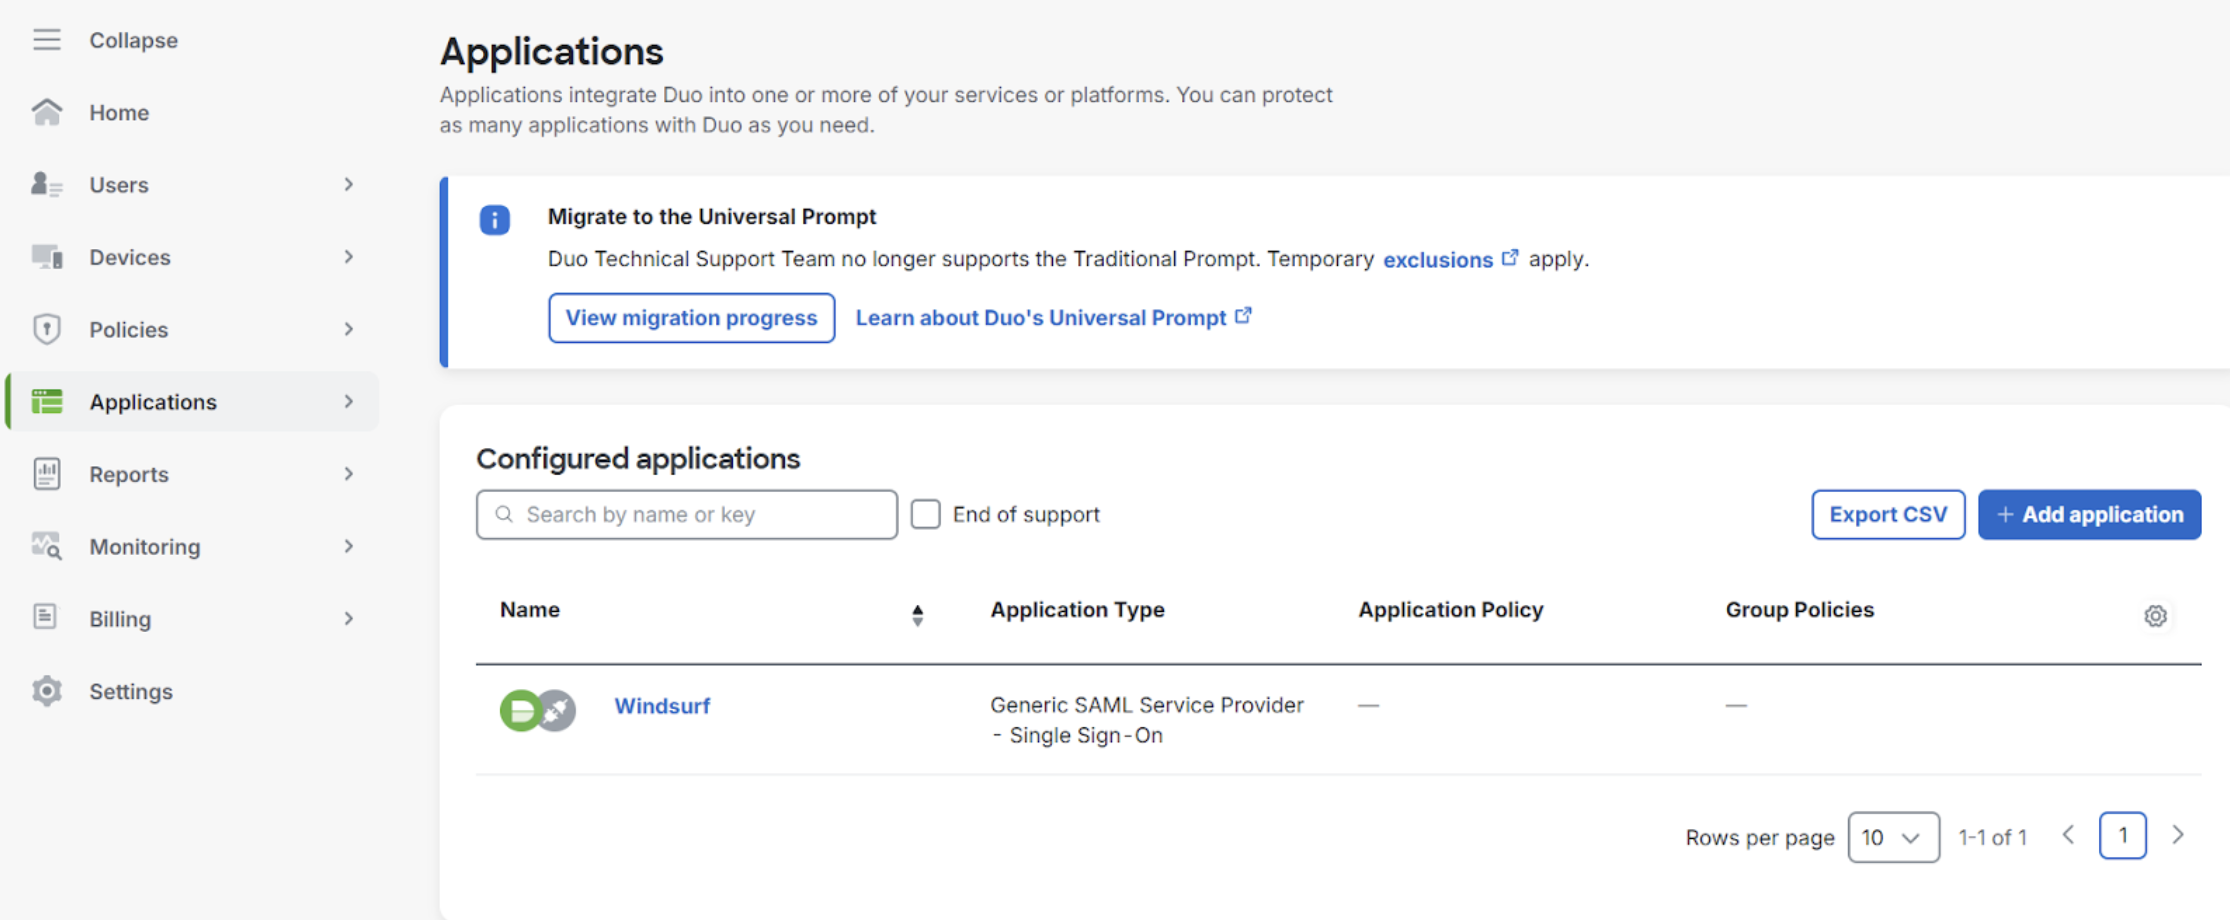
This guide assumes that you have Duo configured and acts as your organizational IDP, or has external IDP configured.You will need administrator access to both Duo and Windsurf accounts.Configure Duo for Windsurf
- Navigate to Applications, and add a Generic SAML service provider
- Navigate to SSO in Team Settings

- When enabling SAML for the first time, you will be required to set up your SSO ID. You will not be able to change it later. It is advised to set this to your organization or team name with alphanumeric characters only.
-
Copy the
Entity IDvalue from the Duo portal and paste it into theIdP Entity IDfield in the Windsurf portal. -
Copy the
Single Sign-On URLvalue from the Duo portal and paste it into theSSO URLfield in the Windsurf portal. -
Copy the certificate value from the Duo portal and paste it in the
X509 Certificatefield in the Windsurf portal

-
Copy the
SP Identity IDvalue from the Windsurf portal and paste it into theEntity IDfield in the Duo portal. -
Copy the
Callback URL (Assertion Consumer Service URL)from the Windsurf portal and paste it into theAssertion Consumer Service (ACS) URLfield in the Duo portal. - In the Duo portal, configure the attribute statements as following:

- Enable the SAML login in the Windsurf portal so you can test it.
- Once your test was successfully completed, you may logout. You can now use SSO sign in when browsing to your team/organization page with the SSO ID you have configured in step 3.
Prerequisites
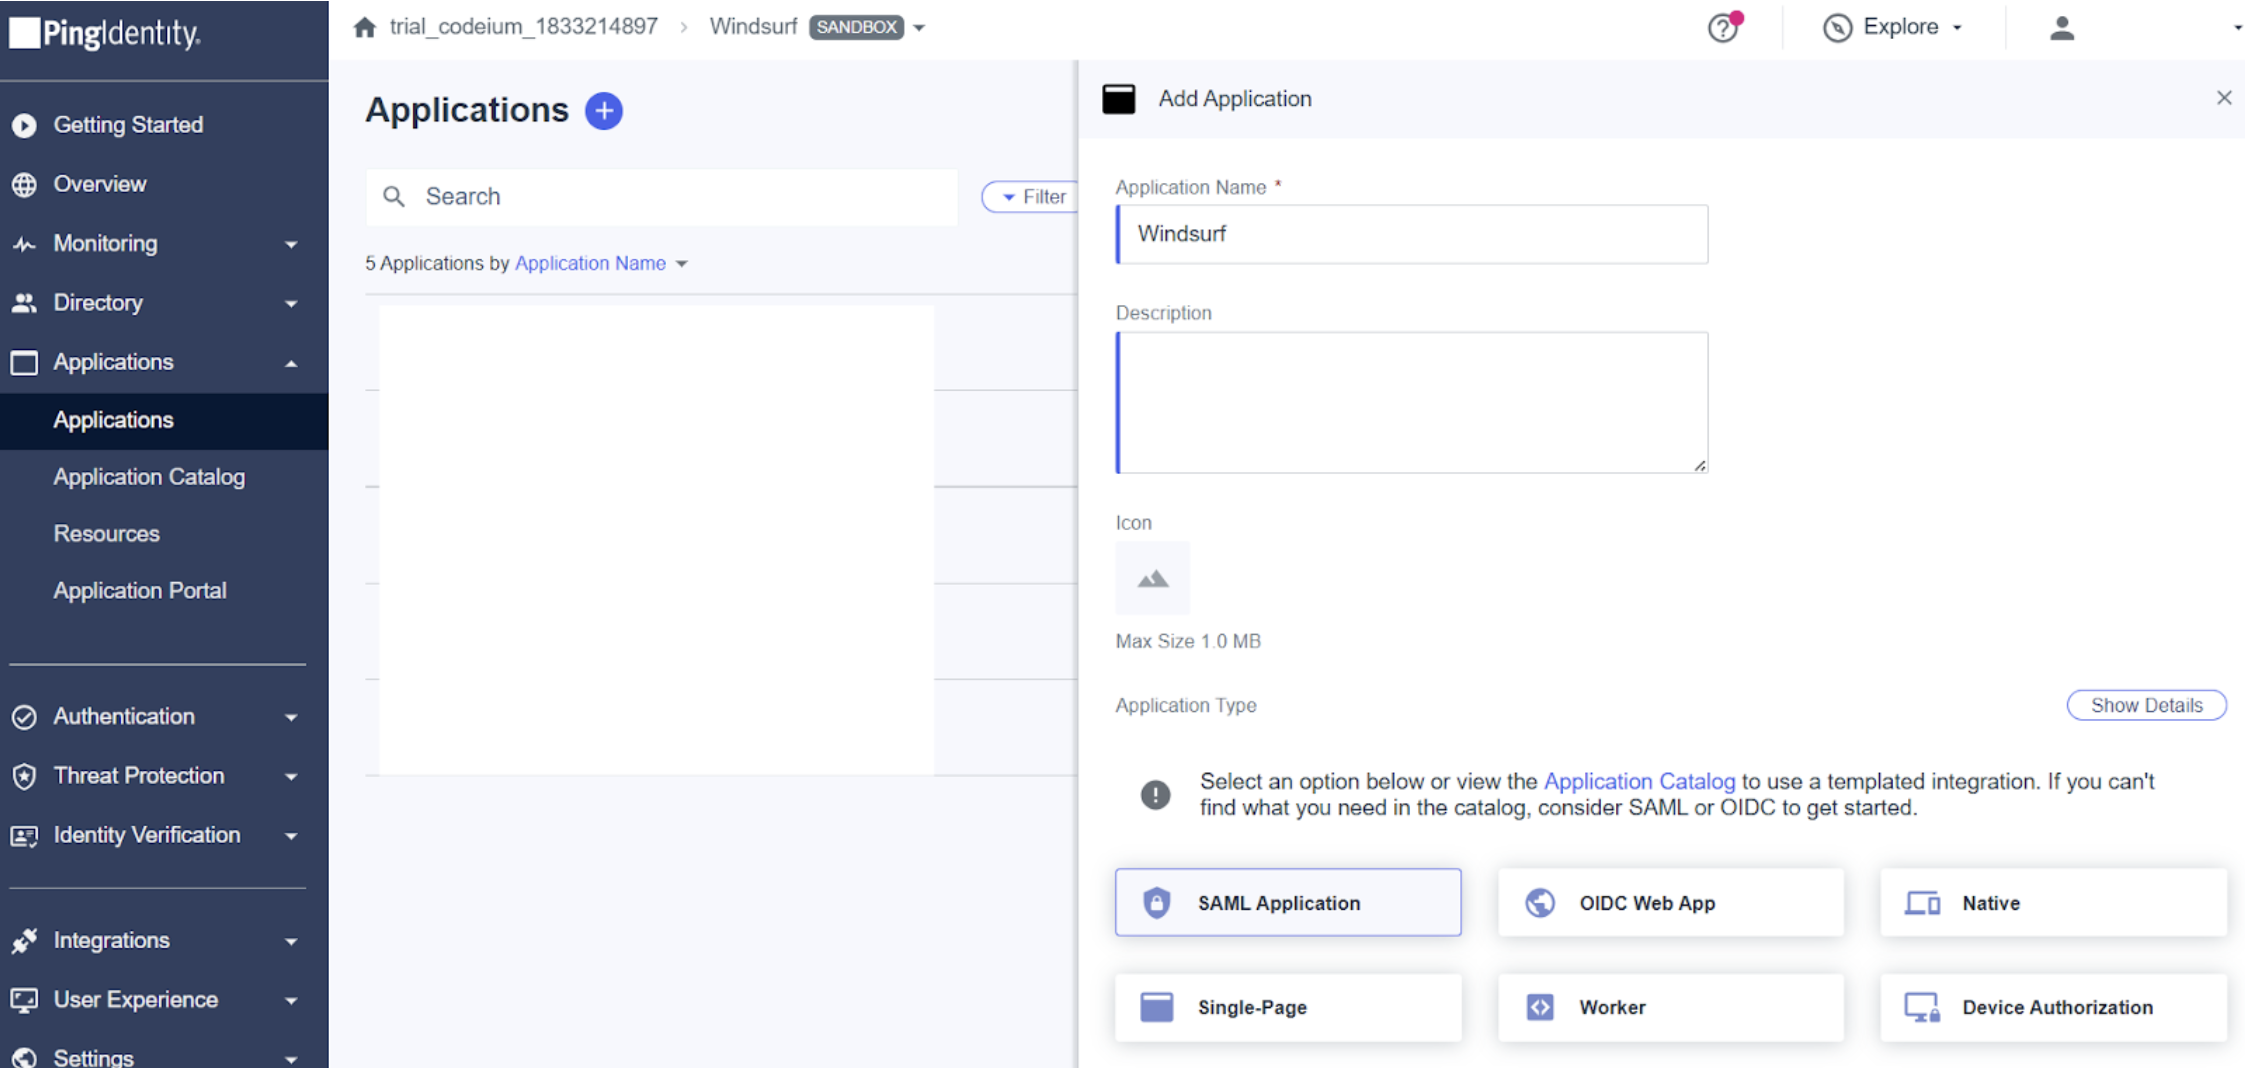
This guide assumes that you have PingID configured and acts as your organizational IDP, or has external IDP configured.You will need administrator access to both PingID and Windsurf accounts.Configure PingID for Windsurf
- Navigate to Applications and add Windsurf as a SAML Application
- Navigate to SSO in Team Settings
- When enabling SAML for the first time, you will be required to set up your SSO ID. You will not be able to change it later.
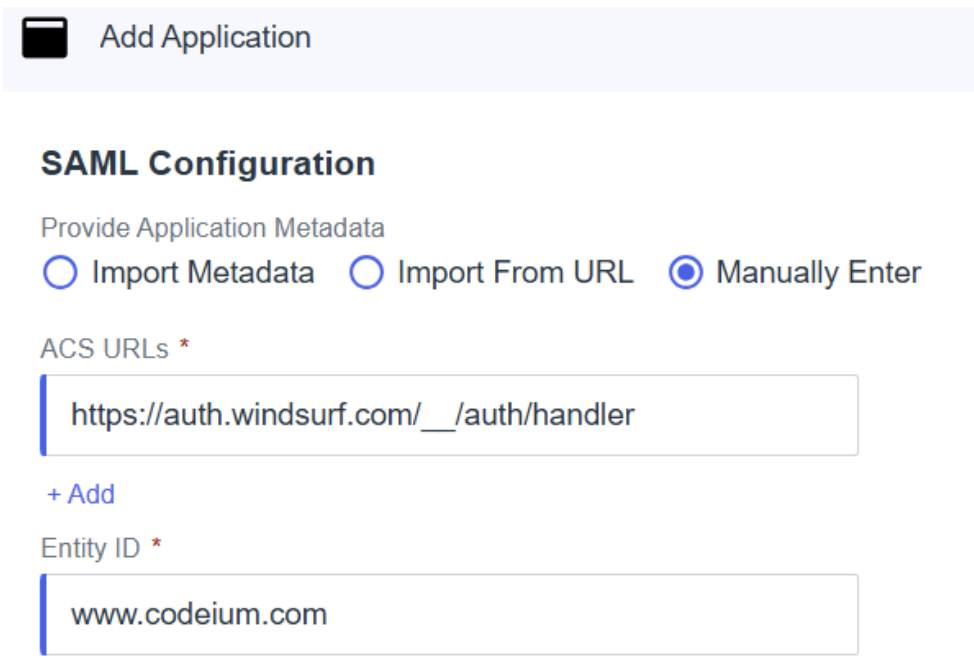
- In PingID - choose to manually enter the configuration and fill out the fields with the following values:
- ACS URLs - this is the
Callback URL (Assertion Consumer Service URL)from the Windsurf portal. - Entity ID - this is the
SP Entity IDfrom the Windsurf portal.
-
Copy the
Issuer IDfrom PingID to theIdP Entity IDvalue in the Windsurf portal. -
Copy the
Single Signon Servicevalue from PingID to theSSO URLvalue in the Windsurf portal. -
Download the Signing Certificate from PingID as X509 PEM (.crt), open the file and copy its contents to the
X509 Certificatevalue in the Windsurf portal.
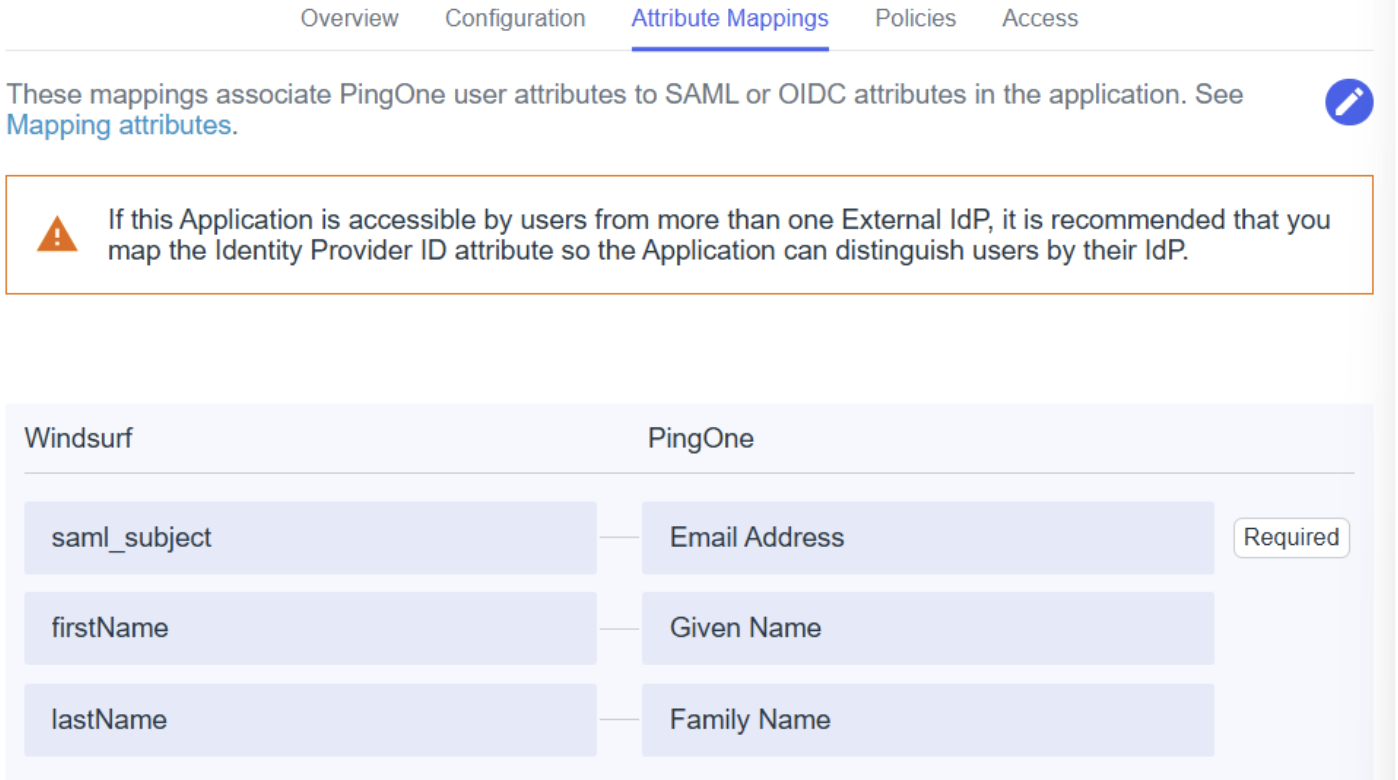
- In attribute mappings, make sure to map:
saml_subject- Email AddressfirstName- Given NamelastName- Family Name
- Add/edit any other policies and access as required by your setup/organization
- Enable the SAML login in the Windsurf portal so you can test it.
- Once your test was successfully completed, you may logout. You can now use SSO sign in when browsing to your team/organization page with the SSO ID you have configured in step 3.