/[name-of-workflow]
How it works
Rules generally provide large language models with guidance by providing persistent, reusable context at the prompt level. Workflows extend this concept by providing a structured sequence of steps or prompts at the trajectory level, guiding the model through a series of interconnected tasks or actions.
/[workflow-name] command.
Upon invocation, Cascade sequentially processes each step defined in the Workflow, performing actions or generating responses as specified.
How to create a Workflow
To get started with Workflows, click on theCustomizations icon in the top right slider menu in Cascade, then navigate to the Workflows panel. Here, you can click on the + Workflow button to create a new Workflow.
Workflows are saved as markdown files within .windsurf/workflows/ directories and contain a title, description, and a series of steps with specific instructions for Cascade to follow.
Workflow Discovery
Windsurf automatically discovers workflows from multiple locations to provide flexible organization:- Current workspace and sub-directories: All
.windsurf/workflows/directories within your current workspace and its sub-directories - Git repository structure: For git repositories, Windsurf also searches up to the git root directory to find workflows in parent directories
- Multiple workspace support: When multiple folders are open in the same workspace, workflows are deduplicated and displayed with the shortest relative path
Workflow Storage Locations
Workflows can be stored in any of these locations:.windsurf/workflows/in your current workspace directory.windsurf/workflows/in any sub-directory of your workspace.windsurf/workflows/in parent directories up to the git root (for git repositories)
.windsurf/workflows/ directory of your current workspace, not necessarily at the git root.
Workflow files are limited to 12000 characters each.
Generate a Workflow with Cascade
You can also ask Cascade to generate Workflows for you! This works particularly well for Workflows involving a series of steps in a particular CLI tool.Example Workflows
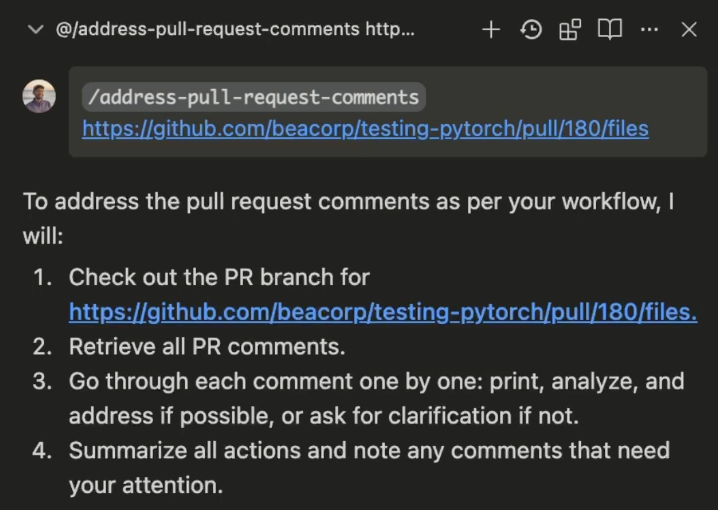
There are a myriad of use cases for Workflows, such as:/address-pr-comments
This is a Workflow our team uses internally to address PR comments:
/git-workflows
Commit using predefined formats and create a pull requests with standardized title and descriptions using the appropriate CLI commands.
/dependency-management
Automate the installation or updating of project dependencies based on a configuration file (e.g., requirements.txt, package.json).
/code-formatting
Automatically run code formatters (like Prettier, Black) and linters (like ESLint, Flake8) on file save or before committing to maintain code style and catch errors early.
/run-tests-and-fix
Run or add unit or end-to-end tests and fix the errors automatically to ensure code quality before committing, merging, or deploying.
/deployment
Automate the steps to deploy your application to various environments (development, staging, production), including any necessary pre-deployment checks or post-deployment verifications.
/security-scan
Integrate and trigger security vulnerability scans on your codebase as part of the CI/CD pipeline or on demand.
System-Level Workflows (Enterprise)
Enterprise organizations can deploy system-level workflows that are available globally across all workspaces and cannot be modified by end users without administrator permissions. This is ideal for enforcing organization-wide development processes, deployment procedures, and compliance workflows. System-level workflows are loaded from OS-specific directories: macOS:.md files) in the appropriate directory for your operating system. The system will automatically load all .md files from these directories.
Workflow Precedence
When workflows with the same name exist at multiple levels, system-level workflows take the highest precedence:- System (highest priority) - Organization-wide workflows deployed by IT
- Workspace - Project-specific workflows in
.windsurf/workflows/ - Global - User-defined workflows
- Built-in - Default workflows provided by Windsurf
Important: System-level workflows should be managed by your IT or security team. Ensure your internal teams handle deployment, updates, and compliance according to your organization’s policies. You can use standard tools and workflows such as Mobile Device Management (MDM) or Configuration Management to do so.