> ## Documentation Index
> Fetch the complete documentation index at: https://docs.windsurf.com/llms.txt
> Use this file to discover all available pages before exploring further.
# 设置 SSO & SCIM
> 使用 Google Workspace、Microsoft Azure AD、Okta 或其他 SAML 身份提供商,为你的组织配置单点登录(SSO)以及基于 SCIM(跨域身份管理系统,一种用于自动化用户和群组供应的开放标准)的自动供应功能。
此功能仅适用于 Teams 和 Enterprise 用户。
此功能不适用于 Cognition Platform 方案。对于 Cognition Platform,你应当在其设置中配置和管理 SSO。
Windsurf 现已支持通过 SAML 使用 SSO(单点登录)进行登录。如果你的组织使用 Microsoft Entra、Okta、Google Workspaces 或其他支持 SAML 的身份提供商,你即可在 Windsurf 中使用 SSO。
Windsurf 目前仅支持由 SP 发起的 SSO;暂不支持由 IDP 发起的 SSO。
### 配置 IDP 应用
在 Google 管理控制台(admin.google.com)左侧点击 **Apps -> Web and mobile apps**。
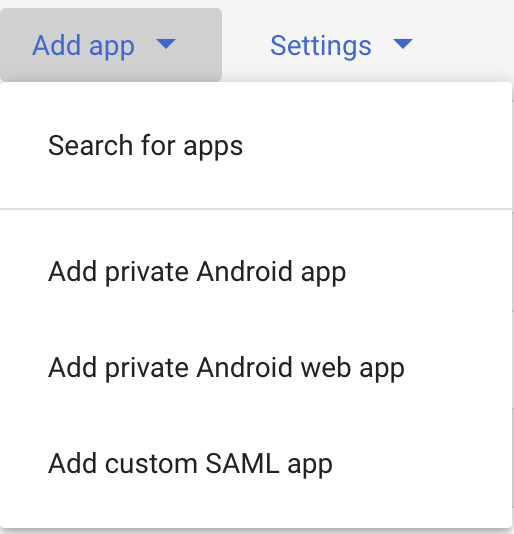
 点击 **Add app**,然后点击 **Add custom SAML app**。
 将 **App name** 填写为 `Windsurf`,然后点击 **Next**。
下一页(Google Identity Provider details)是 Google 控制台页面,你需要将其中的数据复制到 [https://windsurf.com/team/settings](https://windsurf.com/team/settings) 的 Windsurf SSO 设置中。
* 将 Google 控制台页面的 **SSO URL** 复制到 Windsurf 设置中的 **SSO URL**
* 将 Google 控制台页面的 **Entity ID** 复制到 Windsurf 设置中的 **IdP Entity ID**
* 将 Google 控制台页面的 **Certificate** 复制到 Windsurf 设置中的 **X509 Certificate**
* 在 Google 控制台页面点击 **Continue**
Google 控制台页面的下一页需要你从 Codeium 的设置页面复制数据
* 将 Codeium 设置页面的 **Callback URL** 复制到 Google 控制台页面的 **ACS URL**
* 将 Codeium 设置页面的 **SP Entity ID** 复制到 Google 控制台页面的 **SP Entity ID**
* 将 **Name ID** 格式更改为 **EMAIL**
* 在 Google 控制台页面点击 **Continue**
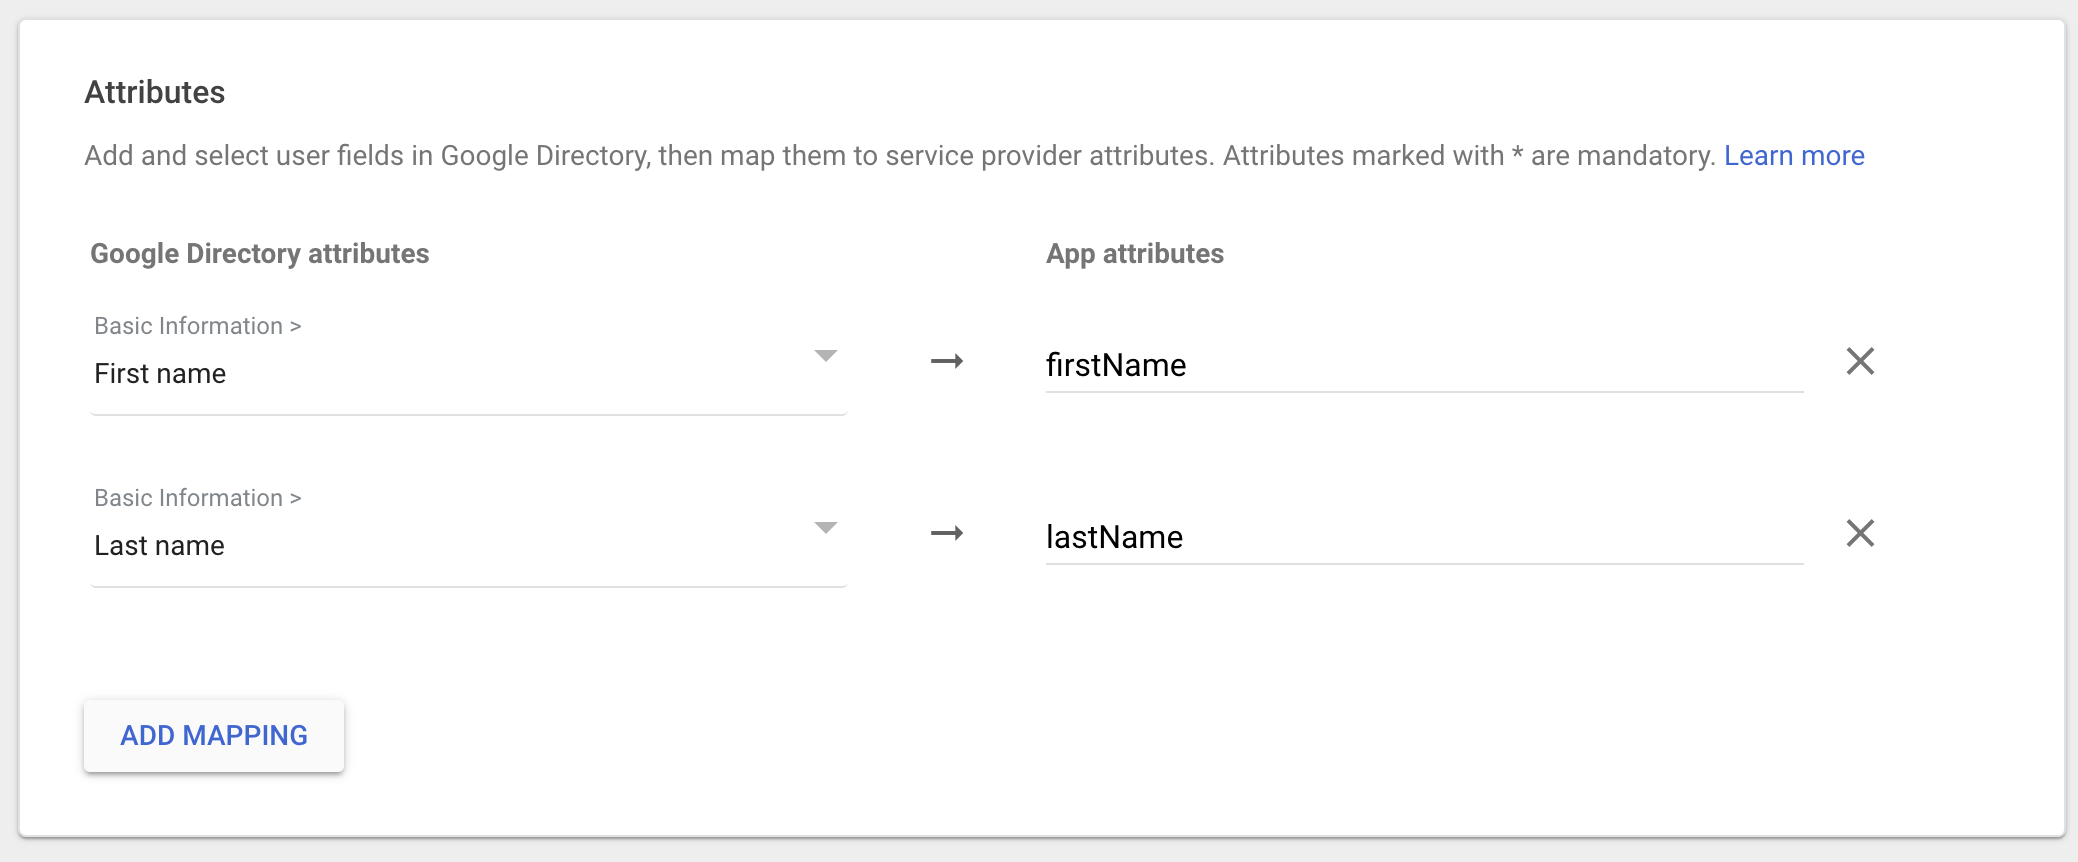
Google 控制台页面的下一页需要进行一些配置
* 点击 **Add Mapping**,选择 **First name**,并将 **App attributes** 设置为 **firstName**
* 点击 **Add Mapping**,选择 **Last name**,并将 **App attributes** 设置为 **lastName**
* 点击 **Finish**
将 **App name** 填写为 `Windsurf`,然后点击 **Next**。
下一页(Google Identity Provider details)是 Google 控制台页面,你需要将其中的数据复制到 [https://windsurf.com/team/settings](https://windsurf.com/team/settings) 的 Windsurf SSO 设置中。
* 将 Google 控制台页面的 **SSO URL** 复制到 Windsurf 设置中的 **SSO URL**
* 将 Google 控制台页面的 **Entity ID** 复制到 Windsurf 设置中的 **IdP Entity ID**
* 将 Google 控制台页面的 **Certificate** 复制到 Windsurf 设置中的 **X509 Certificate**
* 在 Google 控制台页面点击 **Continue**
Google 控制台页面的下一页需要你从 Codeium 的设置页面复制数据
* 将 Codeium 设置页面的 **Callback URL** 复制到 Google 控制台页面的 **ACS URL**
* 将 Codeium 设置页面的 **SP Entity ID** 复制到 Google 控制台页面的 **SP Entity ID**
* 将 **Name ID** 格式更改为 **EMAIL**
* 在 Google 控制台页面点击 **Continue**
Google 控制台页面的下一页需要进行一些配置
* 点击 **Add Mapping**,选择 **First name**,并将 **App attributes** 设置为 **firstName**
* 点击 **Add Mapping**,选择 **Last name**,并将 **App attributes** 设置为 **lastName**
* 点击 **Finish**
 在 Codeium 的设置页面,点击 **Enable Login with SAML**,然后点击 **Save**。请务必点击 **Test Login** 以确认登录正常。此后所有用户将被强制使用 SSO 登录。
Windsurf Enterprise 现已支持通过 SAML 使用 SSO(单点登录)登录。如果你的组织使用 Microsoft Entra ID(原 Azure AD),即可在 Windsurf 中使用 SSO。
Windsurf 目前仅支持由 SP 发起的 SSO;暂不支持由 IDP 发起的 SSO。
## 第 1 部分:在 Microsoft Entra ID 中创建 Enterprise 应用
本节中的所有步骤均在 **Microsoft Entra ID 管理中心** 中完成。
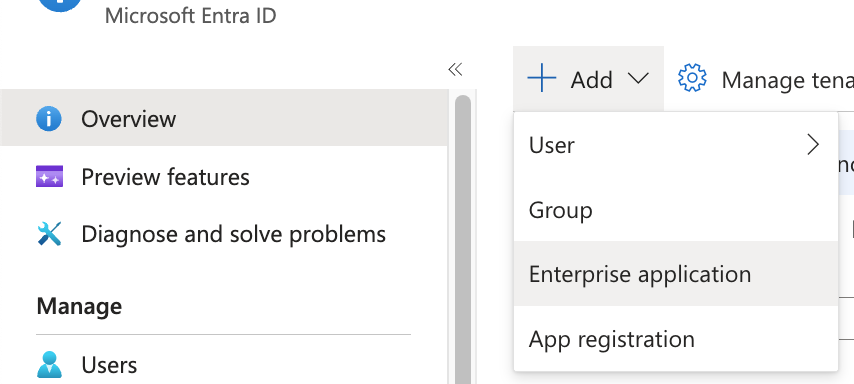
1. 在 Microsoft Entra ID 中,点击 **Add**,然后点击 **Enterprise Application**。
在 Codeium 的设置页面,点击 **Enable Login with SAML**,然后点击 **Save**。请务必点击 **Test Login** 以确认登录正常。此后所有用户将被强制使用 SSO 登录。
Windsurf Enterprise 现已支持通过 SAML 使用 SSO(单点登录)登录。如果你的组织使用 Microsoft Entra ID(原 Azure AD),即可在 Windsurf 中使用 SSO。
Windsurf 目前仅支持由 SP 发起的 SSO;暂不支持由 IDP 发起的 SSO。
## 第 1 部分:在 Microsoft Entra ID 中创建 Enterprise 应用
本节中的所有步骤均在 **Microsoft Entra ID 管理中心** 中完成。
1. 在 Microsoft Entra ID 中,点击 **Add**,然后点击 **Enterprise Application**。
 2. 点击 **Create your own application**。
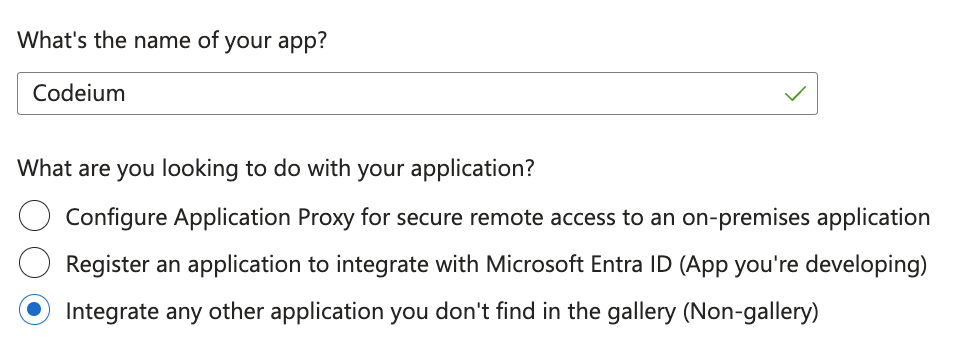
 3. 将应用命名为 **Windsurf**,选择 *Integrate any other application you don't find in the gallery*,然后点击 **Create**。
 ## 第 2 部分:在 Microsoft Entra ID 中配置 SAML 和用户属性
本节中的所有步骤均在 **Microsoft Entra ID 管理中心** 中完成。
4. 在新的 Windsurf 应用中,点击 **Set up single sign on**,然后点击 **SAML**。
5. 在 **Basic SAML Configuration** 下点击 **Edit**。
6. **保持此 Entra ID 标签页打开**,另开一个标签页,访问 **Windsurf Teams SSO settings**([https://windsurf.com/team/settings)。](https://windsurf.com/team/settings)。)
7. 在 **Microsoft Entra ID** 的 SAML 配置表单中:
* **Identifier (Entity ID)**:从 **Windsurf SSO settings page** 复制 **SP Entity ID** 值
* **Reply URL (Assertion Consumer Service URL)**:从 **Windsurf SSO settings page** 复制 **Callback URL** 值
* 点击顶部的 **Save**
8. 配置用户属性以正确显示姓名。在 **Microsoft Entra ID** 的 **Attributes & Claims** 下,点击 **Edit**。
9. 点击 **Add new claim** 分别创建 2 个新声明:
* **第一个声明**:Name = `firstName`,Source attribute = `user.givenname`
* **第二个声明**:Name = `lastName`,Source attribute = `user.surname`
## 第 3 部分:在 Windsurf 门户中配置 SSO 设置
在 **Windsurf 门户**([https://windsurf.com/team/settings)完成配置。](https://windsurf.com/team/settings)完成配置。)
10. 在 **Windsurf SSO settings page** 中:
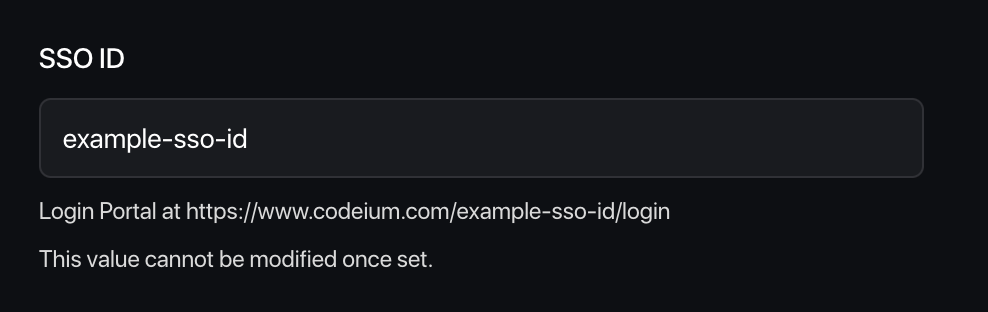
* **Pick your SSO ID**:为团队的登录门户选择一个唯一标识(之后不可更改)
* **IdP Entity ID**:从 **Microsoft Entra ID** 的 **Set up Windsurf** → **Microsoft Entra Identifier** 中复制该值
IdP Entity ID URL 必须以 `/` 结尾(例如 `https://sts.windows.net/{tenant-id}/`)。如果 URL 未包含末尾的斜杠,请手动添加。
* **SSO URL**:从 **Microsoft Entra ID** 复制 **Login URL** 值
* **X509 Certificate**:从 **Microsoft Entra ID** 下载 **SAML certificate (Base64)**,打开文件后,将其文本内容粘贴到此处
11. 在 **Windsurf 门户** 中,点击 **Enable Login with SAML**,然后点击 **Save**。
12. **测试配置**:点击 **Test Login** 验证 SSO 配置是否正常工作。
**重要**:在成功测试登录之前,请不要登出或关闭 Windsurf 设置页面。如果测试失败,你可能需要先对配置进行排查再继续。
Windsurf Enterprise 现已通过 SAML 支持使用 SSO(单点登录)登录。如果你的组织使用 Microsoft Entra、Okta、Google Workspaces 或其他支持 SAML 的身份提供商(IdP),即可在 Windsurf 中使用 SSO。
Windsurf 仅支持由 SP 发起的 SSO;目前不支持由 IdP 发起的 SSO。
### 配置 IdP 应用
在左侧边栏点击 Applications,然后点击 Create App Integration
## 第 2 部分:在 Microsoft Entra ID 中配置 SAML 和用户属性
本节中的所有步骤均在 **Microsoft Entra ID 管理中心** 中完成。
4. 在新的 Windsurf 应用中,点击 **Set up single sign on**,然后点击 **SAML**。
5. 在 **Basic SAML Configuration** 下点击 **Edit**。
6. **保持此 Entra ID 标签页打开**,另开一个标签页,访问 **Windsurf Teams SSO settings**([https://windsurf.com/team/settings)。](https://windsurf.com/team/settings)。)
7. 在 **Microsoft Entra ID** 的 SAML 配置表单中:
* **Identifier (Entity ID)**:从 **Windsurf SSO settings page** 复制 **SP Entity ID** 值
* **Reply URL (Assertion Consumer Service URL)**:从 **Windsurf SSO settings page** 复制 **Callback URL** 值
* 点击顶部的 **Save**
8. 配置用户属性以正确显示姓名。在 **Microsoft Entra ID** 的 **Attributes & Claims** 下,点击 **Edit**。
9. 点击 **Add new claim** 分别创建 2 个新声明:
* **第一个声明**:Name = `firstName`,Source attribute = `user.givenname`
* **第二个声明**:Name = `lastName`,Source attribute = `user.surname`
## 第 3 部分:在 Windsurf 门户中配置 SSO 设置
在 **Windsurf 门户**([https://windsurf.com/team/settings)完成配置。](https://windsurf.com/team/settings)完成配置。)
10. 在 **Windsurf SSO settings page** 中:
* **Pick your SSO ID**:为团队的登录门户选择一个唯一标识(之后不可更改)
* **IdP Entity ID**:从 **Microsoft Entra ID** 的 **Set up Windsurf** → **Microsoft Entra Identifier** 中复制该值
IdP Entity ID URL 必须以 `/` 结尾(例如 `https://sts.windows.net/{tenant-id}/`)。如果 URL 未包含末尾的斜杠,请手动添加。
* **SSO URL**:从 **Microsoft Entra ID** 复制 **Login URL** 值
* **X509 Certificate**:从 **Microsoft Entra ID** 下载 **SAML certificate (Base64)**,打开文件后,将其文本内容粘贴到此处
11. 在 **Windsurf 门户** 中,点击 **Enable Login with SAML**,然后点击 **Save**。
12. **测试配置**:点击 **Test Login** 验证 SSO 配置是否正常工作。
**重要**:在成功测试登录之前,请不要登出或关闭 Windsurf 设置页面。如果测试失败,你可能需要先对配置进行排查再继续。
Windsurf Enterprise 现已通过 SAML 支持使用 SSO(单点登录)登录。如果你的组织使用 Microsoft Entra、Okta、Google Workspaces 或其他支持 SAML 的身份提供商(IdP),即可在 Windsurf 中使用 SSO。
Windsurf 仅支持由 SP 发起的 SSO;目前不支持由 IdP 发起的 SSO。
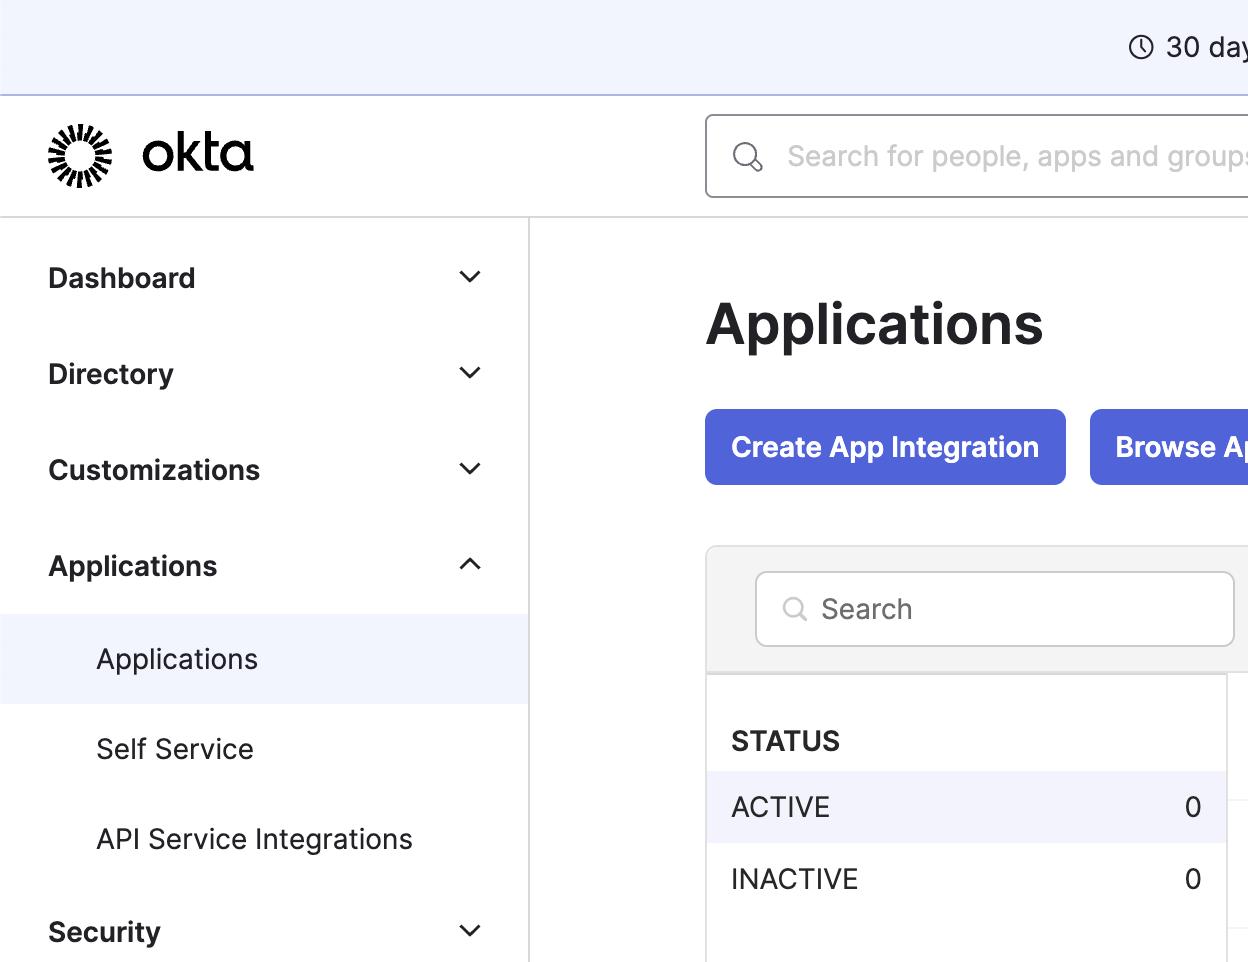
### 配置 IdP 应用
在左侧边栏点击 Applications,然后点击 Create App Integration
 选择 SAML 2.0 作为登录方式
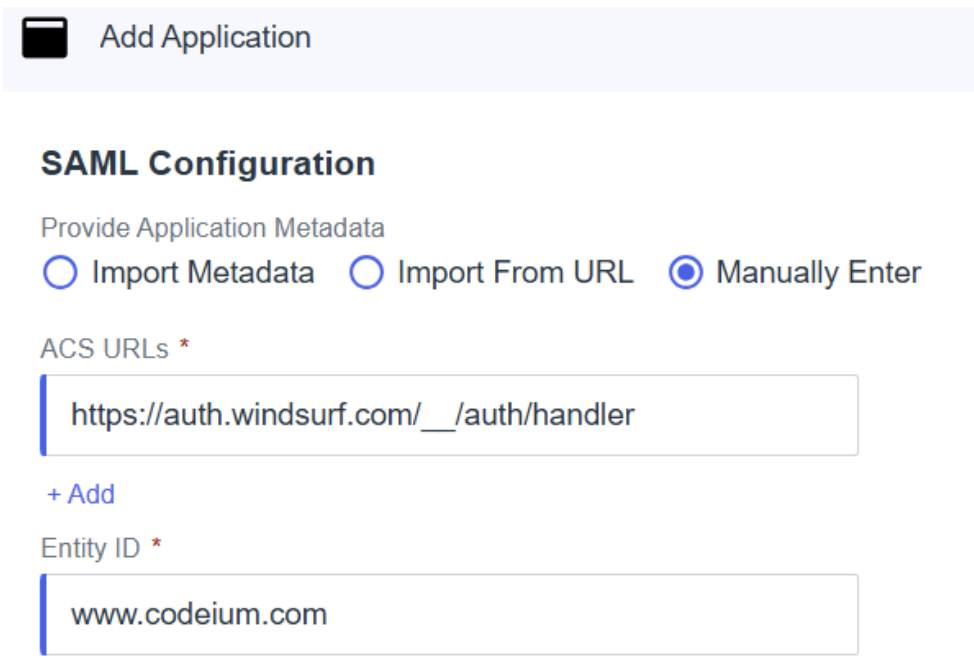
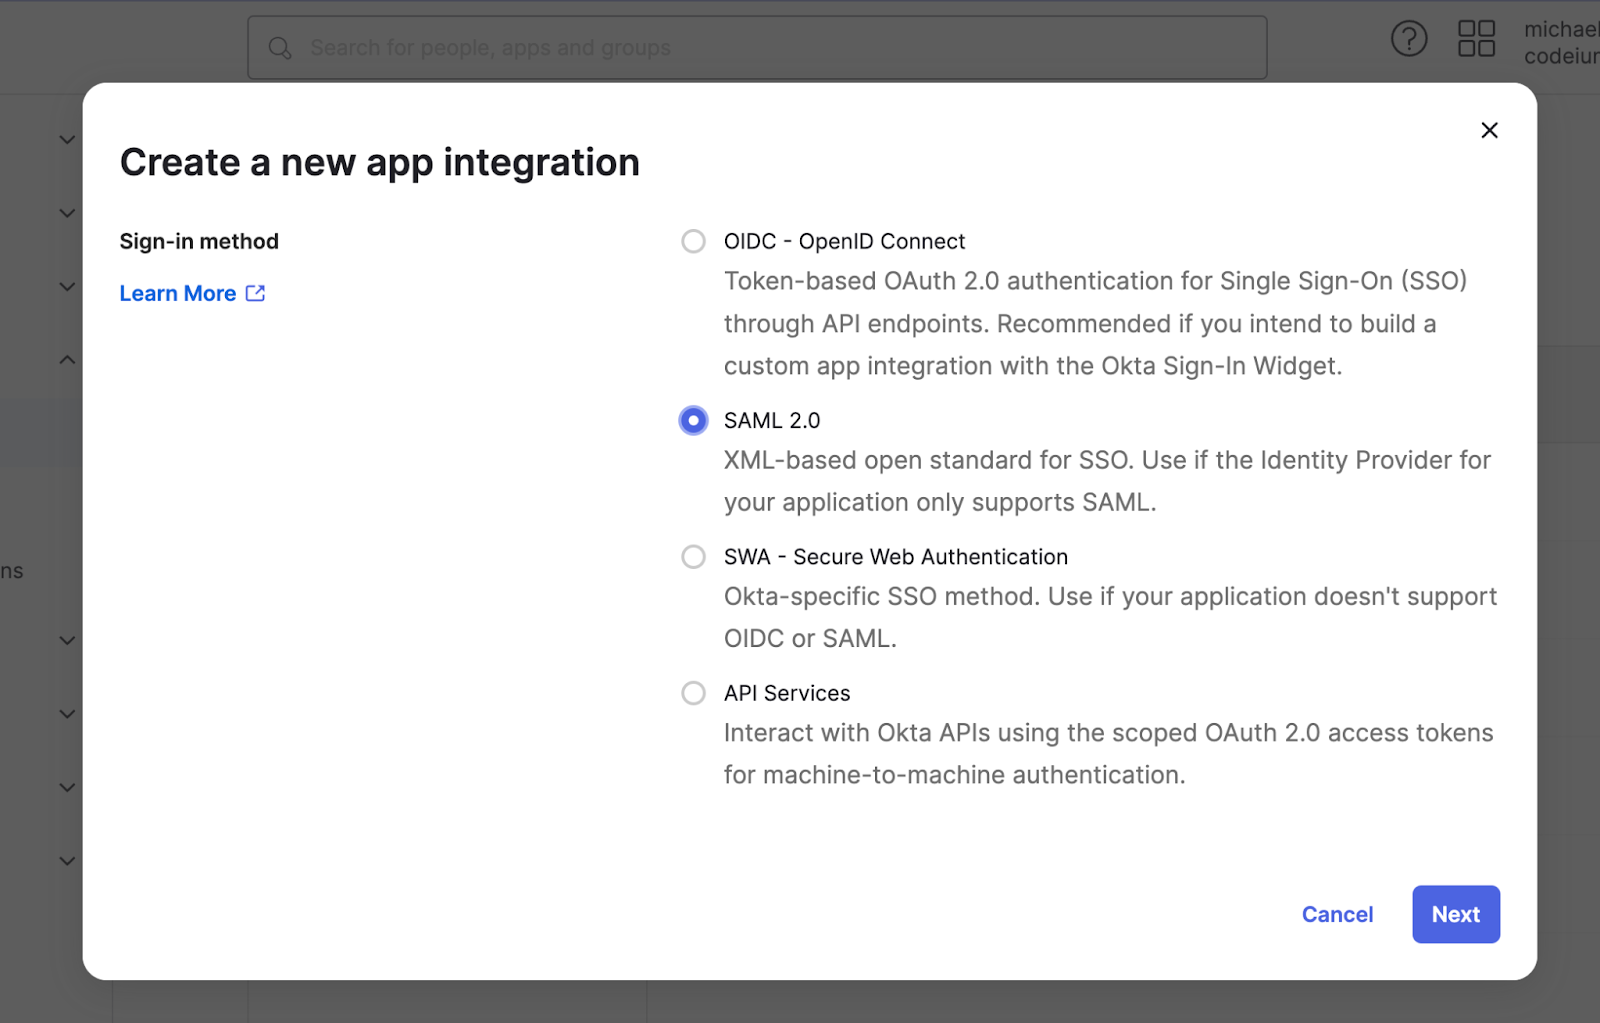 将应用名称设为 Windsurf(或其他任意名称),然后点击 Next
按如下方式配置 SAML 设置:
* 将 Single sign-on URL 设置为 [https://auth.windsurf.com/\_\_/auth/handler](https://auth.windsurf.com/\_\_/auth/handler)
* 将 Audience URI (SP Entity ID) 设置为 [www.codeium.com](http://www.codeium.com)
* 将 NameID format 设置为 EmailAddress
* 将 Application username 设置为 Email
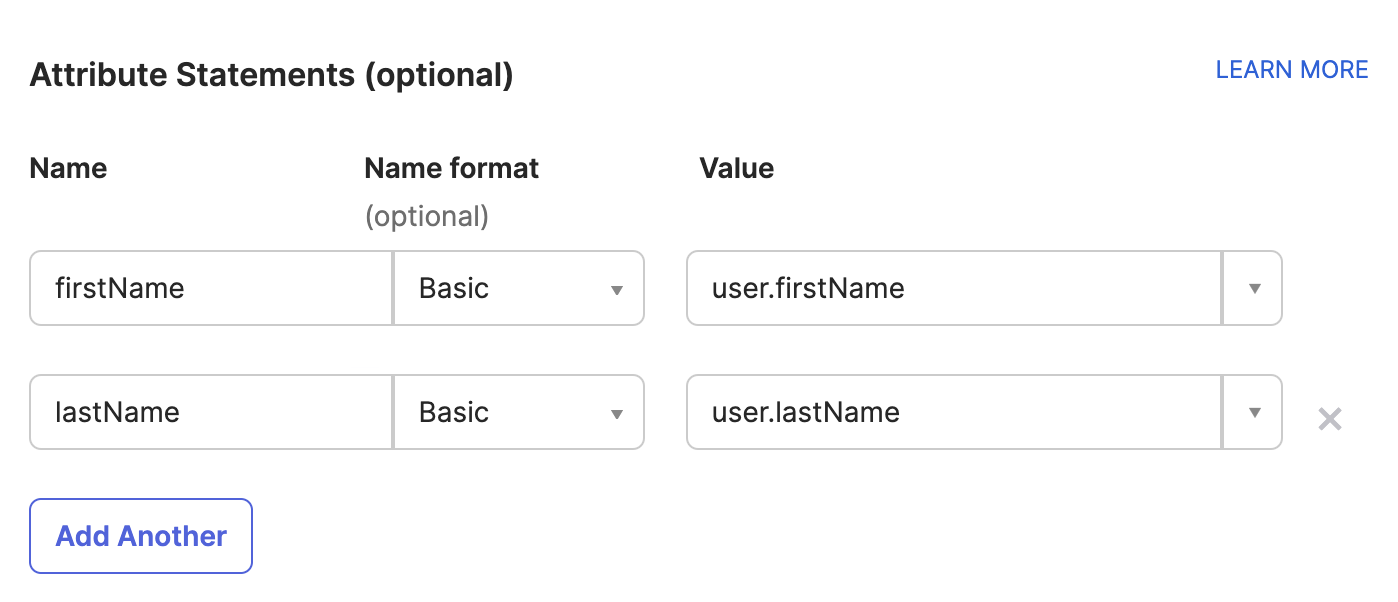
按如下方式配置属性声明(attribute statements),然后点击 **Next**。
将应用名称设为 Windsurf(或其他任意名称),然后点击 Next
按如下方式配置 SAML 设置:
* 将 Single sign-on URL 设置为 [https://auth.windsurf.com/\_\_/auth/handler](https://auth.windsurf.com/\_\_/auth/handler)
* 将 Audience URI (SP Entity ID) 设置为 [www.codeium.com](http://www.codeium.com)
* 将 NameID format 设置为 EmailAddress
* 将 Application username 设置为 Email
按如下方式配置属性声明(attribute statements),然后点击 **Next**。
 在反馈部分,选择“This is an internal app that we have created”,然后点击 **Finish**。
### 将 Okta 注册为 SAML 提供商
系统应会将你重定向到自定义 SAML 应用的 Sign on 选项卡。现在需要将此页面中的信息填写到 Windsurf 的 SSO 设置中。
* 打开 [https://windsurf.com/team/settings,然后点击](https://windsurf.com/team/settings,然后点击) Configure SAML
* 复制 Okta 应用页面中 ‘Issuer’ 后的文本,并粘贴到 IdP Entity ID
* 复制 Okta 应用页面中 ‘Sign on URL’ 后的文本,并粘贴到 SSO URL
* 下载 Signing Certificate,并粘贴到 X509 certificate
* 勾选 Enable Login with SAML,然后点击 Save
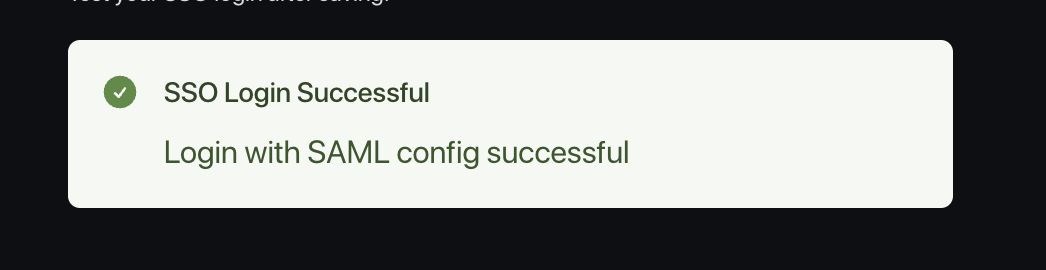
* 使用 Test Login 按钮测试登录。你应会看到成功消息:
在反馈部分,选择“This is an internal app that we have created”,然后点击 **Finish**。
### 将 Okta 注册为 SAML 提供商
系统应会将你重定向到自定义 SAML 应用的 Sign on 选项卡。现在需要将此页面中的信息填写到 Windsurf 的 SSO 设置中。
* 打开 [https://windsurf.com/team/settings,然后点击](https://windsurf.com/team/settings,然后点击) Configure SAML
* 复制 Okta 应用页面中 ‘Issuer’ 后的文本,并粘贴到 IdP Entity ID
* 复制 Okta 应用页面中 ‘Sign on URL’ 后的文本,并粘贴到 SSO URL
* 下载 Signing Certificate,并粘贴到 X509 certificate
* 勾选 Enable Login with SAML,然后点击 Save
* 使用 Test Login 按钮测试登录。你应会看到成功消息:
 此时一切应已配置完成,现在可以将用户添加到新的 Windsurf Okta 应用中。
请将你组织的自定义 Login Portal URL 分享给用户,并让他们通过该链接登录。
此时一切应已配置完成,现在可以将用户添加到新的 Windsurf Okta 应用中。
请将你组织的自定义 Login Portal URL 分享给用户,并让他们通过该链接登录。
 通过 SSO 登录到 Windsurf 的用户将自动获批加入团队。
### 注意事项
请注意,Windsurf 目前不支持由 IdP 发起的登录流程。
我们目前也尚不支持 OIDC。
# 故障排查
### Login with SAML config failed: Firebase: Error (auth/operation-not-allowed)
通过 SSO 登录到 Windsurf 的用户将自动获批加入团队。
### 注意事项
请注意,Windsurf 目前不支持由 IdP 发起的登录流程。
我们目前也尚不支持 OIDC。
# 故障排查
### Login with SAML config failed: Firebase: Error (auth/operation-not-allowed)
 这表明你的 SSO ID 无效或 SSO URL 不正确。请确保其为字母数字组合,且没有多余空格或无效字符。请重新按照本指南的步骤核对,确保使用了正确的值。
### Login with SAML config failed: Firebase: SAML Response \ mismatch. (auth/invalid-credential)
这表明你的 SSO ID 无效或 SSO URL 不正确。请确保其为字母数字组合,且没有多余空格或无效字符。请重新按照本指南的步骤核对,确保使用了正确的值。
### Login with SAML config failed: Firebase: SAML Response \ mismatch. (auth/invalid-credential)
 这表明你的 IdP Entity ID 无效。请确保从 Okta 控制台完整、准确地复制,且字符串前后没有多余字符或空格。
### Failed to verify the signature in samlresponse
这表明你的 X509 certificate 值不正确。请确保复制了正确的密钥,并且其格式如下:
```
-----BEGIN CERTIFICATE-----
value
------END CERTIFICATE------
```
Windsurf 支持与 Microsoft Entra ID / Azure AD 进行用户和群组的 SCIM(跨域身份管理系统,一种用于自动化用户和群组供应的开放标准)同步。使用 SCIM 同步无需设置 SSO(单点登录),但强烈建议同时配置。
你需要:
* Microsoft Entra ID / Azure AD 的管理员访问权限
* Windsurf 的管理员访问权限
* Entra ID 中已有的 Windsurf 应用(通常来自您现有的 SSO(单点登录)应用)
**所需的服务密钥权限**
用于 SCIM(跨域身份管理系统,一种用于自动化用户和群组供应的开放标准)预配的服务密钥必须具备以下权限:
* **Team User Read** - 用于读取用户和群组信息
* **Team User Update** - 用于创建和更新用户与群组
* **Team User Delete** - 用于停用/删除用户与群组
你可以创建一个包含这些权限的自定义角色,或使用已包含这些权限的现有管理员角色。
## 步骤 1:创建具有 SCIM(跨域身份管理系统,一种用于自动化用户和群组供应的开放标准)权限的角色
在设置 SCIM(跨域身份管理系统,一种用于自动化用户和群组供应的开放标准)配置之前,你需要创建一个具有所需权限的角色。
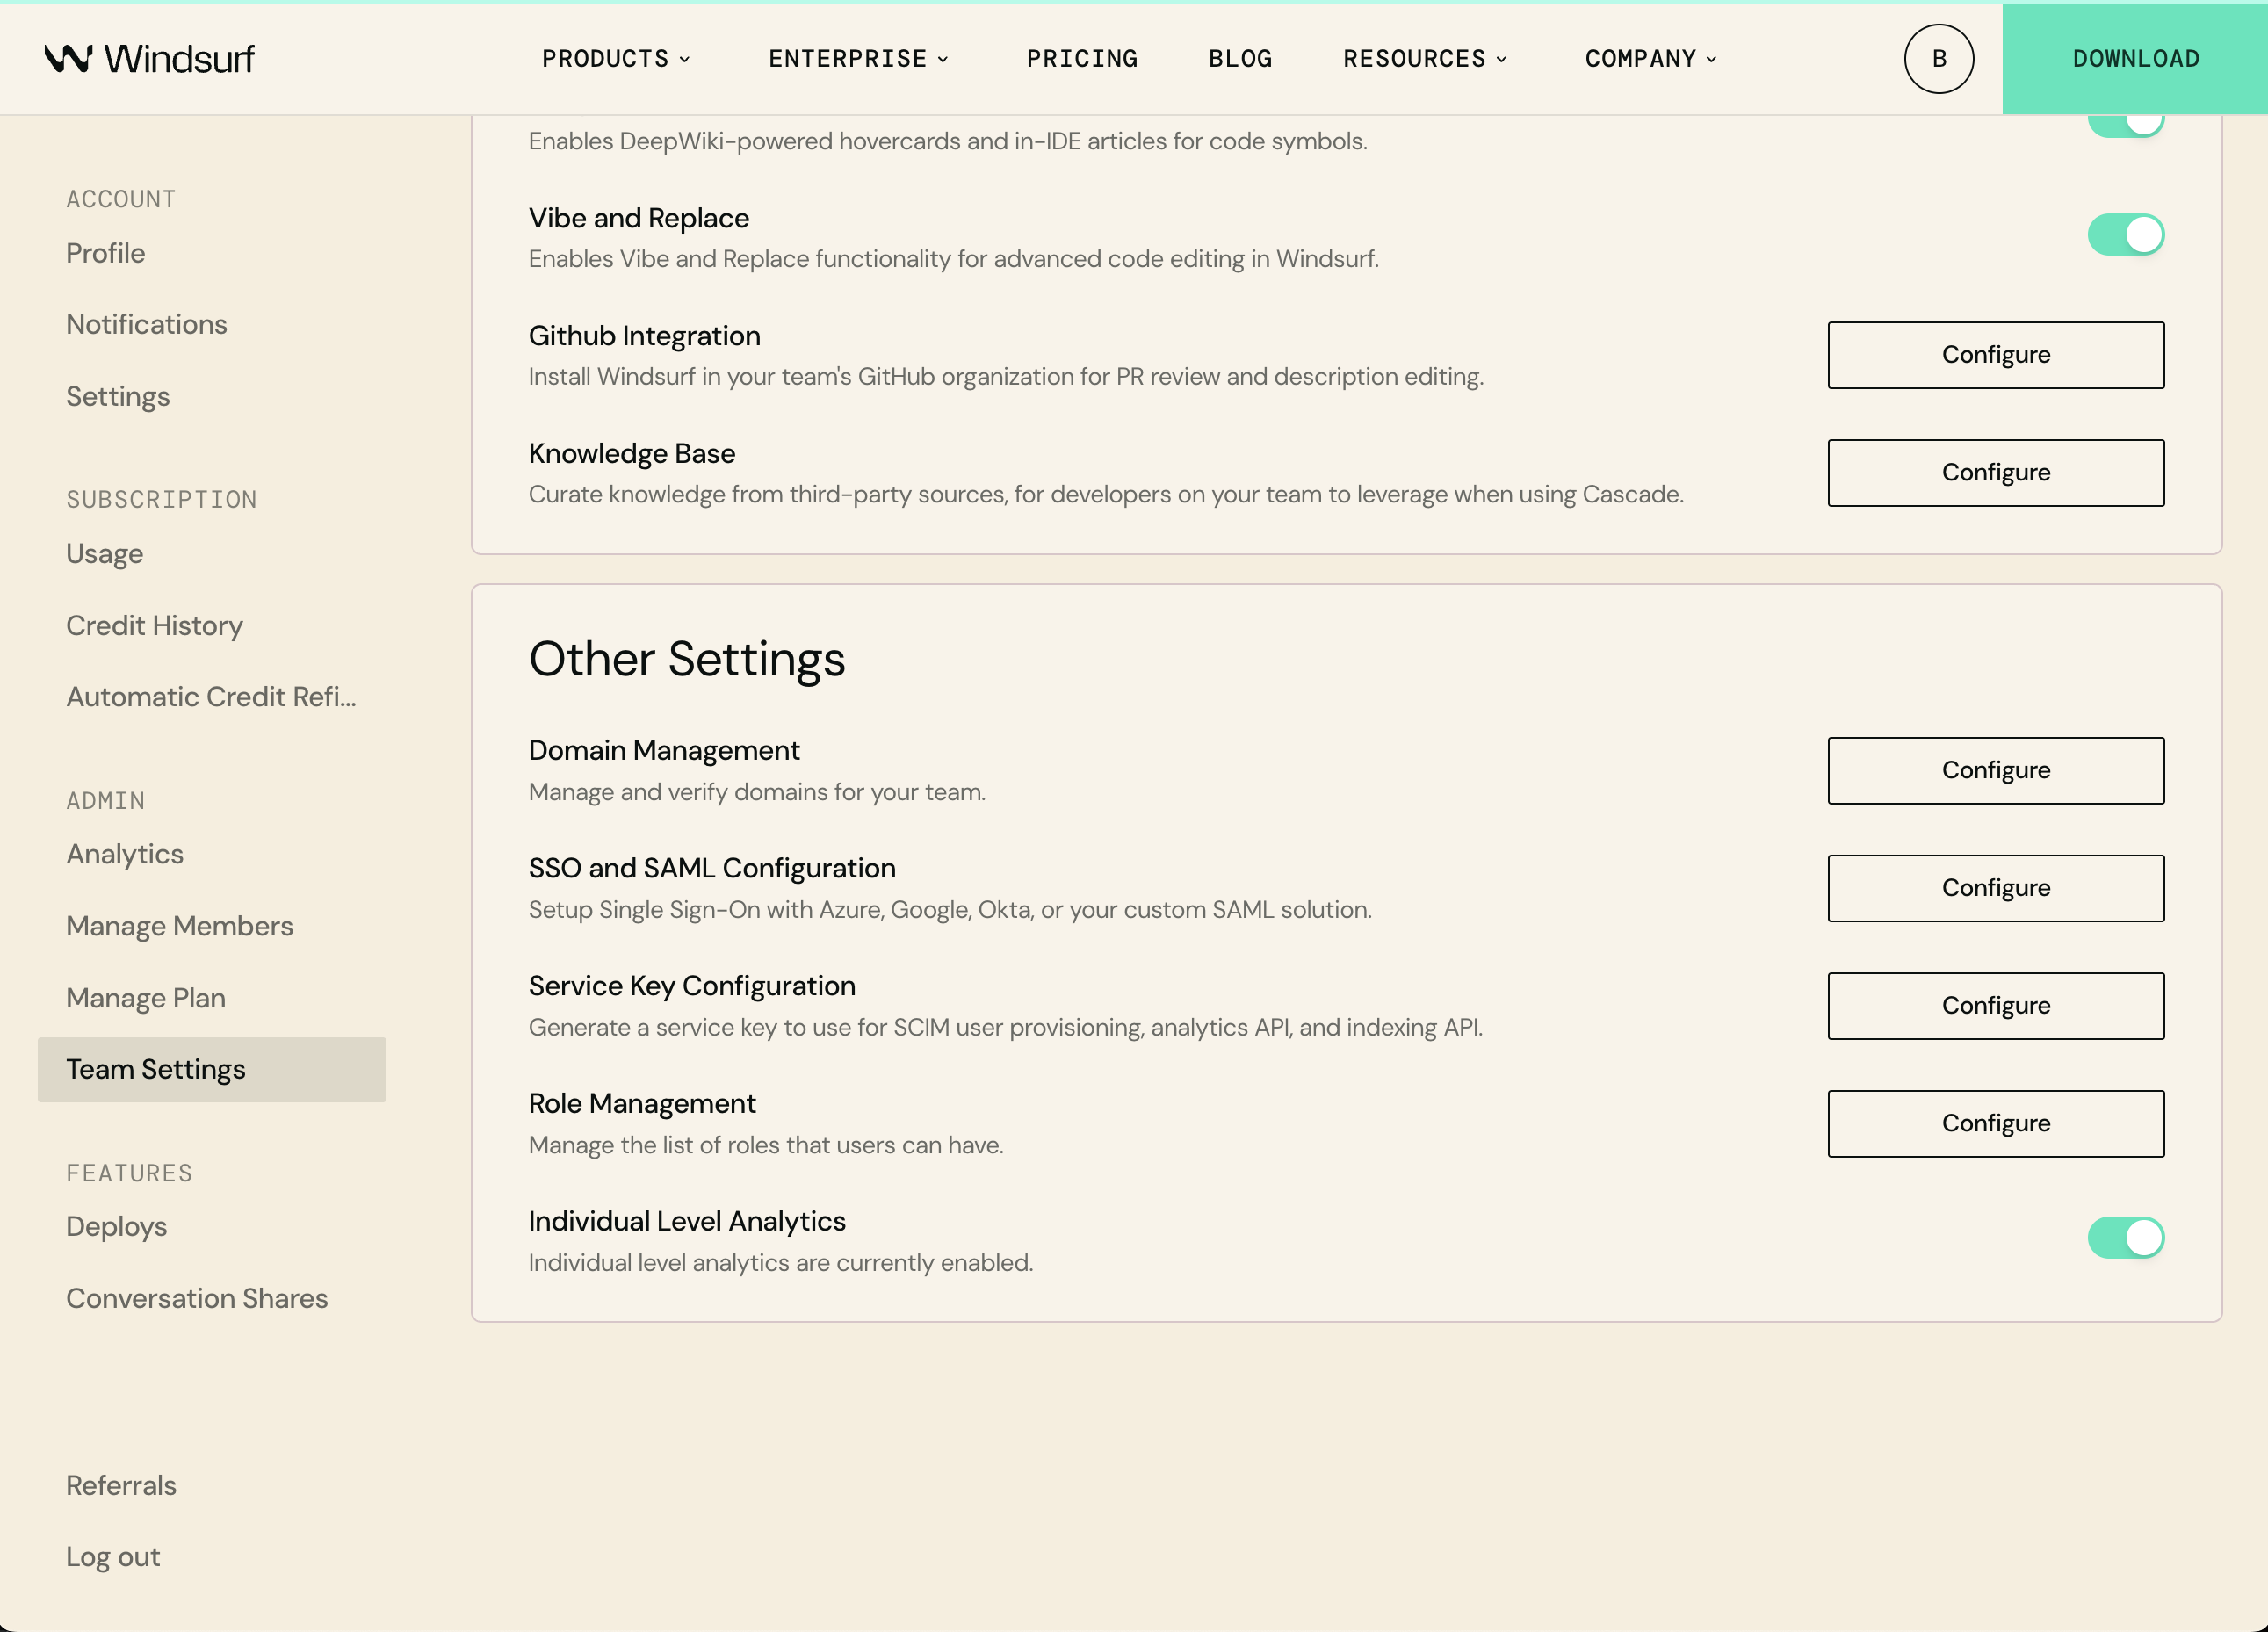
1. 前往 [Windsurf 团队设置](https://windsurf.com/team/settings)
2. 在“Other Settings”下,点击 **Role Management** 旁边的 **Configure**
3. 点击 **Add Role**,并将该角色命名为“SCIM Provisioning”
4. 添加下列权限:
* Team User Read
* Team User Update
* Team User Delete
5. 点击 **Save** 按钮
## 步骤 2:导航到现有的 Windsurf 应用
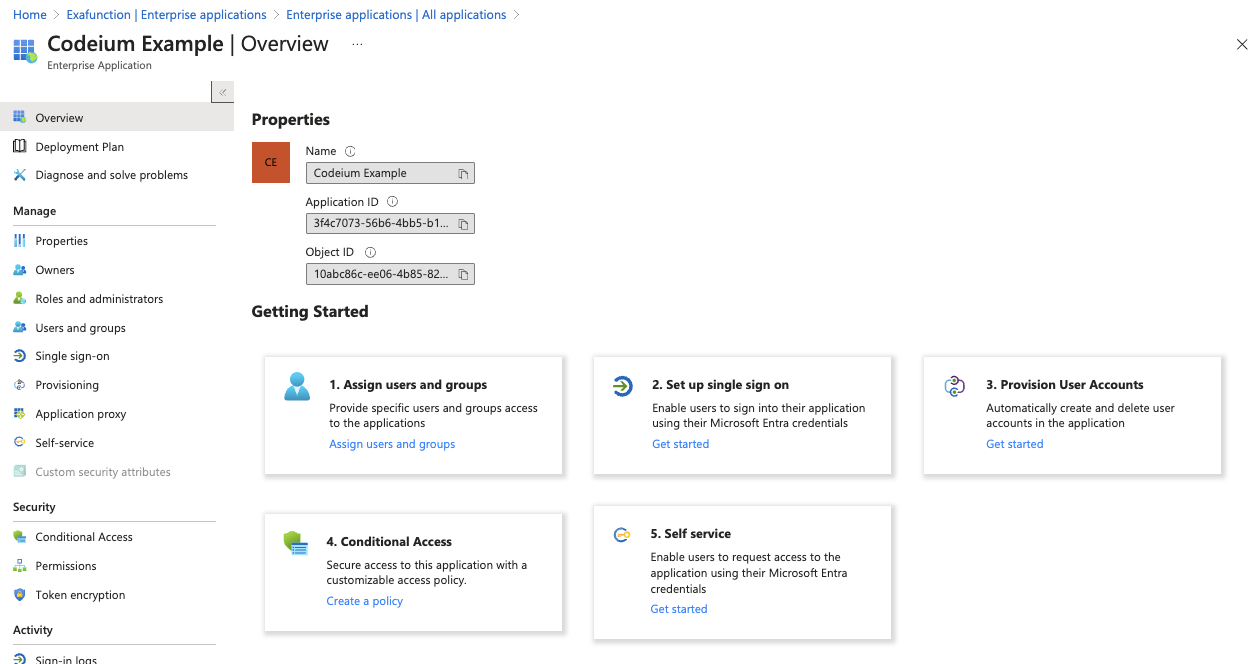
转到 Azure 上的 Microsoft Entra ID,点击左侧边栏中的企业应用程序,然后点击列表中现有的 Windsurf 应用程序。
这表明你的 IdP Entity ID 无效。请确保从 Okta 控制台完整、准确地复制,且字符串前后没有多余字符或空格。
### Failed to verify the signature in samlresponse
这表明你的 X509 certificate 值不正确。请确保复制了正确的密钥,并且其格式如下:
```
-----BEGIN CERTIFICATE-----
value
------END CERTIFICATE------
```
Windsurf 支持与 Microsoft Entra ID / Azure AD 进行用户和群组的 SCIM(跨域身份管理系统,一种用于自动化用户和群组供应的开放标准)同步。使用 SCIM 同步无需设置 SSO(单点登录),但强烈建议同时配置。
你需要:
* Microsoft Entra ID / Azure AD 的管理员访问权限
* Windsurf 的管理员访问权限
* Entra ID 中已有的 Windsurf 应用(通常来自您现有的 SSO(单点登录)应用)
**所需的服务密钥权限**
用于 SCIM(跨域身份管理系统,一种用于自动化用户和群组供应的开放标准)预配的服务密钥必须具备以下权限:
* **Team User Read** - 用于读取用户和群组信息
* **Team User Update** - 用于创建和更新用户与群组
* **Team User Delete** - 用于停用/删除用户与群组
你可以创建一个包含这些权限的自定义角色,或使用已包含这些权限的现有管理员角色。
## 步骤 1:创建具有 SCIM(跨域身份管理系统,一种用于自动化用户和群组供应的开放标准)权限的角色
在设置 SCIM(跨域身份管理系统,一种用于自动化用户和群组供应的开放标准)配置之前,你需要创建一个具有所需权限的角色。
1. 前往 [Windsurf 团队设置](https://windsurf.com/team/settings)
2. 在“Other Settings”下,点击 **Role Management** 旁边的 **Configure**
3. 点击 **Add Role**,并将该角色命名为“SCIM Provisioning”
4. 添加下列权限:
* Team User Read
* Team User Update
* Team User Delete
5. 点击 **Save** 按钮
## 步骤 2:导航到现有的 Windsurf 应用
转到 Azure 上的 Microsoft Entra ID,点击左侧边栏中的企业应用程序,然后点击列表中现有的 Windsurf 应用程序。
 ## 步骤 3:设置 SCIM 配置
点击中间"配置用户账户"下的"开始使用"(步骤 3),然后再次点击"开始使用"。
## 步骤 3:设置 SCIM 配置
点击中间"配置用户账户"下的"开始使用"(步骤 3),然后再次点击"开始使用"。
 在 Provisioning 设置页面中,选择以下选项。
配置模式:自动
管理员凭据 > 租户 URL:[https://server.codeium.com/scim/v2](https://server.codeium.com/scim/v2)
在 Provisioning 设置页面中,选择以下选项。
配置模式:自动
管理员凭据 > 租户 URL:[https://server.codeium.com/scim/v2](https://server.codeium.com/scim/v2)
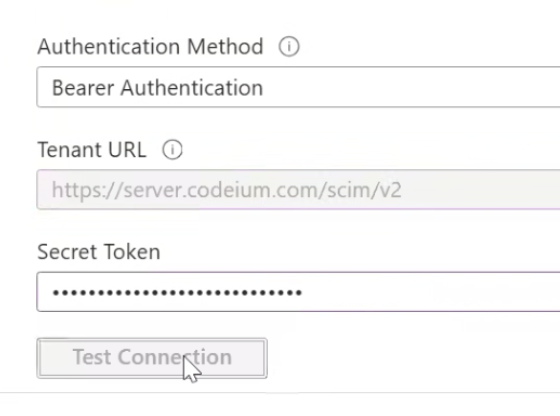 保持 Azure 配置页面打开,现在转到 Windsurf 网页门户,点击页面顶部导航栏中的个人资料图标。在团队设置下,选择服务密钥并点击添加服务密钥。输入任意密钥名称(如 'Azure SCIM Provisioning'),**选择您之前创建的 "SCIM Provisioning" 角色**,然后点击创建服务密钥。复制输出的密钥,返回 Azure 页面,将其粘贴到密钥令牌中。
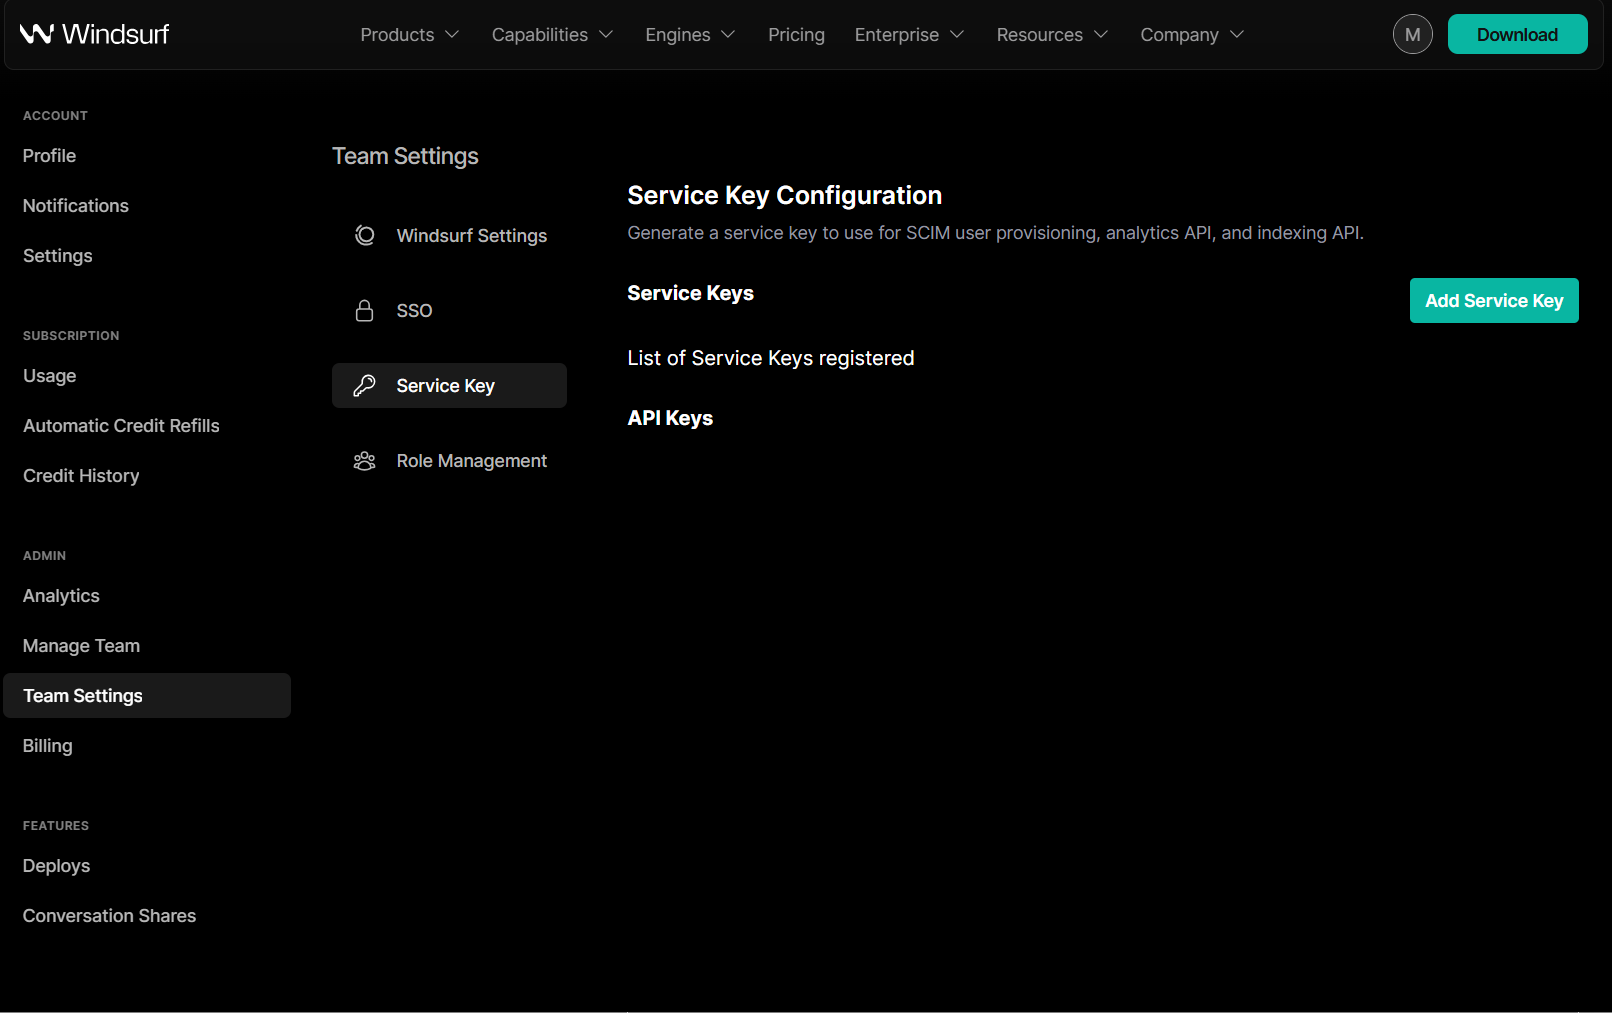 (在 Windsurf 上创建密钥后应显示的内容)
在 Provisioning 页面上,点击 Test Connection,这应该已经验证了 SCIM(跨域身份管理系统,一种用于自动化用户和群组供应的开放标准)连接。
现在在配置表单上方点击 Save。
## 步骤 4:配置 SCIM 供应
点击 Save 后,Provisioning 页面中应该会出现一个新选项 Mappings。展开 Mappings,然后点击 Provision Microsoft Entra ID Users
(在 Windsurf 上创建密钥后应显示的内容)
在 Provisioning 页面上,点击 Test Connection,这应该已经验证了 SCIM(跨域身份管理系统,一种用于自动化用户和群组供应的开放标准)连接。
现在在配置表单上方点击 Save。
## 步骤 4:配置 SCIM 供应
点击 Save 后,Provisioning 页面中应该会出现一个新选项 Mappings。展开 Mappings,然后点击 Provision Microsoft Entra ID Users
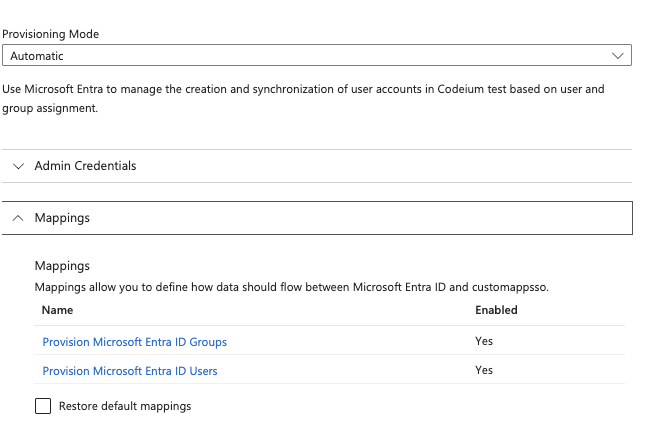 在属性映射下,删除 displayName 下的所有字段,仅保留 userName、active 和 displayName 字段。
 对于 active,现在点击 Edit。在 Expression 下,将字段修改为
```
NOT([IsSoftDeleted])
```
然后点击确定。
您的用户属性应如下所示
对于 active,现在点击 Edit。在 Expression 下,将字段修改为
```
NOT([IsSoftDeleted])
```
然后点击确定。
您的用户属性应如下所示
 在属性映射页面中,点击顶部的"保存",然后返回到预配页面。
现在在同一页面上,在"映射"下点击"预配 Microsoft Entra ID 组"。仅点击 externalId 的删除按钮,然后点击顶部的"保存"。返回到预配页面。
在属性映射页面中,点击顶部的"保存",然后返回到预配页面。
现在在同一页面上,在"映射"下点击"预配 Microsoft Entra ID 组"。仅点击 externalId 的删除按钮,然后点击顶部的"保存"。返回到预配页面。
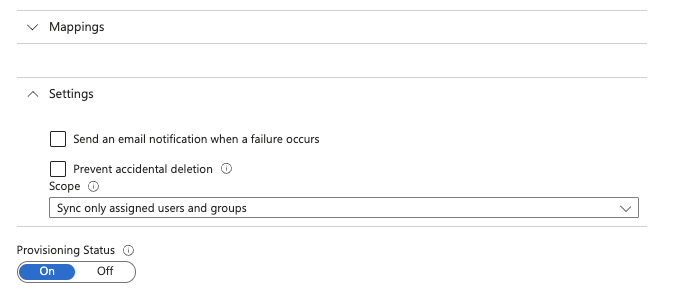
 在配置页面底部,还应该有一个"配置状态"切换开关。将其设置为"开启"以启用 SCIM(跨域身份管理系统,一种用于自动化用户和群组供应的开放标准)同步。现在每 40 分钟,您的 Entra ID 应用程序中的用户和群组将会同步到 Windsurf。
 点击 Save 完成设置,您现在已为 SCIM(跨域身份管理系统,一种用于自动化用户和群组供应的开放标准)启用了用户和群组同步。只有分配给该应用程序的用户和群组才会同步到 Windsurf。请注意,由于 Azure 的 SCIM 设计,移除用户只会禁用其对 Windsurf 的访问权限(并停止占用席位),而不会删除用户。
Windsurf 支持通过 Okta 对用户和群组进行 SCIM 同步。使用 SCIM 同步无需先设置 SSO(单点登录),但我们强烈推荐启用 SSO。
你需要:
* Okta 管理员权限
* Windsurf 管理员权限
* 在 Okta 中已存在的 Windsurf 应用(通常来自你现有的 SSO 应用)
## Step 1: Navigate to the existing Windsurf Application
前往 Okta,点击 Applications,左侧边栏中的 Applications,然后在应用列表中点击现有的 Windsurf 应用。
## Step 2: Enable SCIM Provisioning
在 General 选项卡中的 App Settings,点击右上角的 Edit。勾选“Enable SCIM Provisioning”复选框,然后点击 Save。顶部应出现新的 Provisioning 选项卡。
现在前往 Provisioning,点击 Edit,并在以下字段中输入:
SCIM connector base URL: [https://server.codeium.com/scim/v2](https://server.codeium.com/scim/v2)
Unique identifier field for users: email
Supported provisioning actions: Push New Users, Push Profile Updates, Push Groups
Authentication Mode: HTTP Header
对于 HTTP Header - Authorization,你可以在以下位置生成令牌:
* [https://windsurf.com/team/settings](https://windsurf.com/team/settings) 并进入 Service Key Configuration
* 点击 Configure,然后选择 Add Service Key,并为你的 API key 命名
* 复制该 API key,返回 Okta 并将其粘贴到 HTTP Header - Authorization
填写完 Provisioning Integration 后点击 Save。
## Step 3: Setup Provisioning
在 Provisioning 选项卡下,左侧应出现两个新子页签。点击 To App,并选择 Edit Provisioning to App。勾选 Create Users、Update User Attributes 和 Deactivate Users,然后点击 Save。
完成此步骤后,分配到该应用的所有用户都会同步到 Windsurf。
## Step 4: Setup Group Provisioning (Optional)
要将群组同步到 Windsurf,你需要指定要推送的群组。在应用中,点击顶部的 Push Groups 选项卡。点击 + Push Groups -> Find Groups by name。筛选要添加的群组,确保已勾选 Push group memberships immediately,然后点击 Save。该群组将被创建,群组成员将同步到 Windsurf。随后可以在 Analytics 页面使用群组来筛选群组相关的 Analytics。
本指南介绍如何使用 SCIM API 在 Windsurf 中创建和维护群组。
有些情况下,用户可能希望手动配置群组而不是通过身份提供商(Azure/Okta)来配置。公司可能希望从 Windsurf 无法访问的其他内部数据源(HR 网站、源代码管理工具等)配置群组,或者公司可能需要比其身份提供商提供的更精细的群组控制。因此,可以通过 HTTP 请求使用 API 来创建群组。以下提供了通过 CURL 进行 HTTP 请求的示例。
这里有 5 个主要 API:创建群组、添加群组成员、替换群组成员、删除群组和列出群组中的用户。
### 创建群组
```
curl -k -X POST https://server.codeium.com/scim/v2/Groups -d '{
"displayName": "<群组名称>",
"schemas": ["urn:ietf:params:scim:schemas:core:2.0:Group"]
}' -H "Authorization: Bearer " -H "Content-Type: application/scim+json"
```
### 添加组成员
```
curl -X PATCH https://server.codeium.com/scim/v2/Groups/<群组名称> -d '{"schemas": ["urn:ietf:params:scim:api:messages:2.0:PatchOp"],
"Operations":[
{
"op": "add",
"path":"members",
"value": [{"value": "<邮箱 1>"}, {"value": "<邮箱 2>"}]
}]}' -H "Authorization: Bearer " -H "Content-Type: application/scim+json"
```
### 替换组成员
```
curl -X PATCH https://server.codeium.com/scim/v2/Groups/<群组名称> -d '{"schemas": ["urn:ietf:params:scim:api:messages:2.0:PatchOp"],
"Operations":[
{
"op": "replace",
"path":"members",
"value": [{"value": "<邮箱 1>"}, {"value": "<邮箱 2>"}]
}]}' -H "Authorization: Bearer " -H "Content-Type: application/scim+json"
```
### 删除群组
```
curl -X DELETE https://server.codeium.com/scim/v2/Groups/<群组名称> -H "Authorization: Bearer " -H "Content-Type: application/scim+json"
```
### 列表组
```
curl -X GET -H "Authorization: Bearer " "https://server.codeium.com/scim/v2/Groups"
```
### 列出群组中的用户
```
curl -X GET -H "Authorization: Bearer " "https://server.codeium.com/scim/v2/Groups/<群组 ID>"
```
您需要先创建群组,然后替换该群组以创建包含成员的群组。如果您的群组名称包含特殊字符(如空格),还需要对群组名称进行 URL 编码,例如名为 'Engineering Group' 的群组在 URL 中必须写成 'Engineering%20Group'。
请注意,用户需要先在 Windsurf 中创建(通过 SCIM(跨域身份管理系统,一种用于自动化用户和群组供应的开放标准)或手动创建账户),然后才能被添加到群组中。
## 用户 API
同时也为用户提供了相应的 API。以下是 Windsurf 支持的一些常见 SCIM(跨域身份管理系统,一种用于自动化用户和群组供应的开放标准)API。
禁用用户(启用时将 false 改为 true):
```
curl -X PATCH \
https://server.codeium.com/scim/v2/Users/<用户 API 密钥> \
-H 'Content-Type: application/scim+json' \
-H 'Authorization: Bearer ' \
-d '{
"schemas": ["urn:ietf:params:scim:api:messages:2.0:PatchOp"],
"Operations": [
{
"op": "replace",
"path": "active",
"value": false
}
]
}'
```
创建用户:
```
curl -X POST \
https://server.codeium.com/scim/v2/Users \
-H 'Content-Type: application/scim+json' \
-H 'Authorization: Bearer ' \
-d '{
"schemas": ["urn:ietf:params:scim:schemas:core:2.0:User"],
"userName": "",
"displayName": "",
"active": true,
}'
```
更新名称:
```
curl -X PATCH \
'https:///_route/api_server/scim/v2/Users/' \
-H 'Authorization: Bearer ' \
-H 'Content-Type: application/scim+json' \
-d '{
"schemas": ["urn:ietf:params:scim:api:messages:2.0:PatchOp"],
"Operations": [
{
"op": "Replace",
"path": "displayName",
"value": ""
}
]
}'
```
## 创建 API 密钥
前往 [https://windsurf.com/team/settings。在服务密钥配置下,点击添加服务密钥。输入任意密钥名称(如\"Azure](https://windsurf.com/team/settings。在服务密钥配置下,点击添加服务密钥。输入任意密钥名称\(如\"Azure) Provisioning Key")并点击创建服务密钥。复制输出的密钥并保存,现在您可以使用该密钥来授权上述 API。
## 先决条件
本指南假设你已将 Duo 配置为组织的 IDP,或已配置外部 IDP。
你需要对 Duo 和 Windsurf 账户均具有管理员权限。
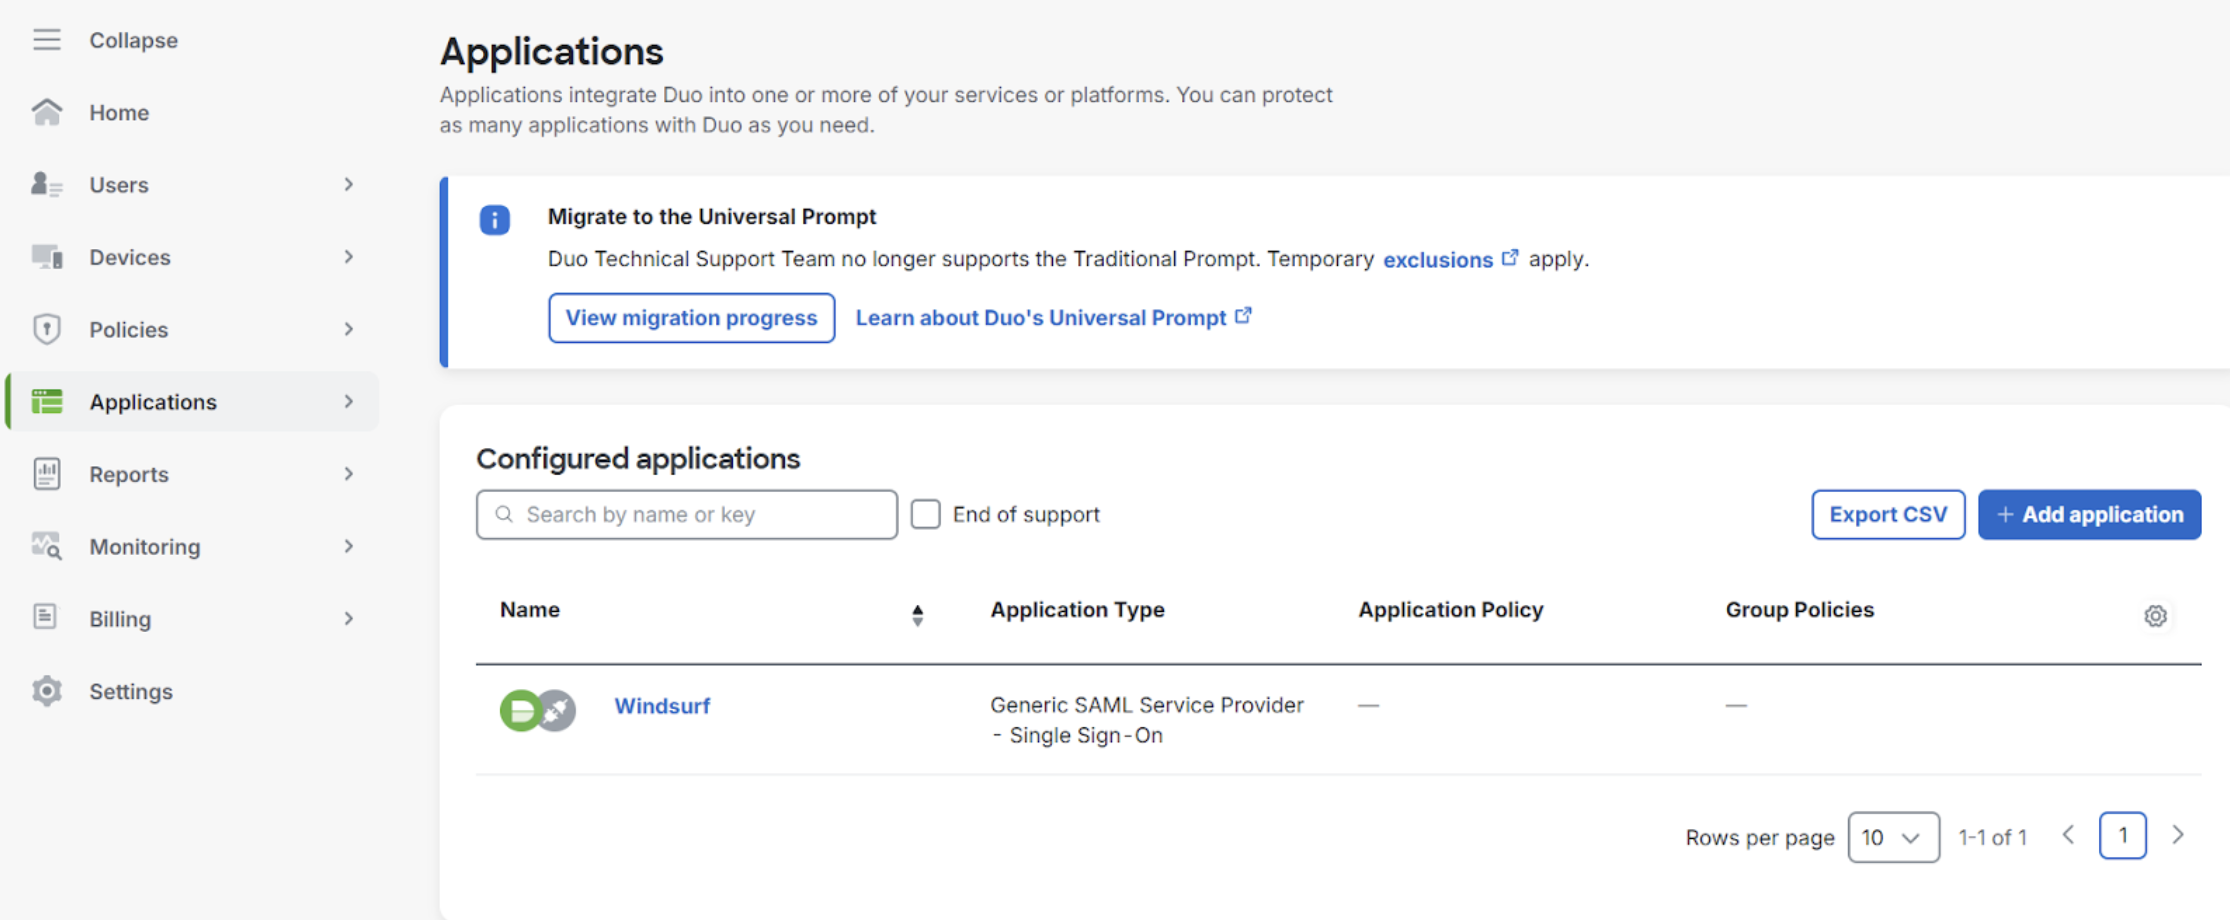
## 为 Windsurf 配置 Duo
1. 前往 Applications,添加一个 Generic SAML 服务提供商
点击 Save 完成设置,您现在已为 SCIM(跨域身份管理系统,一种用于自动化用户和群组供应的开放标准)启用了用户和群组同步。只有分配给该应用程序的用户和群组才会同步到 Windsurf。请注意,由于 Azure 的 SCIM 设计,移除用户只会禁用其对 Windsurf 的访问权限(并停止占用席位),而不会删除用户。
Windsurf 支持通过 Okta 对用户和群组进行 SCIM 同步。使用 SCIM 同步无需先设置 SSO(单点登录),但我们强烈推荐启用 SSO。
你需要:
* Okta 管理员权限
* Windsurf 管理员权限
* 在 Okta 中已存在的 Windsurf 应用(通常来自你现有的 SSO 应用)
## Step 1: Navigate to the existing Windsurf Application
前往 Okta,点击 Applications,左侧边栏中的 Applications,然后在应用列表中点击现有的 Windsurf 应用。
## Step 2: Enable SCIM Provisioning
在 General 选项卡中的 App Settings,点击右上角的 Edit。勾选“Enable SCIM Provisioning”复选框,然后点击 Save。顶部应出现新的 Provisioning 选项卡。
现在前往 Provisioning,点击 Edit,并在以下字段中输入:
SCIM connector base URL: [https://server.codeium.com/scim/v2](https://server.codeium.com/scim/v2)
Unique identifier field for users: email
Supported provisioning actions: Push New Users, Push Profile Updates, Push Groups
Authentication Mode: HTTP Header
对于 HTTP Header - Authorization,你可以在以下位置生成令牌:
* [https://windsurf.com/team/settings](https://windsurf.com/team/settings) 并进入 Service Key Configuration
* 点击 Configure,然后选择 Add Service Key,并为你的 API key 命名
* 复制该 API key,返回 Okta 并将其粘贴到 HTTP Header - Authorization
填写完 Provisioning Integration 后点击 Save。
## Step 3: Setup Provisioning
在 Provisioning 选项卡下,左侧应出现两个新子页签。点击 To App,并选择 Edit Provisioning to App。勾选 Create Users、Update User Attributes 和 Deactivate Users,然后点击 Save。
完成此步骤后,分配到该应用的所有用户都会同步到 Windsurf。
## Step 4: Setup Group Provisioning (Optional)
要将群组同步到 Windsurf,你需要指定要推送的群组。在应用中,点击顶部的 Push Groups 选项卡。点击 + Push Groups -> Find Groups by name。筛选要添加的群组,确保已勾选 Push group memberships immediately,然后点击 Save。该群组将被创建,群组成员将同步到 Windsurf。随后可以在 Analytics 页面使用群组来筛选群组相关的 Analytics。
本指南介绍如何使用 SCIM API 在 Windsurf 中创建和维护群组。
有些情况下,用户可能希望手动配置群组而不是通过身份提供商(Azure/Okta)来配置。公司可能希望从 Windsurf 无法访问的其他内部数据源(HR 网站、源代码管理工具等)配置群组,或者公司可能需要比其身份提供商提供的更精细的群组控制。因此,可以通过 HTTP 请求使用 API 来创建群组。以下提供了通过 CURL 进行 HTTP 请求的示例。
这里有 5 个主要 API:创建群组、添加群组成员、替换群组成员、删除群组和列出群组中的用户。
### 创建群组
```
curl -k -X POST https://server.codeium.com/scim/v2/Groups -d '{
"displayName": "<群组名称>",
"schemas": ["urn:ietf:params:scim:schemas:core:2.0:Group"]
}' -H "Authorization: Bearer " -H "Content-Type: application/scim+json"
```
### 添加组成员
```
curl -X PATCH https://server.codeium.com/scim/v2/Groups/<群组名称> -d '{"schemas": ["urn:ietf:params:scim:api:messages:2.0:PatchOp"],
"Operations":[
{
"op": "add",
"path":"members",
"value": [{"value": "<邮箱 1>"}, {"value": "<邮箱 2>"}]
}]}' -H "Authorization: Bearer " -H "Content-Type: application/scim+json"
```
### 替换组成员
```
curl -X PATCH https://server.codeium.com/scim/v2/Groups/<群组名称> -d '{"schemas": ["urn:ietf:params:scim:api:messages:2.0:PatchOp"],
"Operations":[
{
"op": "replace",
"path":"members",
"value": [{"value": "<邮箱 1>"}, {"value": "<邮箱 2>"}]
}]}' -H "Authorization: Bearer " -H "Content-Type: application/scim+json"
```
### 删除群组
```
curl -X DELETE https://server.codeium.com/scim/v2/Groups/<群组名称> -H "Authorization: Bearer " -H "Content-Type: application/scim+json"
```
### 列表组
```
curl -X GET -H "Authorization: Bearer " "https://server.codeium.com/scim/v2/Groups"
```
### 列出群组中的用户
```
curl -X GET -H "Authorization: Bearer " "https://server.codeium.com/scim/v2/Groups/<群组 ID>"
```
您需要先创建群组,然后替换该群组以创建包含成员的群组。如果您的群组名称包含特殊字符(如空格),还需要对群组名称进行 URL 编码,例如名为 'Engineering Group' 的群组在 URL 中必须写成 'Engineering%20Group'。
请注意,用户需要先在 Windsurf 中创建(通过 SCIM(跨域身份管理系统,一种用于自动化用户和群组供应的开放标准)或手动创建账户),然后才能被添加到群组中。
## 用户 API
同时也为用户提供了相应的 API。以下是 Windsurf 支持的一些常见 SCIM(跨域身份管理系统,一种用于自动化用户和群组供应的开放标准)API。
禁用用户(启用时将 false 改为 true):
```
curl -X PATCH \
https://server.codeium.com/scim/v2/Users/<用户 API 密钥> \
-H 'Content-Type: application/scim+json' \
-H 'Authorization: Bearer ' \
-d '{
"schemas": ["urn:ietf:params:scim:api:messages:2.0:PatchOp"],
"Operations": [
{
"op": "replace",
"path": "active",
"value": false
}
]
}'
```
创建用户:
```
curl -X POST \
https://server.codeium.com/scim/v2/Users \
-H 'Content-Type: application/scim+json' \
-H 'Authorization: Bearer ' \
-d '{
"schemas": ["urn:ietf:params:scim:schemas:core:2.0:User"],
"userName": "",
"displayName": "",
"active": true,
}'
```
更新名称:
```
curl -X PATCH \
'https:///_route/api_server/scim/v2/Users/' \
-H 'Authorization: Bearer ' \
-H 'Content-Type: application/scim+json' \
-d '{
"schemas": ["urn:ietf:params:scim:api:messages:2.0:PatchOp"],
"Operations": [
{
"op": "Replace",
"path": "displayName",
"value": ""
}
]
}'
```
## 创建 API 密钥
前往 [https://windsurf.com/team/settings。在服务密钥配置下,点击添加服务密钥。输入任意密钥名称(如\"Azure](https://windsurf.com/team/settings。在服务密钥配置下,点击添加服务密钥。输入任意密钥名称\(如\"Azure) Provisioning Key")并点击创建服务密钥。复制输出的密钥并保存,现在您可以使用该密钥来授权上述 API。
## 先决条件
本指南假设你已将 Duo 配置为组织的 IDP,或已配置外部 IDP。
你需要对 Duo 和 Windsurf 账户均具有管理员权限。
## 为 Windsurf 配置 Duo
1. 前往 Applications,添加一个 Generic SAML 服务提供商
 2. 前往 Team Settings 中的 SSO
 3. 首次启用 SAML 时,你需要设置 SSO ID。**之后将无法更改。**
建议将其设置为你的组织或团队名称,并仅使用字母和数字字符。
4. 在 Duo 门户中复制 `Entity ID` 的值,粘贴到 Windsurf 门户中的 `IdP Entity ID` 字段。
5. 在 Duo 门户中复制 `Single Sign-On URL` 的值,粘贴到 Windsurf 门户中的 `SSO URL` 字段。
6. 在 Duo 门户中复制证书值,粘贴到 Windsurf 门户中的 `X509 Certificate` 字段
3. 首次启用 SAML 时,你需要设置 SSO ID。**之后将无法更改。**
建议将其设置为你的组织或团队名称,并仅使用字母和数字字符。
4. 在 Duo 门户中复制 `Entity ID` 的值,粘贴到 Windsurf 门户中的 `IdP Entity ID` 字段。
5. 在 Duo 门户中复制 `Single Sign-On URL` 的值,粘贴到 Windsurf 门户中的 `SSO URL` 字段。
6. 在 Duo 门户中复制证书值,粘贴到 Windsurf 门户中的 `X509 Certificate` 字段
 7. 在 Windsurf 门户中复制 `SP Identity ID` 的值,粘贴到 Duo 门户中的 `Entity ID` 字段。
8. 在 Windsurf 门户中复制 `Callback URL (Assertion Consumer Service URL)`,粘贴到 Duo 门户中的 `Assertion Consumer Service (ACS) URL` 字段。
9. 在 Duo 门户中按下图配置属性声明:
7. 在 Windsurf 门户中复制 `SP Identity ID` 的值,粘贴到 Duo 门户中的 `Entity ID` 字段。
8. 在 Windsurf 门户中复制 `Callback URL (Assertion Consumer Service URL)`,粘贴到 Duo 门户中的 `Assertion Consumer Service (ACS) URL` 字段。
9. 在 Duo 门户中按下图配置属性声明:
 10. 在 Windsurf 门户中启用 SAML 登录以进行测试。
**注意:此时不要登出或关闭窗口。**
如果出现错误或超时,请先排查设置,否则你将不得不在 Windsurf 门户中禁用 SAML 设置。
**如果在未确认测试成功前登出或关闭窗口,可能会被锁定无法访问。**
11. 测试成功后即可登出。之后,使用第 3 步配置的 SSO ID 访问你的团队/组织页面时即可使用 SSO 登录。
[https://www.codeium.com/yourssoid/login](https://www.codeium.com/yourssoid/login)
## 先决条件
本指南假设你已将 PingID 配置为组织的身份提供商(IDP),或已配置外部 IDP。
你需要对 PingID 和 Windsurf 账户均拥有管理员权限。
## 为 Windsurf 配置 PingID
1. 进入 Applications,将 Windsurf 添加为 SAML Application
10. 在 Windsurf 门户中启用 SAML 登录以进行测试。
**注意:此时不要登出或关闭窗口。**
如果出现错误或超时,请先排查设置,否则你将不得不在 Windsurf 门户中禁用 SAML 设置。
**如果在未确认测试成功前登出或关闭窗口,可能会被锁定无法访问。**
11. 测试成功后即可登出。之后,使用第 3 步配置的 SSO ID 访问你的团队/组织页面时即可使用 SSO 登录。
[https://www.codeium.com/yourssoid/login](https://www.codeium.com/yourssoid/login)
## 先决条件
本指南假设你已将 PingID 配置为组织的身份提供商(IDP),或已配置外部 IDP。
你需要对 PingID 和 Windsurf 账户均拥有管理员权限。
## 为 Windsurf 配置 PingID
1. 进入 Applications,将 Windsurf 添加为 SAML Application
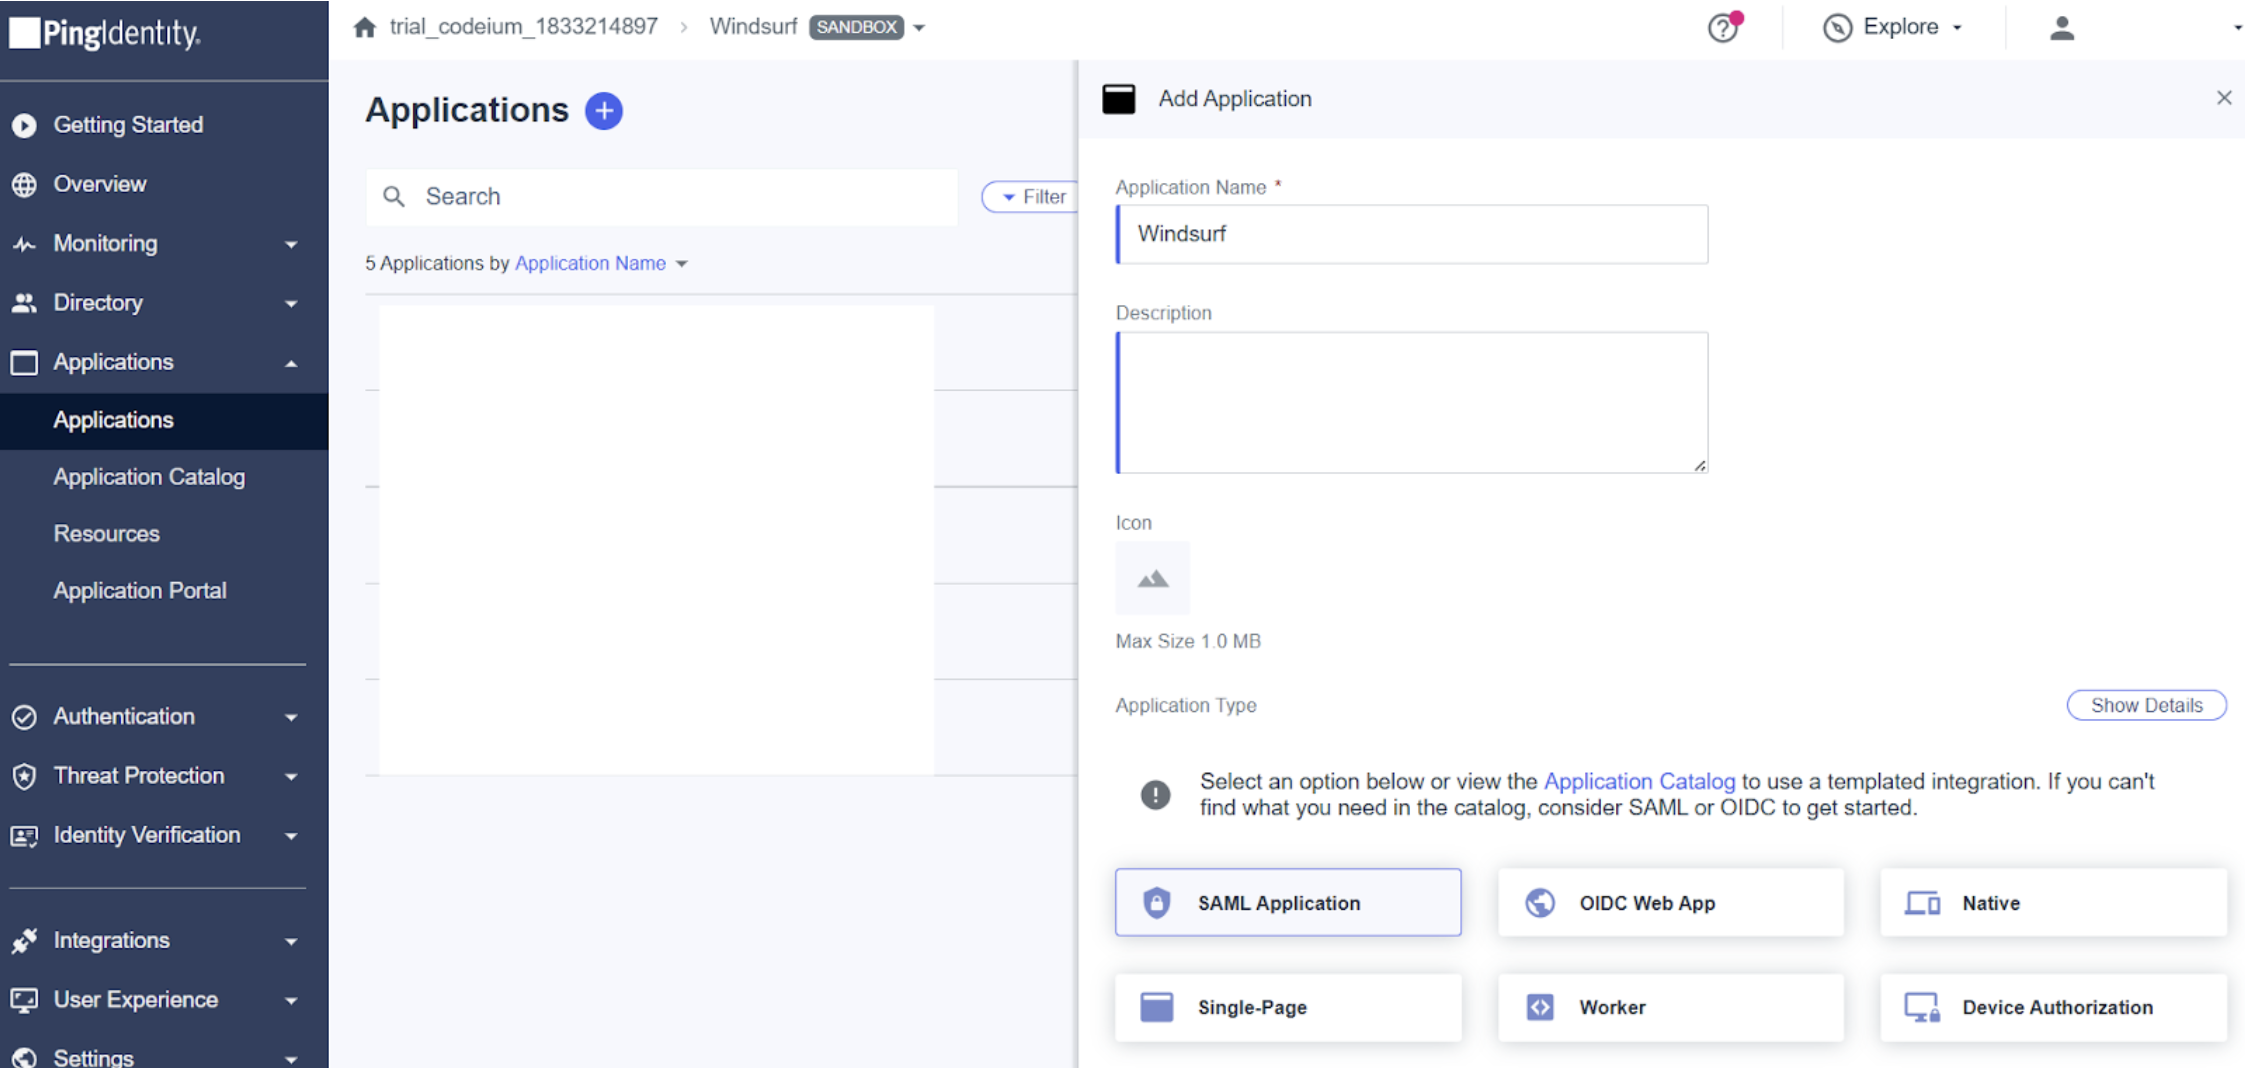 2. 在 Team Settings 中进入 SSO
3. 首次启用 SAML 时,你需要设置 SSO ID。**之后将无法更改。**
建议仅使用字母和数字,将其设置为你的组织或团队名称。
4. 在 PingID 中选择手动输入配置,并按以下值填写各字段:
* ACS URLs - 即来自 Windsurf 门户的 `Callback URL (Assertion Consumer Service URL)`。
* Entity ID - 即来自 Windsurf 门户的 `SP Entity ID`。
2. 在 Team Settings 中进入 SSO
3. 首次启用 SAML 时,你需要设置 SSO ID。**之后将无法更改。**
建议仅使用字母和数字,将其设置为你的组织或团队名称。
4. 在 PingID 中选择手动输入配置,并按以下值填写各字段:
* ACS URLs - 即来自 Windsurf 门户的 `Callback URL (Assertion Consumer Service URL)`。
* Entity ID - 即来自 Windsurf 门户的 `SP Entity ID`。
 5. 将 PingID 中的 `Issuer ID` 复制到 Windsurf 门户中的 `IdP Entity ID`。
6. 将 PingID 中的 `Single Signon Service` 值复制到 Windsurf 门户中的 `SSO URL`。
7. 从 PingID 下载签名证书(Signing Certificate),格式选择 X509 PEM(.crt),打开文件并将其内容复制到 Windsurf 门户中的 `X509 Certificate`。
**注意**:确保包含以 5 个短横线(-)开头和结尾的完整起始和结束行,不要多复制任何其他字符!
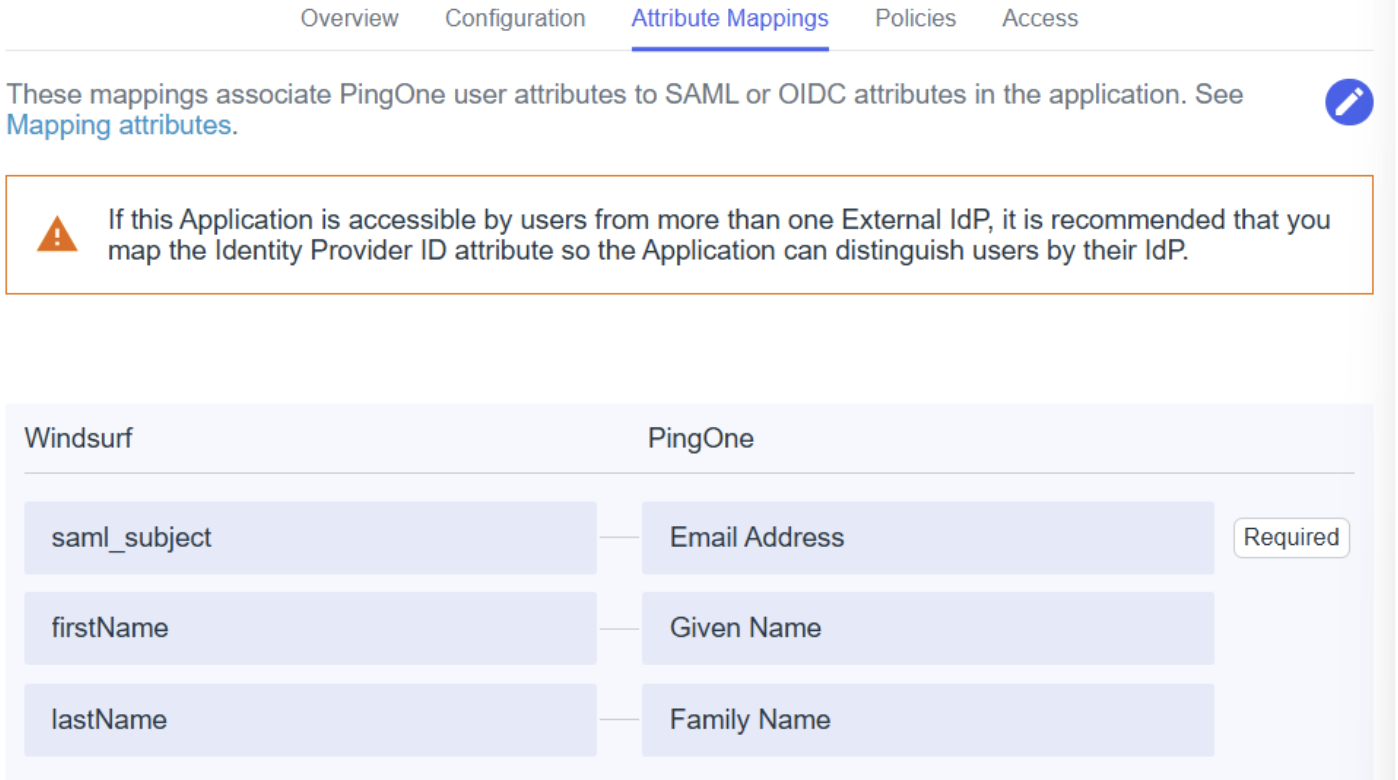
8. 在属性映射中,确保如下映射:
* `saml_subject` - Email Address
* `firstName` - Given Name
* `lastName` - Family Name
5. 将 PingID 中的 `Issuer ID` 复制到 Windsurf 门户中的 `IdP Entity ID`。
6. 将 PingID 中的 `Single Signon Service` 值复制到 Windsurf 门户中的 `SSO URL`。
7. 从 PingID 下载签名证书(Signing Certificate),格式选择 X509 PEM(.crt),打开文件并将其内容复制到 Windsurf 门户中的 `X509 Certificate`。
**注意**:确保包含以 5 个短横线(-)开头和结尾的完整起始和结束行,不要多复制任何其他字符!
8. 在属性映射中,确保如下映射:
* `saml_subject` - Email Address
* `firstName` - Given Name
* `lastName` - Family Name
 9. 按照你的环境/组织需求,添加或编辑其他策略与访问控制。
10. 在 Windsurf 门户中启用 SAML 登录以进行测试。
**注意:此时不要登出或关闭窗口。**
如果出现错误或超时,请排查设置;否则你将需要在 Windsurf 门户中禁用 SAML 设置。
**如果在未确认测试成功前登出或关闭窗口,可能会被锁定在外。**
11. 测试成功后即可登出。随后在使用第 3 步配置的 SSO ID 访问你的团队/组织页面时,即可使用 SSO 登录。
[https://www.codeium.com/yourssoid/login](https://www.codeium.com/yourssoid/login)
9. 按照你的环境/组织需求,添加或编辑其他策略与访问控制。
10. 在 Windsurf 门户中启用 SAML 登录以进行测试。
**注意:此时不要登出或关闭窗口。**
如果出现错误或超时,请排查设置;否则你将需要在 Windsurf 门户中禁用 SAML 设置。
**如果在未确认测试成功前登出或关闭窗口,可能会被锁定在外。**
11. 测试成功后即可登出。随后在使用第 3 步配置的 SSO ID 访问你的团队/组织页面时,即可使用 SSO 登录。
[https://www.codeium.com/yourssoid/login](https://www.codeium.com/yourssoid/login)