> ## Documentation Index
> Fetch the complete documentation index at: https://docs.windsurf.com/llms.txt
> Use this file to discover all available pages before exploring further.
# SSO & SCIM の設定
> Google Workspace、Microsoft Azure AD、Okta、その他のSAMLアイデンティティプロバイダーを使用して、組織向けの SSO(Single Sign-On)および SCIM(System for Cross-domain Identity Management:クロスドメインのアイデンティティ管理のための標準規格)プロビジョニングを設定します。
この機能を利用できるのは、Teams および Enterprise のユーザーのみです。
この機能は Cognition Platform プランには適用されません。Cognition Platform の場合、SSO(Single Sign-On)は Cognition Platform の設定画面から構成および管理してください。
Windsurf は、SAML を用いた SSO(Single Sign-On)でのサインインに対応しました。組織で Microsoft Entra、Okta、Google Workspace、または SAML に対応した他のアイデンティティ プロバイダを利用している場合、Windsurf で SSO を使用できます。
Windsurf が対応しているのは SP 起動(SP-initiated)の SSO のみです。IDP 起動(IdP-initiated)の SSO には現在対応していません。
### IDP アプリケーションの設定
Google 管理コンソール(admin.google.com)で、左側の **Apps -> Web and mobile apps** をクリックします。
 **Add app** をクリックし、続けて **Add custom SAML app** をクリックします。
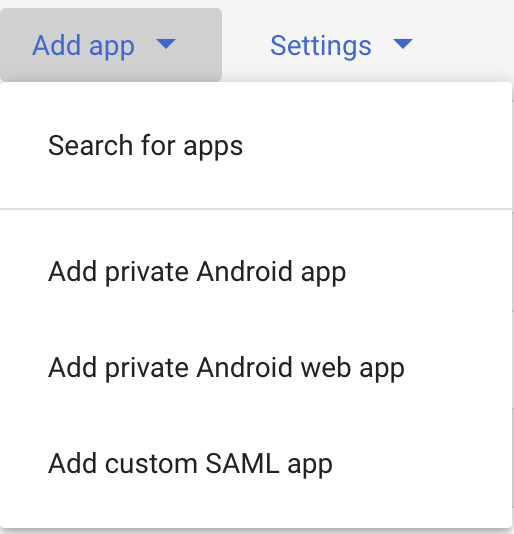 **App name** に `Windsurf` と入力し、**Next** をクリックします。
次の画面(Google のコンソールページの Google Identity Provider details)には、[https://windsurf.com/team/settings](https://windsurf.com/team/settings) にある Windsurf の SSO 設定へコピーする必要のあるデータが表示されます。
* Google のコンソールページの **SSO URL** を、Windsurf の設定の **SSO URL** にコピー
* Google のコンソールページの **Entity ID** を、Windsurf の設定の **Idp Entity ID** にコピー
* Google のコンソールページの **Certificate** を、Windsurf の設定の **X509 Certificate** にコピー
* Google のコンソールページで **Continue** をクリック
次の画面では、Google のコンソールページに Codeium の設定ページからデータをコピーします
* Codeium の設定ページの **Callback URL** を、Google のコンソールページの **ACS URL** にコピー
* Codeium の設定ページの **SP Entity ID** を、Google のコンソールページの **SP Entity ID** にコピー
* **Name ID** のフォーマットを **EMAIL** に変更
* Google のコンソールページで **Continue** をクリック
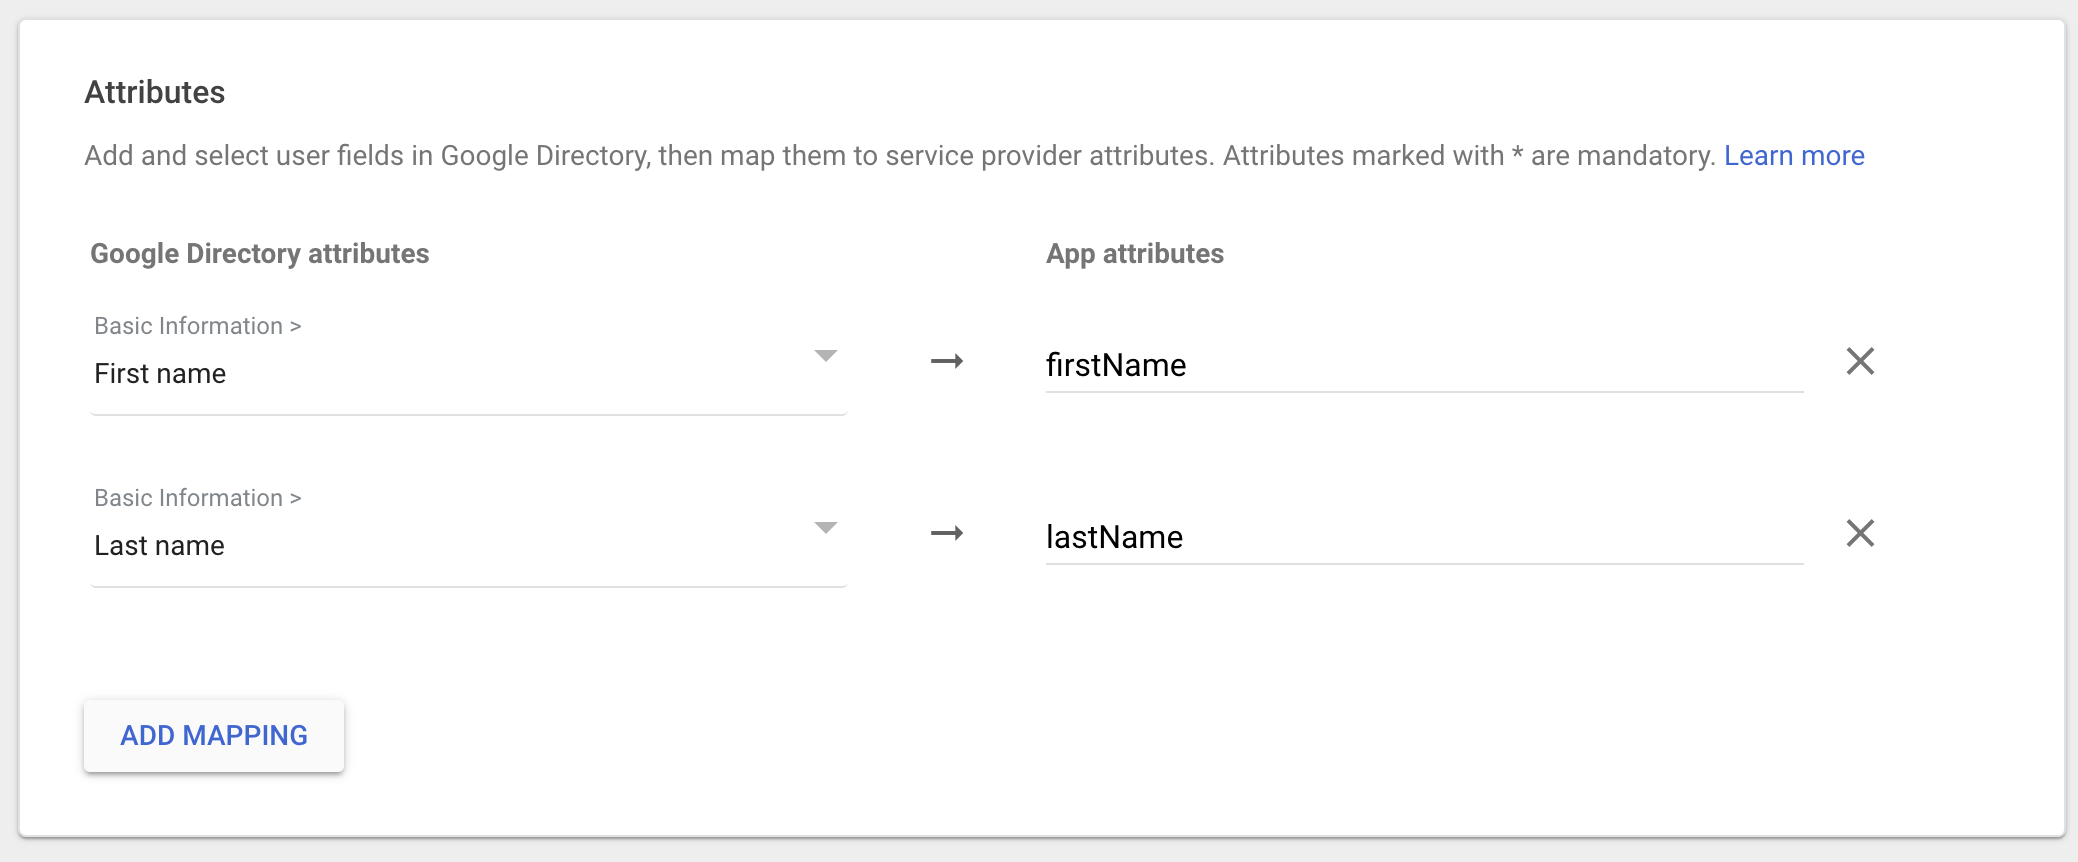
次の画面では、Google のコンソールページで以下の設定を行います
* **Add Mapping** をクリックし、**First name** を選択して **App attributes** を **firstName** に設定
* **Add Mapping** をクリックし、**Last name** を選択して **App attributes** を **lastName** に設定
* **Finish** をクリック
**App name** に `Windsurf` と入力し、**Next** をクリックします。
次の画面(Google のコンソールページの Google Identity Provider details)には、[https://windsurf.com/team/settings](https://windsurf.com/team/settings) にある Windsurf の SSO 設定へコピーする必要のあるデータが表示されます。
* Google のコンソールページの **SSO URL** を、Windsurf の設定の **SSO URL** にコピー
* Google のコンソールページの **Entity ID** を、Windsurf の設定の **Idp Entity ID** にコピー
* Google のコンソールページの **Certificate** を、Windsurf の設定の **X509 Certificate** にコピー
* Google のコンソールページで **Continue** をクリック
次の画面では、Google のコンソールページに Codeium の設定ページからデータをコピーします
* Codeium の設定ページの **Callback URL** を、Google のコンソールページの **ACS URL** にコピー
* Codeium の設定ページの **SP Entity ID** を、Google のコンソールページの **SP Entity ID** にコピー
* **Name ID** のフォーマットを **EMAIL** に変更
* Google のコンソールページで **Continue** をクリック
次の画面では、Google のコンソールページで以下の設定を行います
* **Add Mapping** をクリックし、**First name** を選択して **App attributes** を **firstName** に設定
* **Add Mapping** をクリックし、**Last name** を選択して **App attributes** を **lastName** に設定
* **Finish** をクリック
 Codeium の設定ページで **Enable Login with SAML** をクリックし、その後 **Save** をクリックします。**Test Login** をクリックして、ログインが期待どおりに機能することを確認してください。これで、すべてのユーザーに SSO ログインが適用されます。
Windsurf Enterprise は、SAML を使用した Single Sign-On(SSO)でのサインインをサポートするようになりました。組織で Microsoft Entra ID(旧称 Azure AD)を使用している場合、Windsurf で SSO を利用できます。
Windsurf は SP 起点の SSO のみをサポートしています。IdP 起点の SSO は現在サポートしていません。
## パート 1: Microsoft Entra ID で Enterprise アプリケーションを作成する
このセクションの手順はすべて **Microsoft Entra ID 管理センター**で実行します。
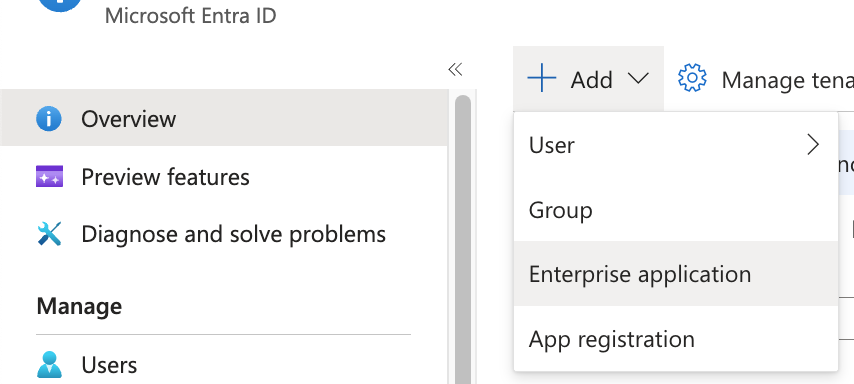
1. Microsoft Entra ID で **Add** をクリックし、次に **Enterprise Application** をクリックします。
Codeium の設定ページで **Enable Login with SAML** をクリックし、その後 **Save** をクリックします。**Test Login** をクリックして、ログインが期待どおりに機能することを確認してください。これで、すべてのユーザーに SSO ログインが適用されます。
Windsurf Enterprise は、SAML を使用した Single Sign-On(SSO)でのサインインをサポートするようになりました。組織で Microsoft Entra ID(旧称 Azure AD)を使用している場合、Windsurf で SSO を利用できます。
Windsurf は SP 起点の SSO のみをサポートしています。IdP 起点の SSO は現在サポートしていません。
## パート 1: Microsoft Entra ID で Enterprise アプリケーションを作成する
このセクションの手順はすべて **Microsoft Entra ID 管理センター**で実行します。
1. Microsoft Entra ID で **Add** をクリックし、次に **Enterprise Application** をクリックします。
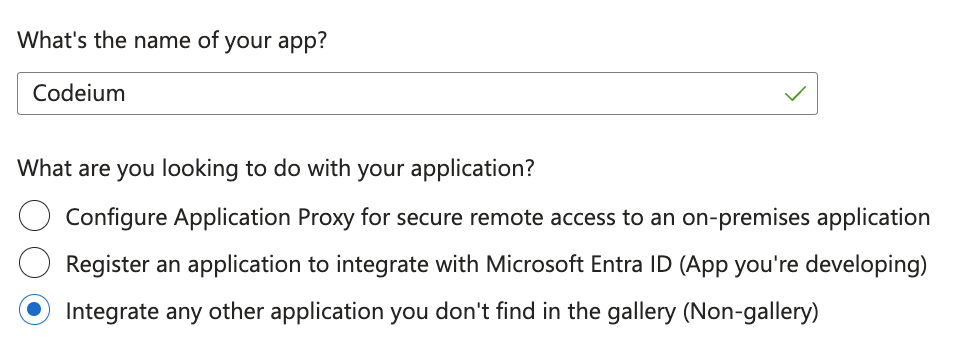
 2. **Create your own application** をクリックします。
 3. アプリケーション名を **Windsurf** にし、*ギャラリーにない他のアプリケーションを統合する* を選択して、**Create** をクリックします。
 ## パート 2: Microsoft Entra ID で SAML とユーザー属性を構成する
このセクションの手順はすべて **Microsoft Entra ID 管理センター**で実行します。
4. 作成した Windsurf アプリケーションで、**Set up single sign on** をクリックし、**SAML** をクリックします。
5. **Basic SAML Configuration** の **Edit** をクリックします。
6. **この Entra ID のタブは開いたままにして**、新しいタブで [https://windsurf.com/team/settings](https://windsurf.com/team/settings) の **Windsurf Teams SSO 設定** に移動します。
7. **Microsoft Entra ID** の SAML 構成フォームで次を設定します:
* **Identifier (Entity ID)**: **Windsurf SSO 設定ページ**の **SP Entity ID** の値をコピー
* **Reply URL (Assertion Consumer Service URL)**: **Windsurf SSO 設定ページ**の **Callback URL** の値をコピー
* 画面上部の **Save** をクリック
8. 表示名が正しくなるようユーザー属性を構成します。**Microsoft Entra ID** の **Attributes & Claims** で **Edit** をクリックします。
9. **Add new claim** をクリックして新しいクレームを 2 件作成します:
* **1 件目のクレーム**: Name = `firstName`, Source attribute = `user.givenname`
* **2 件目のクレーム**: Name = `lastName`, Source attribute = `user.surname`
## パート 3: Windsurf ポータルで SSO 設定を構成する
**Windsurf ポータル**([https://windsurf.com/team/settings)で設定を完了します。](https://windsurf.com/team/settings)で設定を完了します。)
10. **Windsurf SSO 設定ページ**で次を行います:
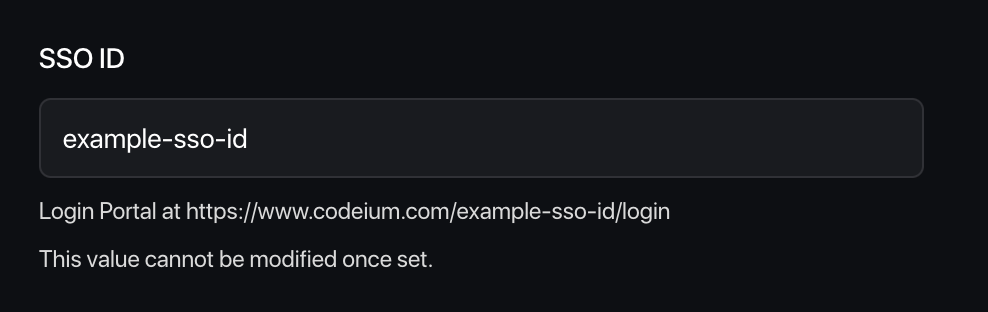
* **Pick your SSO ID**: チームのログインポータル用に一意の識別子を選択します(後から変更できません)
* **IdP Entity ID**: **Microsoft Entra ID** の **Set up Windsurf** → **Microsoft Entra Identifier** の値をコピー
IdP Entity ID の URL は末尾が `/` で終わっている必要があります(例: `https://sts.windows.net/{tenant-id}/`)。末尾のスラッシュがない場合は、手動で追加してください。
* **SSO URL**: **Microsoft Entra ID** の **Login URL** の値をコピー
* **X509 Certificate**: **Microsoft Entra ID** から **SAML certificate (Base64)** をダウンロードし、ファイルを開いてテキスト内容をここに貼り付けます
11. **Windsurf ポータル**で **Enable Login with SAML** をクリックし、**Save** をクリックします。
12. **設定のテスト**: **Test Login** をクリックして、SSO 構成が期待どおりに動作することを確認します。
**重要**: ログインのテストに成功するまで、Windsurf 設定ページからログアウトしたりページを閉じたりしないでください。テストに失敗した場合は、先に進む前に設定のトラブルシューティングが必要になる場合があります。
Windsurf Enterprise は、SAML を使用した SSO(Single Sign-On)でのサインインをサポートするようになりました。組織で Microsoft Entra、Okta、Google Workspace、または SAML に対応した他のアイデンティティ プロバイダを利用している場合、Windsurf で SSO を使用できます。
Windsurf only supports SP-initiated SSO; IDP-initiated SSO is NOT currently supported.
### Configure IDP Application
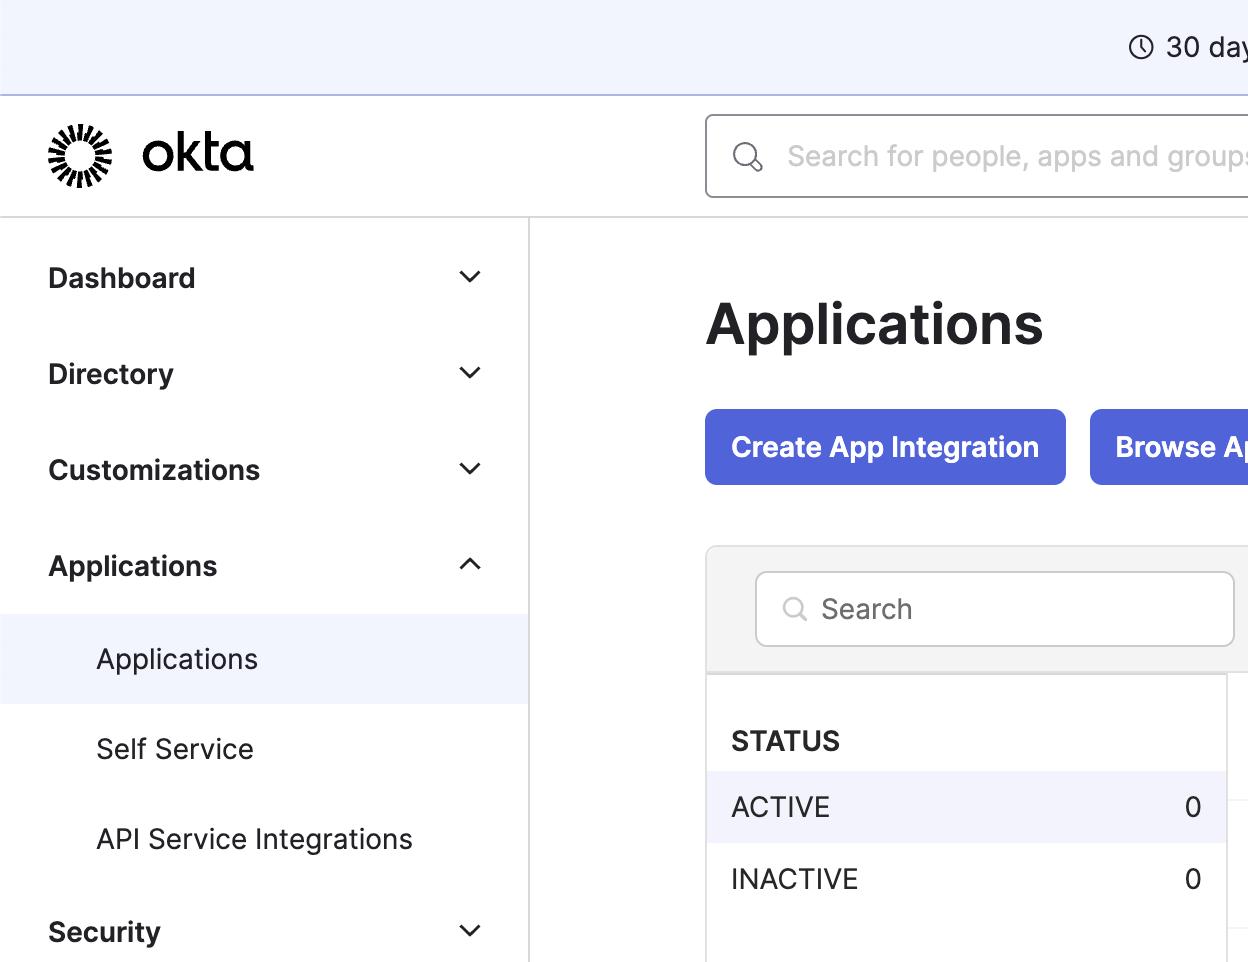
Click on Applications on the left sidebar, and then Create App Integration
## パート 2: Microsoft Entra ID で SAML とユーザー属性を構成する
このセクションの手順はすべて **Microsoft Entra ID 管理センター**で実行します。
4. 作成した Windsurf アプリケーションで、**Set up single sign on** をクリックし、**SAML** をクリックします。
5. **Basic SAML Configuration** の **Edit** をクリックします。
6. **この Entra ID のタブは開いたままにして**、新しいタブで [https://windsurf.com/team/settings](https://windsurf.com/team/settings) の **Windsurf Teams SSO 設定** に移動します。
7. **Microsoft Entra ID** の SAML 構成フォームで次を設定します:
* **Identifier (Entity ID)**: **Windsurf SSO 設定ページ**の **SP Entity ID** の値をコピー
* **Reply URL (Assertion Consumer Service URL)**: **Windsurf SSO 設定ページ**の **Callback URL** の値をコピー
* 画面上部の **Save** をクリック
8. 表示名が正しくなるようユーザー属性を構成します。**Microsoft Entra ID** の **Attributes & Claims** で **Edit** をクリックします。
9. **Add new claim** をクリックして新しいクレームを 2 件作成します:
* **1 件目のクレーム**: Name = `firstName`, Source attribute = `user.givenname`
* **2 件目のクレーム**: Name = `lastName`, Source attribute = `user.surname`
## パート 3: Windsurf ポータルで SSO 設定を構成する
**Windsurf ポータル**([https://windsurf.com/team/settings)で設定を完了します。](https://windsurf.com/team/settings)で設定を完了します。)
10. **Windsurf SSO 設定ページ**で次を行います:
* **Pick your SSO ID**: チームのログインポータル用に一意の識別子を選択します(後から変更できません)
* **IdP Entity ID**: **Microsoft Entra ID** の **Set up Windsurf** → **Microsoft Entra Identifier** の値をコピー
IdP Entity ID の URL は末尾が `/` で終わっている必要があります(例: `https://sts.windows.net/{tenant-id}/`)。末尾のスラッシュがない場合は、手動で追加してください。
* **SSO URL**: **Microsoft Entra ID** の **Login URL** の値をコピー
* **X509 Certificate**: **Microsoft Entra ID** から **SAML certificate (Base64)** をダウンロードし、ファイルを開いてテキスト内容をここに貼り付けます
11. **Windsurf ポータル**で **Enable Login with SAML** をクリックし、**Save** をクリックします。
12. **設定のテスト**: **Test Login** をクリックして、SSO 構成が期待どおりに動作することを確認します。
**重要**: ログインのテストに成功するまで、Windsurf 設定ページからログアウトしたりページを閉じたりしないでください。テストに失敗した場合は、先に進む前に設定のトラブルシューティングが必要になる場合があります。
Windsurf Enterprise は、SAML を使用した SSO(Single Sign-On)でのサインインをサポートするようになりました。組織で Microsoft Entra、Okta、Google Workspace、または SAML に対応した他のアイデンティティ プロバイダを利用している場合、Windsurf で SSO を使用できます。
Windsurf only supports SP-initiated SSO; IDP-initiated SSO is NOT currently supported.
### Configure IDP Application
Click on Applications on the left sidebar, and then Create App Integration
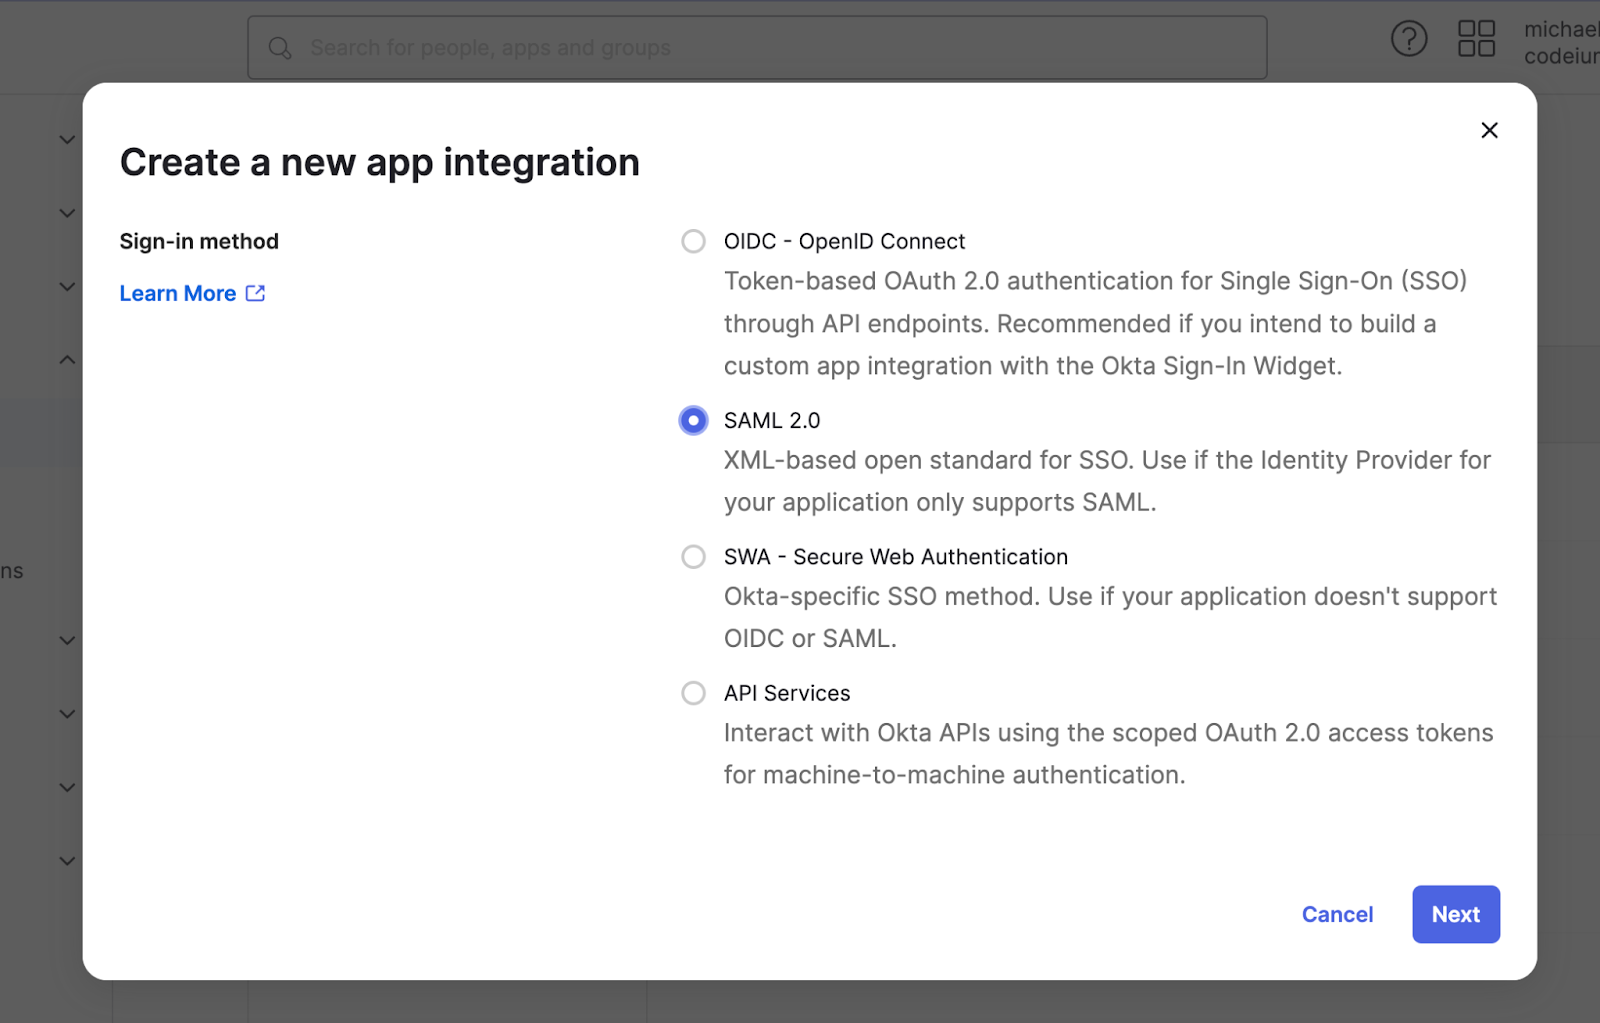
 Select SAML 2.0 as the sign-in method
 Set the app name as Windsurf (or to any other name), and click Next
Configure the SAML settings as
* Single sign-on URL to [https://auth.windsurf.com/\_\_/auth/handler](https://auth.windsurf.com/\_\_/auth/handler)
* Audience URI (SP Entity ID) to [www.codeium.com](http://www.codeium.com)
* NameID format to EmailAddress
* Application username to Email
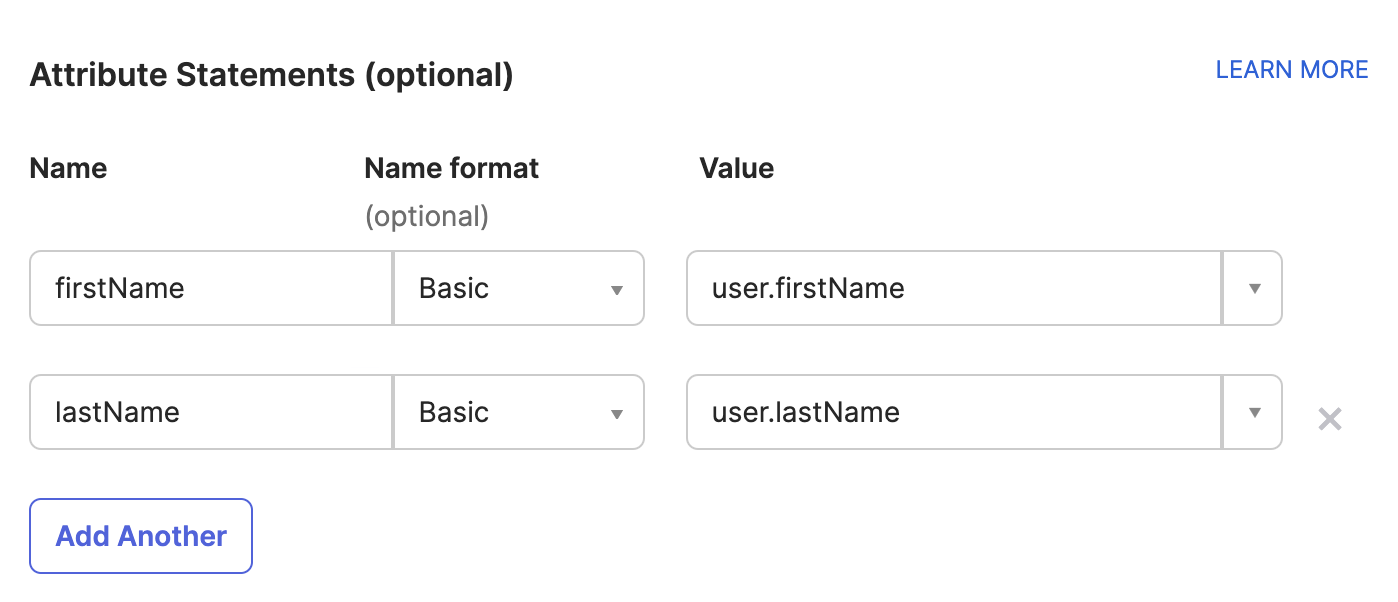
Configure the attribute statements as following, and then click **Next**.
Set the app name as Windsurf (or to any other name), and click Next
Configure the SAML settings as
* Single sign-on URL to [https://auth.windsurf.com/\_\_/auth/handler](https://auth.windsurf.com/\_\_/auth/handler)
* Audience URI (SP Entity ID) to [www.codeium.com](http://www.codeium.com)
* NameID format to EmailAddress
* Application username to Email
Configure the attribute statements as following, and then click **Next**.
 In the feedback section, select “This is an internal app that we have created”, and click **Finish**.
### Register Okta as a SAML provider
You should be redirected to the Sign on tab under your custom SAML application. Now you’ll want to take the info in this page and fill it out in Windsurf’s SSO settings.
* Open [https://windsurf.com/team/settings](https://windsurf.com/team/settings), and click on Configure SAML
* Copy the text after ‘Issuer’ in Okta’s application page and paste it under Idp Entity ID
* Copy the text after ‘Sign on URL’ in Okta’s application page and paste it under SSO URL
* Download the Signing Certificate and paste it under X509 certificate
* Check Enable Login with SAML and then click Save
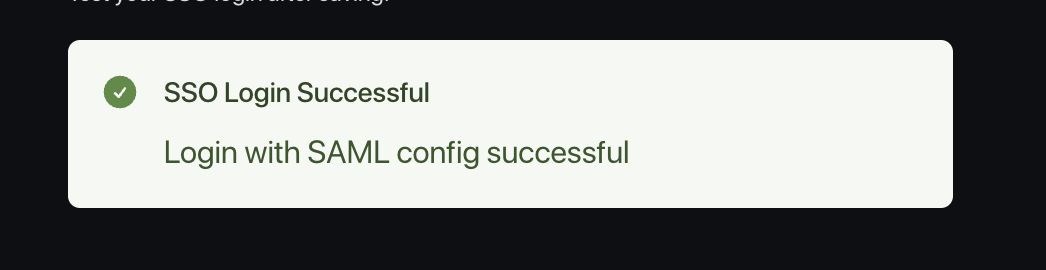
* Test the login with the Test Login button. You should see a success message:
In the feedback section, select “This is an internal app that we have created”, and click **Finish**.
### Register Okta as a SAML provider
You should be redirected to the Sign on tab under your custom SAML application. Now you’ll want to take the info in this page and fill it out in Windsurf’s SSO settings.
* Open [https://windsurf.com/team/settings](https://windsurf.com/team/settings), and click on Configure SAML
* Copy the text after ‘Issuer’ in Okta’s application page and paste it under Idp Entity ID
* Copy the text after ‘Sign on URL’ in Okta’s application page and paste it under SSO URL
* Download the Signing Certificate and paste it under X509 certificate
* Check Enable Login with SAML and then click Save
* Test the login with the Test Login button. You should see a success message:
 At this point everything should have been configured, and can now add users to the new Windsurf Okta application.
You should share your organization's custom Login Portal URL with your users and ask them to sign in via that link.
At this point everything should have been configured, and can now add users to the new Windsurf Okta application.
You should share your organization's custom Login Portal URL with your users and ask them to sign in via that link.
 Users who login to Windsurf via SSO will be auto-approved into the team.
### Caveats
Note that Windsurf does not currently support IDP-initiated login flows.
We also do not yet support OIDC.
# Troubleshooting
### Login with SAML config failed: Firebase: Error (auth/operation-not-allowed)
Users who login to Windsurf via SSO will be auto-approved into the team.
### Caveats
Note that Windsurf does not currently support IDP-initiated login flows.
We also do not yet support OIDC.
# Troubleshooting
### Login with SAML config failed: Firebase: Error (auth/operation-not-allowed)
 This points to your an invalid SSO ID, or your SSO URL being incorrect, make sure it is alphanumeric and has no extra spaces or invalid characters. Please go over the steps in the guide again and make sure you use the correct values.
### Login with SAML config failed: Firebase: SAML Response \ mismatch. (auth/invalid-credential)
This points to your an invalid SSO ID, or your SSO URL being incorrect, make sure it is alphanumeric and has no extra spaces or invalid characters. Please go over the steps in the guide again and make sure you use the correct values.
### Login with SAML config failed: Firebase: SAML Response \ mismatch. (auth/invalid-credential)
 This points to your IdP entity ID being invalid, please make sure you copy it correctly from the Okta portal, without any extra characters or spaces before or after the string.
### Failed to verify the signature in samlresponse
This points to an incorrect value of your X509 certificate, please make sure you copy the correct key, and that it is formatted as:
```
-----BEGIN CERTIFICATE-----
value
------END CERTIFICATE------
```
WindsurfはMicrosoft Entra ID / Azure ADとのユーザーおよびグループのSCIM(System for Cross-domain Identity Management:クロスドメインのアイデンティティ管理のための標準規格)同期をサポートしています。SCIM同期を使用するためにSSO(Single Sign-On)の設定は必須ではありませんが、設定することを強く推奨します。
必要なもの:
* Microsoft Entra ID / Azure AD の管理者権限アクセス
* Windsurf の管理者アクセス
* Entra ID 上の既存の Windsurf アプリケーション(通常は既存の SSO(Single Sign-On)アプリケーションから作成されたもの)
**必要なサービス キーの権限**
SCIM(System for Cross-domain Identity Management:クロスドメインのアイデンティティ管理のための標準規格)プロビジョニングに使用されるサービス キーには、次の権限が必要です:
* **Team User Read** - ユーザーおよびグループ情報を読み取るために必要
* **Team User Update** - ユーザーおよびグループを作成・更新するために必要
* **Team User Delete** - ユーザーおよびグループを無効化・削除するために必要
これらの権限を持つカスタムロールを作成するか、それらを含む既存の管理者ロールを使用できます。
## ステップ1:SCIM権限を持つロールを作成する
SCIM(System for Cross-domain Identity Management:クロスドメインのアイデンティティ管理のための標準規格)プロビジョニングを設定する前に、必要な権限を持つロールを作成する必要があります。
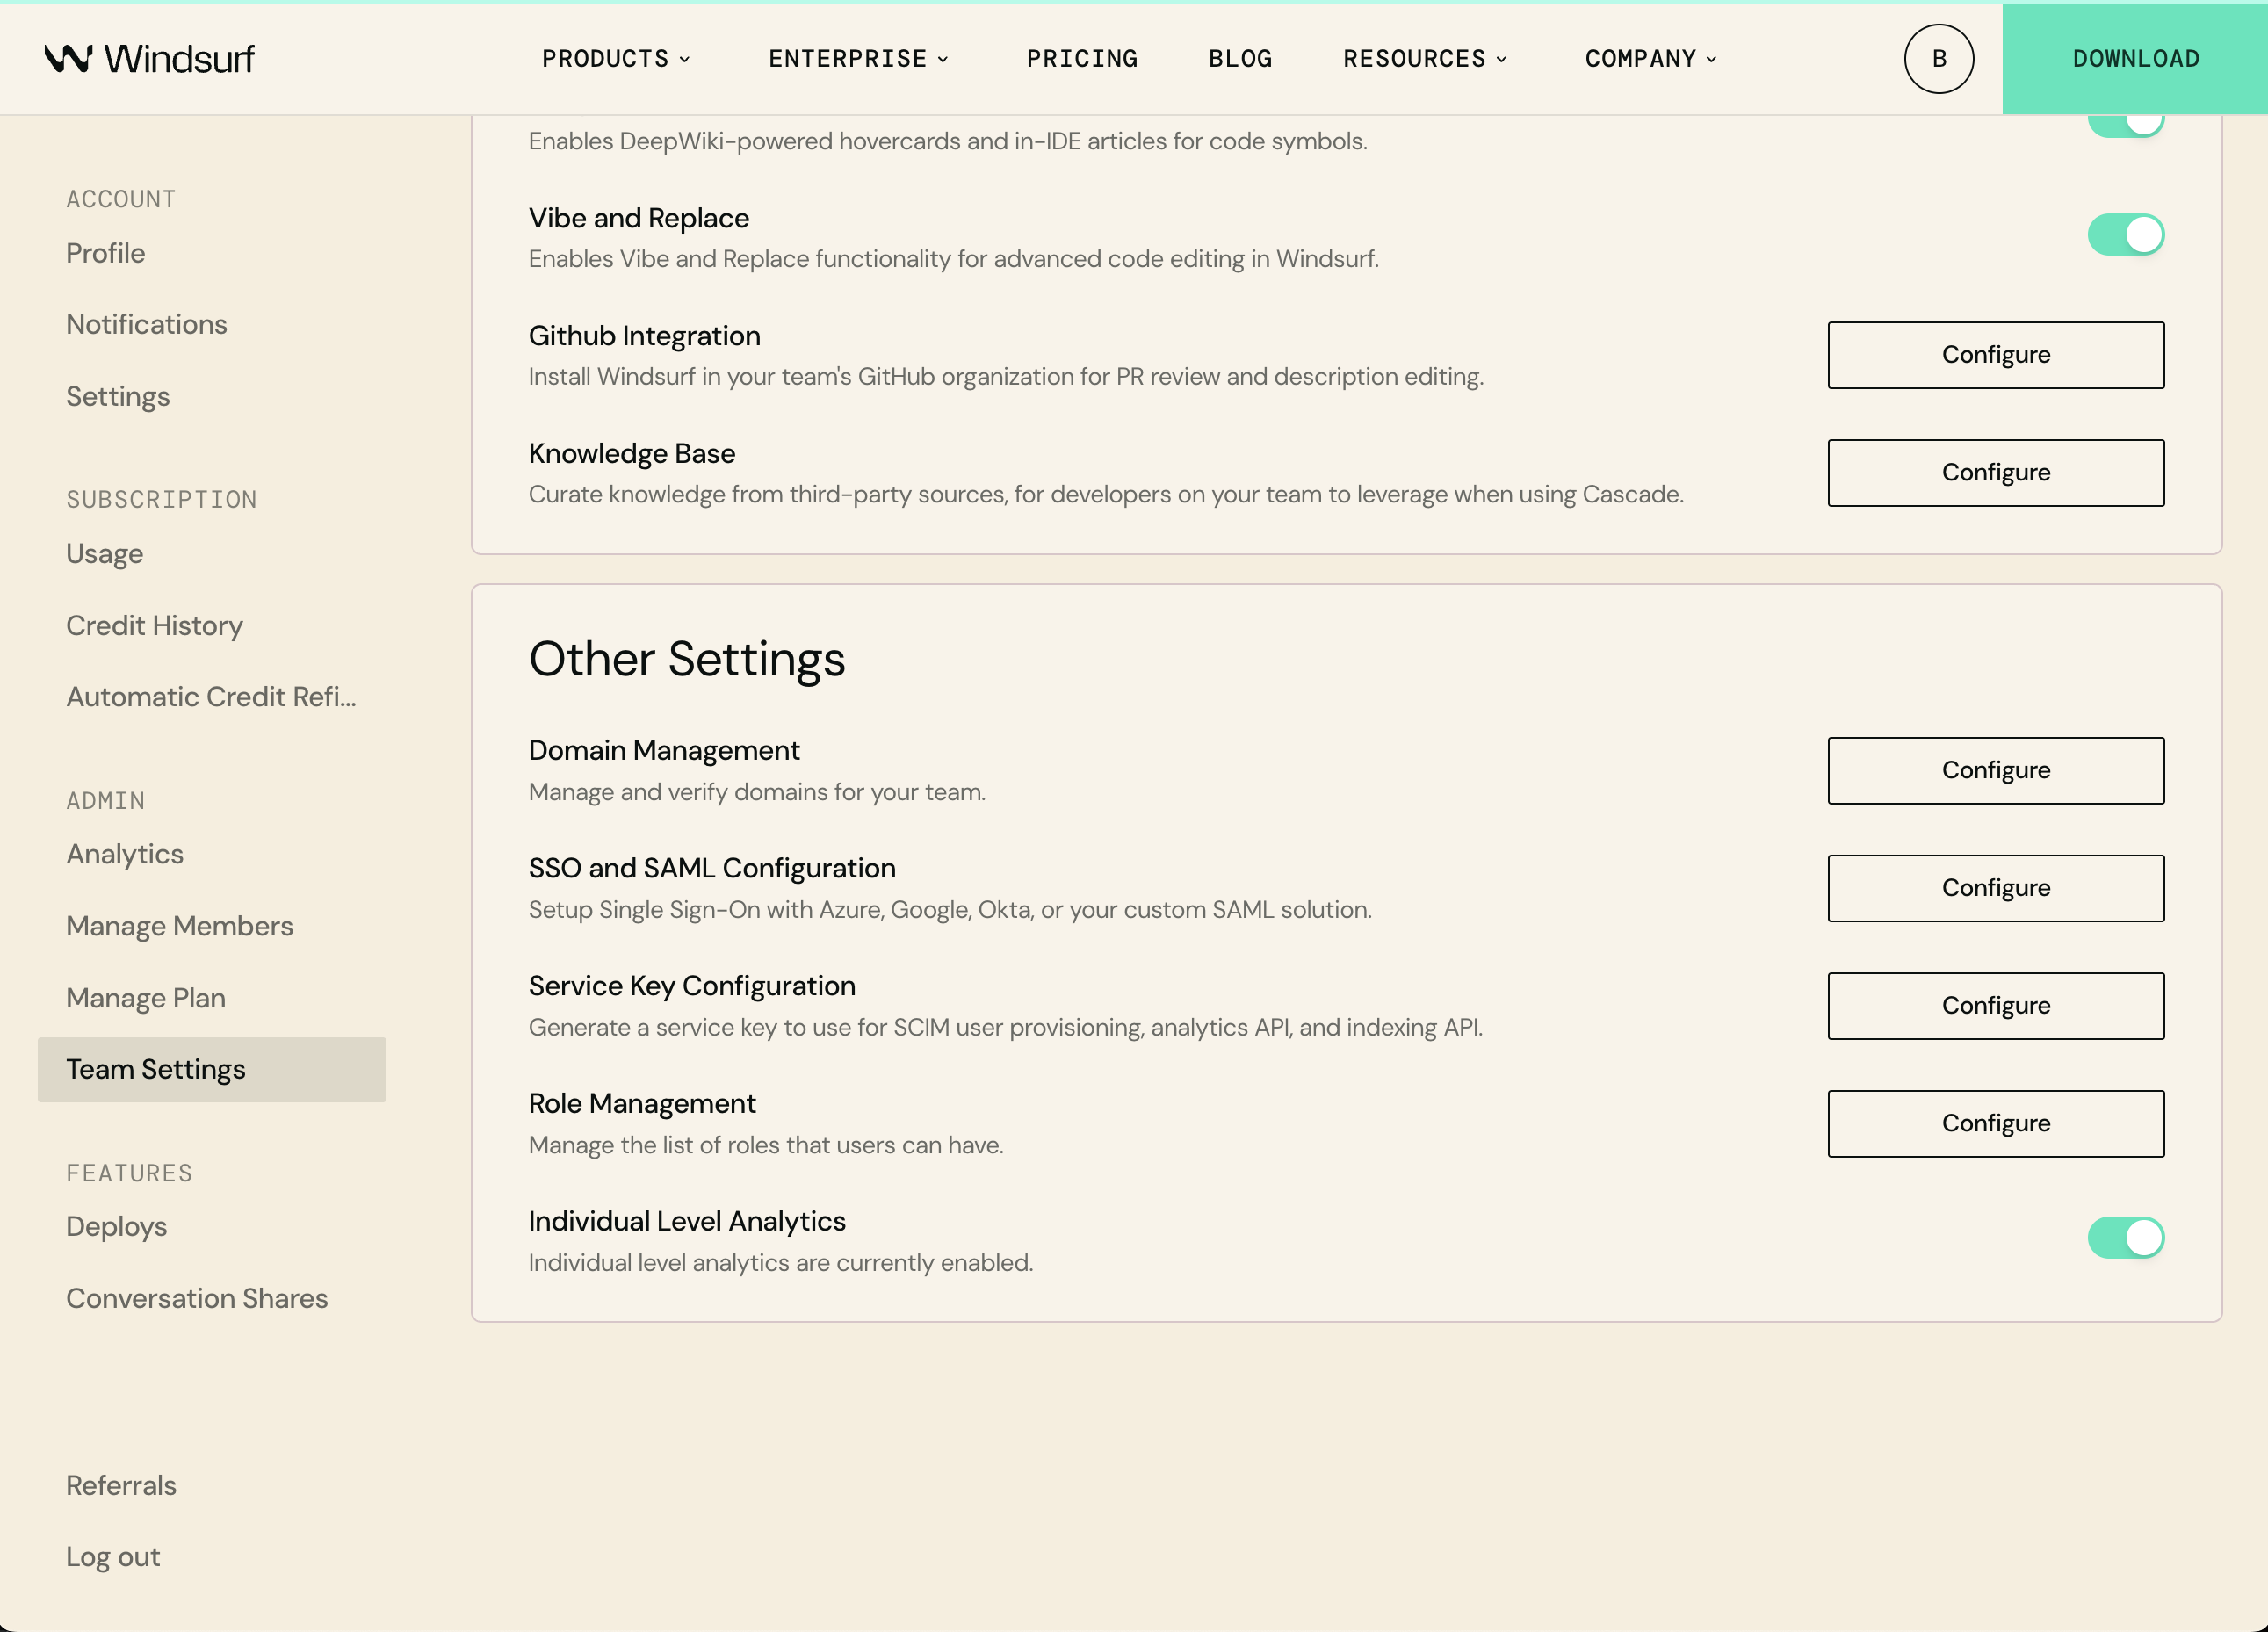
1. [Windsurf Team Settings](https://windsurf.com/team/settings) に移動します
2. 「Other Settings」で、**Role Management** の横にある **Configure** をクリックします
3. **Add Role** をクリックし、名前を「SCIM Provisioning」とします
4. 次の権限を追加してください:
* Team User Read
* Team User Update
* Team User Delete
5. **Save** をクリックします
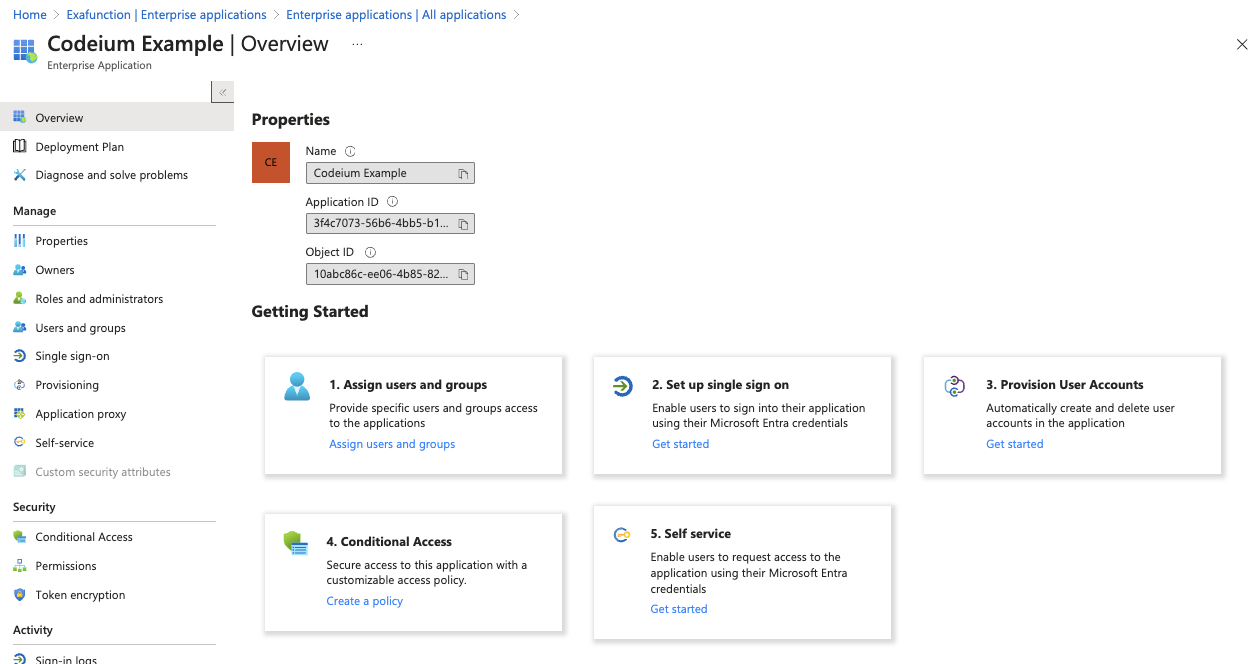
## ステップ2: 既存のWindsurfアプリケーションに移動
Azure上のMicrosoft Entra IDに移動し、左サイドバーの「Enterprise applications」をクリックして、リスト内の既存のWindsurfアプリケーションをクリックします。
This points to your IdP entity ID being invalid, please make sure you copy it correctly from the Okta portal, without any extra characters or spaces before or after the string.
### Failed to verify the signature in samlresponse
This points to an incorrect value of your X509 certificate, please make sure you copy the correct key, and that it is formatted as:
```
-----BEGIN CERTIFICATE-----
value
------END CERTIFICATE------
```
WindsurfはMicrosoft Entra ID / Azure ADとのユーザーおよびグループのSCIM(System for Cross-domain Identity Management:クロスドメインのアイデンティティ管理のための標準規格)同期をサポートしています。SCIM同期を使用するためにSSO(Single Sign-On)の設定は必須ではありませんが、設定することを強く推奨します。
必要なもの:
* Microsoft Entra ID / Azure AD の管理者権限アクセス
* Windsurf の管理者アクセス
* Entra ID 上の既存の Windsurf アプリケーション(通常は既存の SSO(Single Sign-On)アプリケーションから作成されたもの)
**必要なサービス キーの権限**
SCIM(System for Cross-domain Identity Management:クロスドメインのアイデンティティ管理のための標準規格)プロビジョニングに使用されるサービス キーには、次の権限が必要です:
* **Team User Read** - ユーザーおよびグループ情報を読み取るために必要
* **Team User Update** - ユーザーおよびグループを作成・更新するために必要
* **Team User Delete** - ユーザーおよびグループを無効化・削除するために必要
これらの権限を持つカスタムロールを作成するか、それらを含む既存の管理者ロールを使用できます。
## ステップ1:SCIM権限を持つロールを作成する
SCIM(System for Cross-domain Identity Management:クロスドメインのアイデンティティ管理のための標準規格)プロビジョニングを設定する前に、必要な権限を持つロールを作成する必要があります。
1. [Windsurf Team Settings](https://windsurf.com/team/settings) に移動します
2. 「Other Settings」で、**Role Management** の横にある **Configure** をクリックします
3. **Add Role** をクリックし、名前を「SCIM Provisioning」とします
4. 次の権限を追加してください:
* Team User Read
* Team User Update
* Team User Delete
5. **Save** をクリックします
## ステップ2: 既存のWindsurfアプリケーションに移動
Azure上のMicrosoft Entra IDに移動し、左サイドバーの「Enterprise applications」をクリックして、リスト内の既存のWindsurfアプリケーションをクリックします。
 ## ステップ3:SCIMプロビジョニングの設定
中央の「ユーザーアカウントのプロビジョニング」の下にある「開始する」をクリックし(ステップ3)、再度「開始する」をクリックします。
## ステップ3:SCIMプロビジョニングの設定
中央の「ユーザーアカウントのプロビジョニング」の下にある「開始する」をクリックし(ステップ3)、再度「開始する」をクリックします。
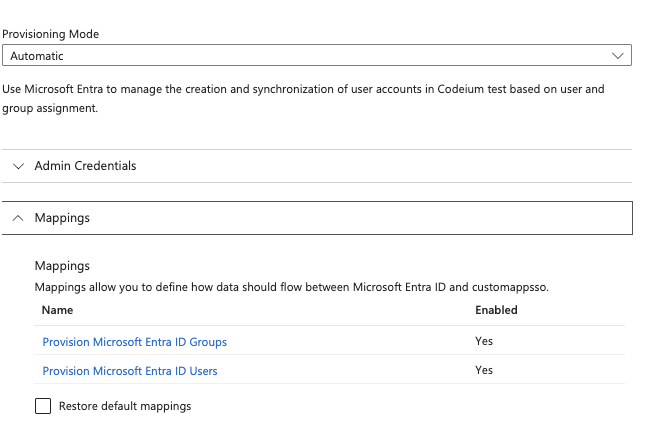
 プロビジョニング設定ページで、以下のオプションを選択してください。
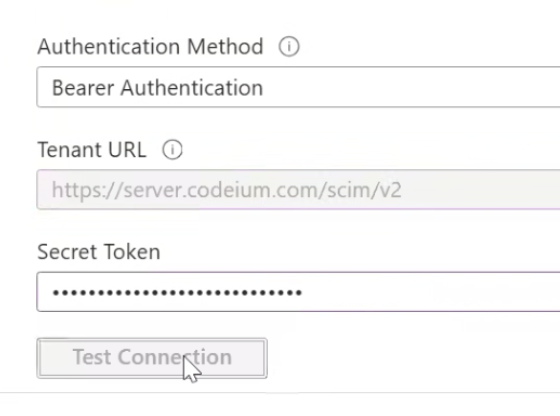
プロビジョニングモード: 自動
管理者認証情報 > テナントURL: [https://server.codeium.com/scim/v2](https://server.codeium.com/scim/v2)
プロビジョニング設定ページで、以下のオプションを選択してください。
プロビジョニングモード: 自動
管理者認証情報 > テナントURL: [https://server.codeium.com/scim/v2](https://server.codeium.com/scim/v2)
 Azure プロビジョニング ページを開いたまま、Windsurf Web ポータルに移動し、ページ上部のナビゲーション バーにあるプロフィール アイコンをクリックします。チーム設定で、サービス キーを選択し、サービス キーを追加をクリックします。任意のキー名(「Azure SCIM Provisioning」など)を入力し、**先ほど作成した「SCIM Provisioning」ロールを選択**し、サービス キーを作成をクリックします。出力されたキーをコピーし、Azure ページに戻って、シークレット トークンに貼り付けます。
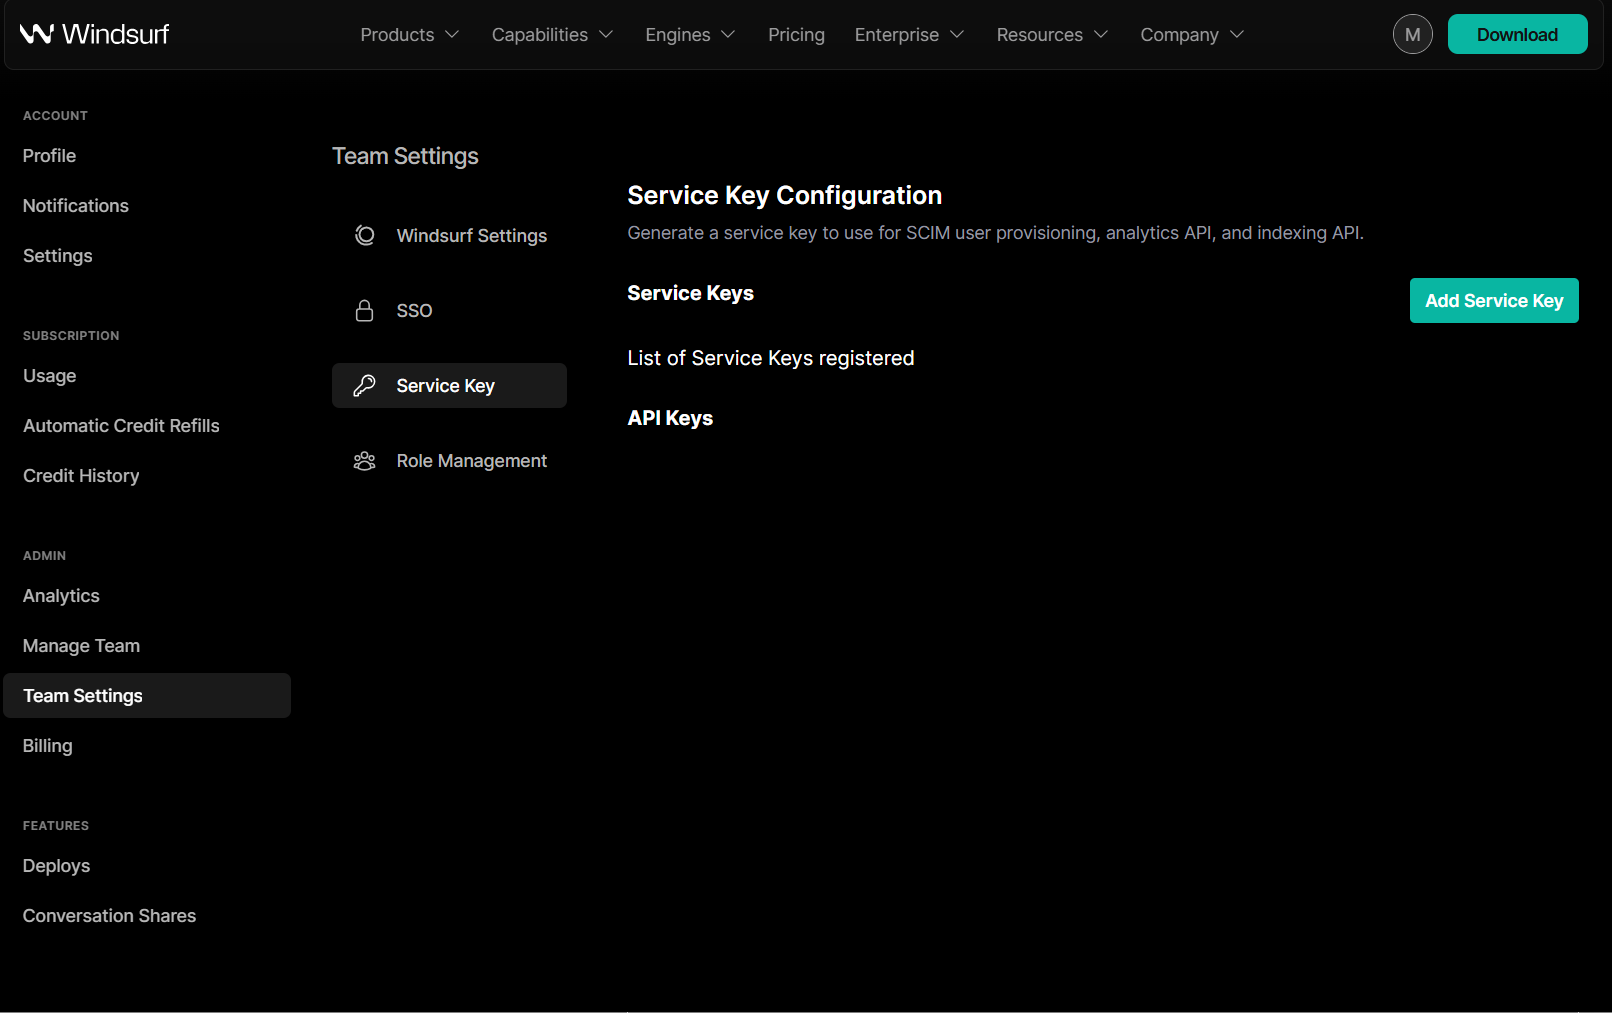 (Windsurfでキーを作成した後に表示される画面)
プロビジョニングページで、「接続をテスト」をクリックし、SCIM(System for Cross-domain Identity Management:クロスドメインのアイデンティティ管理のための標準規格)接続が確認されることを確認してください。
プロビジョニングフォームの上にある「保存」をクリックします。
## ステップ4:SCIMプロビジョニングの設定
「保存」をクリックした後、プロビジョニングページに新しいオプション「マッピング」が表示されているはずです。「マッピング」を展開し、「Microsoft Entra ID ユーザーをプロビジョニング」をクリックします
(Windsurfでキーを作成した後に表示される画面)
プロビジョニングページで、「接続をテスト」をクリックし、SCIM(System for Cross-domain Identity Management:クロスドメインのアイデンティティ管理のための標準規格)接続が確認されることを確認してください。
プロビジョニングフォームの上にある「保存」をクリックします。
## ステップ4:SCIMプロビジョニングの設定
「保存」をクリックした後、プロビジョニングページに新しいオプション「マッピング」が表示されているはずです。「マッピング」を展開し、「Microsoft Entra ID ユーザーをプロビジョニング」をクリックします
 属性マッピングで、displayName配下のすべてのフィールドを削除し、userName、active、displayNameのフィールドのみを残してください。
 activeについては、Editをクリックします。Expressionの下で、フィールドを次のように変更します
```
NOT([IsSoftDeleted])
```
次に「OK」をクリックします。
ユーザー属性は以下のようになります
activeについては、Editをクリックします。Expressionの下で、フィールドを次のように変更します
```
NOT([IsSoftDeleted])
```
次に「OK」をクリックします。
ユーザー属性は以下のようになります
 属性マッピングページで、上部の「保存」をクリックし、プロビジョニングページに戻ります。
次に同じページで、Mappings の下にある Provision Microsoft Entra ID Groups をクリックします。externalId のみ削除をクリックし、上部の Save をクリックします。Provisioning ページに戻ります。
属性マッピングページで、上部の「保存」をクリックし、プロビジョニングページに戻ります。
次に同じページで、Mappings の下にある Provision Microsoft Entra ID Groups をクリックします。externalId のみ削除をクリックし、上部の Save をクリックします。Provisioning ページに戻ります。
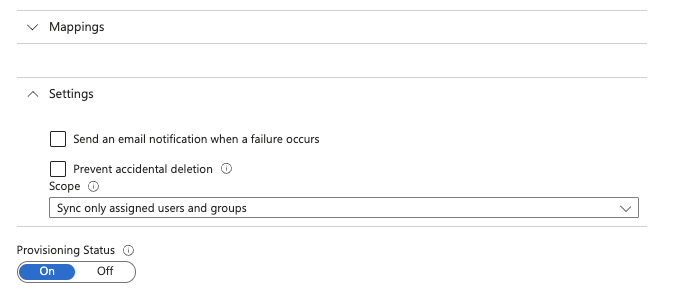
 プロビジョニングページの下部に、プロビジョニングステータスのトグルもあります。これをオンに設定してSCIM(System for Cross-domain Identity Management:クロスドメインのアイデンティティ管理のための標準規格)同期を有効にしてください。これにより、40分ごとにEntra IDアプリケーションのユーザーとグループがWindsurfに同期されるようになります。
 保存をクリックして完了すると、SCIM(System for Cross-domain Identity Management:クロスドメインのアイデンティティ管理のための標準規格)のユーザーとグループの同期が有効になります。アプリケーションに割り当てられたユーザーとグループのみがWindsurfに同期されます。なお、ユーザーの削除は、AzureのSCIM設計により、ユーザーを完全に削除するのではなく、Windsurfへのアクセスを無効にする(シートの使用を停止する)だけとなりますのでご注意ください。
Windsurfは、Oktaを用いたユーザーおよびグループのSCIM同期をサポートしています。SCIM同期を使用するためにSSO(Single Sign-On)を設定する必要はありませんが、強く推奨します。
必要なもの:
* Oktaの管理者アクセス
* Windsurfの管理者アクセス
* Okta上の既存のWindsurfアプリケーション(通常は既存のSSOアプリケーションから作成されたもの)
## ステップ 1: 既存のWindsurfアプリケーションへ移動
Oktaで左サイドバーのApplications、Applicationsをクリックし、アプリケーション一覧から既存のWindsurfアプリケーションをクリックします。
## ステップ 2: SCIMプロビジョニングを有効化
GeneralタブのApp Settingsで右上のEditをクリックします。次に「Enable SCIM Provisioning」のチェックボックスをオンにして、Saveをクリックします。上部に新しいProvisioningタブが表示されるはずです。
続いてProvisioningに移動し、Editをクリックして以下の項目を入力します:
SCIM connector base URL: [https://server.codeium.com/scim/v2](https://server.codeium.com/scim/v2)
Unique identifier field for users: email
Supported provisioning actions: Push New Users, Push Profile Updates, Push Groups
Authentication Mode: HTTP Header
HTTP Header - Authorizationで使用するトークンは次から生成できます
* [https://windsurf.com/team/settings](https://windsurf.com/team/settings) にアクセスし、Service Key Configurationへ移動
* Configureをクリックし、Add Service Keyを選択してAPIキーに名前を付ける
* APIキーをコピーし、Oktaに戻ってHTTP Header - Authorizationに貼り付ける
Provisioning Integrationの入力が完了したらSaveをクリックします。
## ステップ 3: プロビジョニングの設定
Provisioningタブ内の左側に新しいタブが2つ表示されているはずです。To Appをクリックし、Edit Provisioning to Appを選択します。Create Users、Update User Attributes、Deactivate Usersのチェックボックスをオンにして、Saveをクリックします。
このステップ以降、グループに割り当てられたすべてのユーザーがWindsurfに同期されます。
## ステップ 4: グループプロビジョニングの設定(任意)
グループをWindsurfに同期するには、プッシュするグループを指定する必要があります。アプリケーション内で上部のPush Groupsタブをクリックします。次に + Push Groups -> Find Groups by name をクリックします。追加したいグループでフィルタし、「Push group memberships immediately」にチェックが入っていることを確認して、Saveをクリックします。グループが作成され、メンバーがWindsurfに同期されます。グループは、その後Analyticsページでグループ単位のAnalyticsを絞り込むために使用できます。
このガイドでは、SCIM(System for Cross-domain Identity Management:クロスドメインのアイデンティティ管理のための標準規格)APIを使用してWindsurfでグループを作成および維持する方法を説明します。
Identity Provider(Azure/Okta)を使用せずに手動でグループをプロビジョニングしたい理由がいくつかあります。企業では、Windsurfがアクセスできない別の内部ソース(HRウェブサイト、ソースコード管理ツールなど)からグループをプロビジョニングしたい場合や、Identity Providerが提供するものよりもグループに対してより詳細な制御を行いたい場合があります。そのため、グループはHTTPリクエストを介してAPIで作成することも可能です。以下では、CURLを使用したHTTPリクエストの例を示します。
ここには5つの主要なAPIがあります。グループ作成、グループメンバー追加、グループメンバー置換、グループ削除、グループ内ユーザー一覧です。
### グループの作成
```
curl -k -X POST https://server.codeium.com/scim/v2/Groups -d '{
"displayName": "<グループ名>",
"schemas": ["urn:ietf:params:scim:schemas:core:2.0:Group"]
}' -H "Authorization: Bearer " -H "Content-Type: application/scim+json"
```
### グループメンバーを追加
```
curl -X PATCH https://server.codeium.com/scim/v2/Groups/<グループ名> -d '{"schemas": ["urn:ietf:params:scim:api:messages:2.0:PatchOp"],
"Operations":[
{
"op": "add",
"path":"members",
"value": [{"value": "<メールアドレス1>"}, {"value": "<メールアドレス2>"}]
}]}' -H "Authorization: Bearer " -H "Content-Type: application/scim+json"
```
### グループメンバーの置き換え
```
curl -X PATCH https://server.codeium.com/scim/v2/Groups/<グループ名> -d '{"schemas": ["urn:ietf:params:scim:api:messages:2.0:PatchOp"],
"Operations":[
{
"op": "replace",
"path":"members",
"value": [{"value": "<メールアドレス1>"}, {"value": "<メールアドレス2>"}]
}]}' -H "Authorization: Bearer " -H "Content-Type: application/scim+json"
```
### グループの削除
```
curl -X DELETE https://server.codeium.com/scim/v2/Groups/<グループ名> -H "Authorization: Bearer " -H "Content-Type: application/scim+json"
```
### グループの一覧表示
```
curl -X GET -H "Authorization: Bearer " "https://server.codeium.com/scim/v2/Groups"
```
### グループ内のユーザーを一覧表示
```
curl -X GET -H "Authorization: Bearer " "https://server.codeium.com/scim/v2/Groups/<グループID>"
```
まず最初にグループを作成し、その後でメンバーを含むグループに置き換える必要があります。また、グループ名にスペースなどの特殊文字が含まれている場合は、グループ名をURLエンコードする必要があります。例えば、「Engineering Group」というグループ名の場合、URLでは「Engineering%20Group」として記述する必要があります。
ユーザーをグループに追加する前に、Windsurfでユーザーを作成する必要があります(SCIM(System for Cross-domain Identity Management:クロスドメインのアイデンティティ管理のための標準規格)経由、または手動でのアカウント作成)。
## ユーザーAPI
ユーザー向けのAPIも提供されています。以下は、WindsurfがサポートするSCIM(System for Cross-domain Identity Management:クロスドメインのアイデンティティ管理のための標準規格)APIの主要なものです。
ユーザーを無効化する(有効化するには false を true に変更):
```
curl -X PATCH \
https://server.codeium.com/scim/v2/Users/<ユーザーAPIキー> \
-H 'Content-Type: application/scim+json' \
-H 'Authorization: Bearer ' \
-d '{
"schemas": ["urn:ietf:params:scim:api:messages:2.0:PatchOp"],
"Operations": [
{
"op": "replace",
"path": "active",
"value": false
}
]
}'
```
ユーザーを作成する:
```
curl -X POST \
https://server.codeium.com/scim/v2/Users \
-H 'Content-Type: application/scim+json' \
-H 'Authorization: Bearer ' \
-d '{
"schemas": ["urn:ietf:params:scim:schemas:core:2.0:User"],
"userName": "",
"displayName": "",
"active": true,
}'
```
名前を更新:
```
curl -X PATCH \
'https:///_route/api_server/scim/v2/Users/<ユーザー API キー>' \
-H 'Authorization: Bearer ' \
-H 'Content-Type: application/scim+json' \
-d '{
"schemas": ["urn:ietf:params:scim:api:messages:2.0:PatchOp"],
"Operations": [
{
"op": "Replace",
"path": "displayName",
"value": ""
}
]
}'
```
## APIシークレットキーの作成
[https://windsurf.com/team/settings](https://windsurf.com/team/settings) にアクセスします。「サービス キー設定」で「サービス キーを追加」をクリックします。任意のキー名(「Azure Provisioning Key」など)を入力し、「サービス キーを作成」をクリックします。出力されたキーをコピーして保存します。これで、上記のAPIの認証にこのキーを使用できます。
## 前提条件
このガイドは、Duo が組織の IDP として構成されている、または外部 IDP が構成済みであることを前提としています。
Duo アカウントと Windsurf アカウントの両方に対する管理者権限が必要です。
## Windsurf 用に Duo を設定する
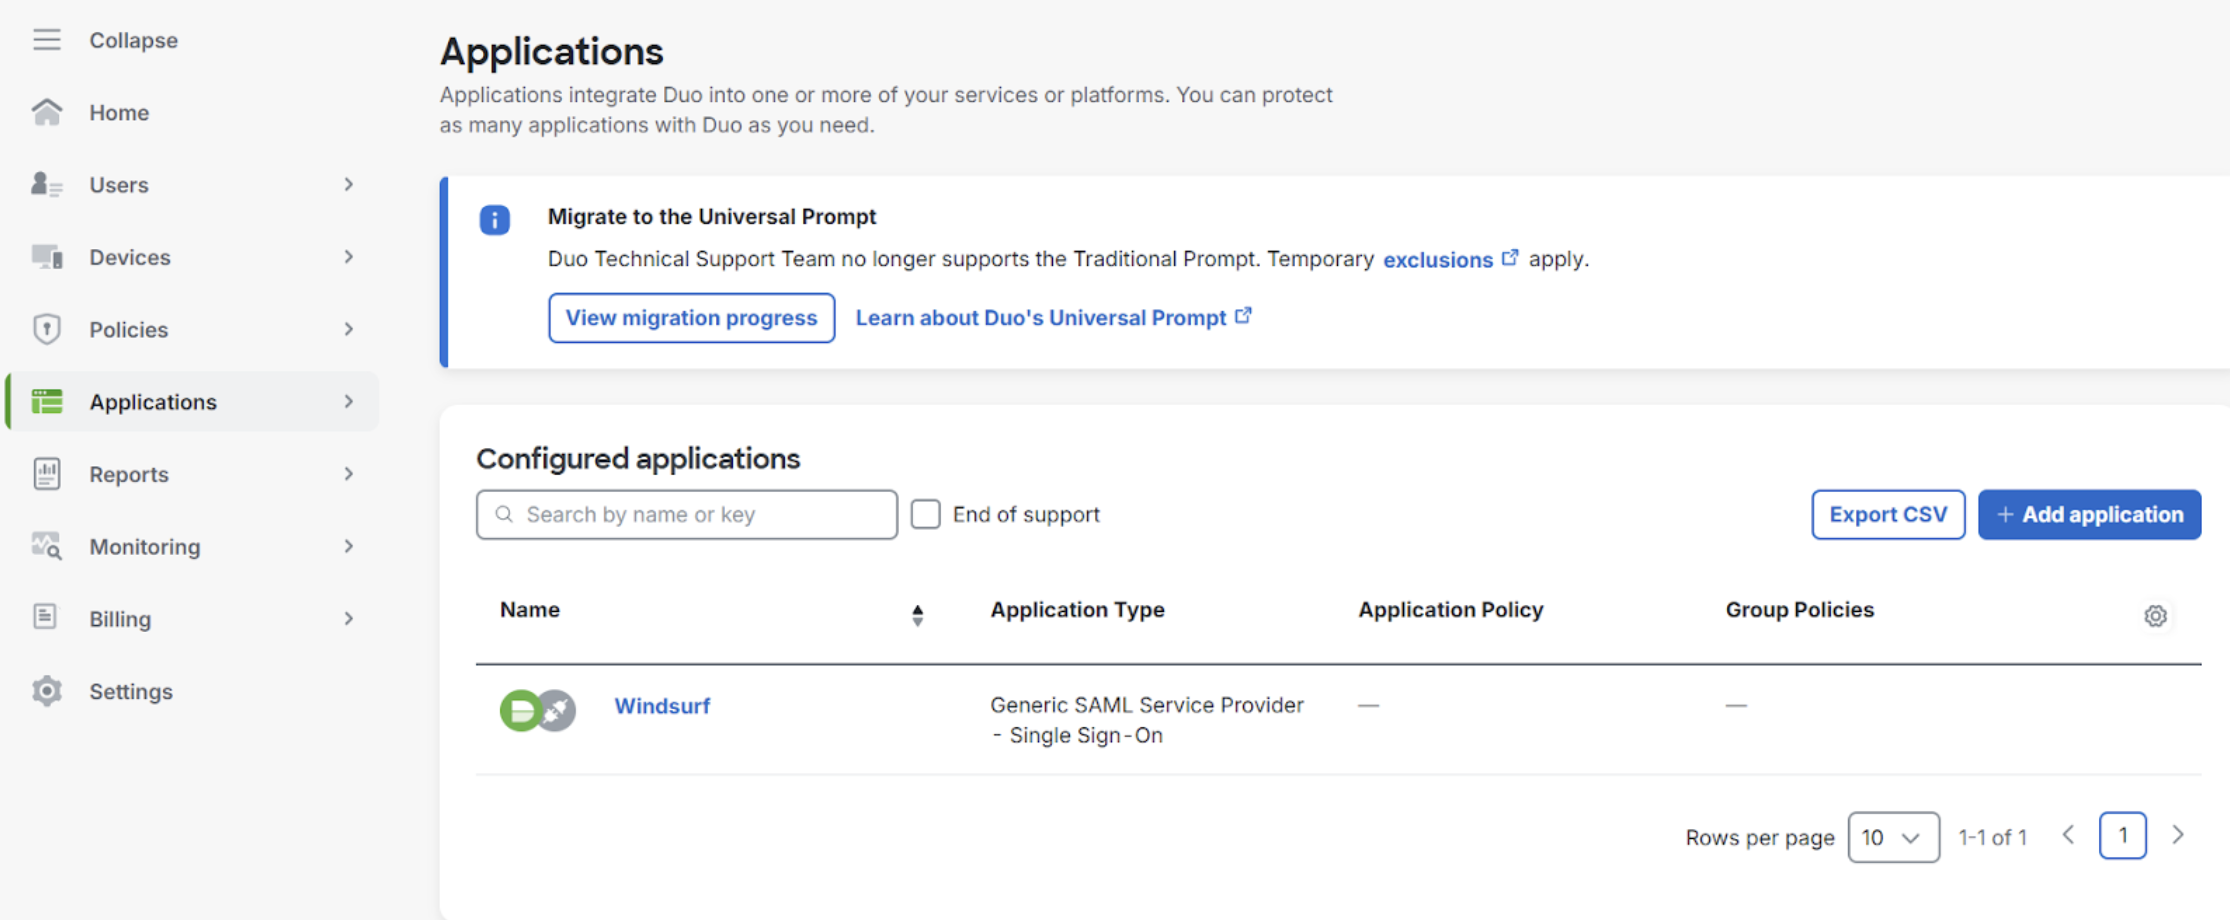
1. Applications に移動し、Generic SAML service provider を追加します
保存をクリックして完了すると、SCIM(System for Cross-domain Identity Management:クロスドメインのアイデンティティ管理のための標準規格)のユーザーとグループの同期が有効になります。アプリケーションに割り当てられたユーザーとグループのみがWindsurfに同期されます。なお、ユーザーの削除は、AzureのSCIM設計により、ユーザーを完全に削除するのではなく、Windsurfへのアクセスを無効にする(シートの使用を停止する)だけとなりますのでご注意ください。
Windsurfは、Oktaを用いたユーザーおよびグループのSCIM同期をサポートしています。SCIM同期を使用するためにSSO(Single Sign-On)を設定する必要はありませんが、強く推奨します。
必要なもの:
* Oktaの管理者アクセス
* Windsurfの管理者アクセス
* Okta上の既存のWindsurfアプリケーション(通常は既存のSSOアプリケーションから作成されたもの)
## ステップ 1: 既存のWindsurfアプリケーションへ移動
Oktaで左サイドバーのApplications、Applicationsをクリックし、アプリケーション一覧から既存のWindsurfアプリケーションをクリックします。
## ステップ 2: SCIMプロビジョニングを有効化
GeneralタブのApp Settingsで右上のEditをクリックします。次に「Enable SCIM Provisioning」のチェックボックスをオンにして、Saveをクリックします。上部に新しいProvisioningタブが表示されるはずです。
続いてProvisioningに移動し、Editをクリックして以下の項目を入力します:
SCIM connector base URL: [https://server.codeium.com/scim/v2](https://server.codeium.com/scim/v2)
Unique identifier field for users: email
Supported provisioning actions: Push New Users, Push Profile Updates, Push Groups
Authentication Mode: HTTP Header
HTTP Header - Authorizationで使用するトークンは次から生成できます
* [https://windsurf.com/team/settings](https://windsurf.com/team/settings) にアクセスし、Service Key Configurationへ移動
* Configureをクリックし、Add Service Keyを選択してAPIキーに名前を付ける
* APIキーをコピーし、Oktaに戻ってHTTP Header - Authorizationに貼り付ける
Provisioning Integrationの入力が完了したらSaveをクリックします。
## ステップ 3: プロビジョニングの設定
Provisioningタブ内の左側に新しいタブが2つ表示されているはずです。To Appをクリックし、Edit Provisioning to Appを選択します。Create Users、Update User Attributes、Deactivate Usersのチェックボックスをオンにして、Saveをクリックします。
このステップ以降、グループに割り当てられたすべてのユーザーがWindsurfに同期されます。
## ステップ 4: グループプロビジョニングの設定(任意)
グループをWindsurfに同期するには、プッシュするグループを指定する必要があります。アプリケーション内で上部のPush Groupsタブをクリックします。次に + Push Groups -> Find Groups by name をクリックします。追加したいグループでフィルタし、「Push group memberships immediately」にチェックが入っていることを確認して、Saveをクリックします。グループが作成され、メンバーがWindsurfに同期されます。グループは、その後Analyticsページでグループ単位のAnalyticsを絞り込むために使用できます。
このガイドでは、SCIM(System for Cross-domain Identity Management:クロスドメインのアイデンティティ管理のための標準規格)APIを使用してWindsurfでグループを作成および維持する方法を説明します。
Identity Provider(Azure/Okta)を使用せずに手動でグループをプロビジョニングしたい理由がいくつかあります。企業では、Windsurfがアクセスできない別の内部ソース(HRウェブサイト、ソースコード管理ツールなど)からグループをプロビジョニングしたい場合や、Identity Providerが提供するものよりもグループに対してより詳細な制御を行いたい場合があります。そのため、グループはHTTPリクエストを介してAPIで作成することも可能です。以下では、CURLを使用したHTTPリクエストの例を示します。
ここには5つの主要なAPIがあります。グループ作成、グループメンバー追加、グループメンバー置換、グループ削除、グループ内ユーザー一覧です。
### グループの作成
```
curl -k -X POST https://server.codeium.com/scim/v2/Groups -d '{
"displayName": "<グループ名>",
"schemas": ["urn:ietf:params:scim:schemas:core:2.0:Group"]
}' -H "Authorization: Bearer " -H "Content-Type: application/scim+json"
```
### グループメンバーを追加
```
curl -X PATCH https://server.codeium.com/scim/v2/Groups/<グループ名> -d '{"schemas": ["urn:ietf:params:scim:api:messages:2.0:PatchOp"],
"Operations":[
{
"op": "add",
"path":"members",
"value": [{"value": "<メールアドレス1>"}, {"value": "<メールアドレス2>"}]
}]}' -H "Authorization: Bearer " -H "Content-Type: application/scim+json"
```
### グループメンバーの置き換え
```
curl -X PATCH https://server.codeium.com/scim/v2/Groups/<グループ名> -d '{"schemas": ["urn:ietf:params:scim:api:messages:2.0:PatchOp"],
"Operations":[
{
"op": "replace",
"path":"members",
"value": [{"value": "<メールアドレス1>"}, {"value": "<メールアドレス2>"}]
}]}' -H "Authorization: Bearer " -H "Content-Type: application/scim+json"
```
### グループの削除
```
curl -X DELETE https://server.codeium.com/scim/v2/Groups/<グループ名> -H "Authorization: Bearer " -H "Content-Type: application/scim+json"
```
### グループの一覧表示
```
curl -X GET -H "Authorization: Bearer " "https://server.codeium.com/scim/v2/Groups"
```
### グループ内のユーザーを一覧表示
```
curl -X GET -H "Authorization: Bearer " "https://server.codeium.com/scim/v2/Groups/<グループID>"
```
まず最初にグループを作成し、その後でメンバーを含むグループに置き換える必要があります。また、グループ名にスペースなどの特殊文字が含まれている場合は、グループ名をURLエンコードする必要があります。例えば、「Engineering Group」というグループ名の場合、URLでは「Engineering%20Group」として記述する必要があります。
ユーザーをグループに追加する前に、Windsurfでユーザーを作成する必要があります(SCIM(System for Cross-domain Identity Management:クロスドメインのアイデンティティ管理のための標準規格)経由、または手動でのアカウント作成)。
## ユーザーAPI
ユーザー向けのAPIも提供されています。以下は、WindsurfがサポートするSCIM(System for Cross-domain Identity Management:クロスドメインのアイデンティティ管理のための標準規格)APIの主要なものです。
ユーザーを無効化する(有効化するには false を true に変更):
```
curl -X PATCH \
https://server.codeium.com/scim/v2/Users/<ユーザーAPIキー> \
-H 'Content-Type: application/scim+json' \
-H 'Authorization: Bearer ' \
-d '{
"schemas": ["urn:ietf:params:scim:api:messages:2.0:PatchOp"],
"Operations": [
{
"op": "replace",
"path": "active",
"value": false
}
]
}'
```
ユーザーを作成する:
```
curl -X POST \
https://server.codeium.com/scim/v2/Users \
-H 'Content-Type: application/scim+json' \
-H 'Authorization: Bearer ' \
-d '{
"schemas": ["urn:ietf:params:scim:schemas:core:2.0:User"],
"userName": "",
"displayName": "",
"active": true,
}'
```
名前を更新:
```
curl -X PATCH \
'https:///_route/api_server/scim/v2/Users/<ユーザー API キー>' \
-H 'Authorization: Bearer ' \
-H 'Content-Type: application/scim+json' \
-d '{
"schemas": ["urn:ietf:params:scim:api:messages:2.0:PatchOp"],
"Operations": [
{
"op": "Replace",
"path": "displayName",
"value": ""
}
]
}'
```
## APIシークレットキーの作成
[https://windsurf.com/team/settings](https://windsurf.com/team/settings) にアクセスします。「サービス キー設定」で「サービス キーを追加」をクリックします。任意のキー名(「Azure Provisioning Key」など)を入力し、「サービス キーを作成」をクリックします。出力されたキーをコピーして保存します。これで、上記のAPIの認証にこのキーを使用できます。
## 前提条件
このガイドは、Duo が組織の IDP として構成されている、または外部 IDP が構成済みであることを前提としています。
Duo アカウントと Windsurf アカウントの両方に対する管理者権限が必要です。
## Windsurf 用に Duo を設定する
1. Applications に移動し、Generic SAML service provider を追加します
 2. Team Settings の SSO に移動します
 3. 初めて SAML を有効化する場合、SSO ID の設定が求められます。**後から変更することはできません。**
英数字のみを用いて、組織名またはチーム名に設定することを推奨します。
4. Duo ポータルの `Entity ID` の値をコピーし、Windsurf ポータルの `IdP Entity ID` フィールドに貼り付けます。
5. Duo ポータルの `Single Sign-On URL` の値をコピーし、Windsurf ポータルの `SSO URL` フィールドに貼り付けます。
6. Duo ポータルの証明書の値をコピーし、Windsurf ポータルの `X509 Certificate` フィールドに貼り付けます
3. 初めて SAML を有効化する場合、SSO ID の設定が求められます。**後から変更することはできません。**
英数字のみを用いて、組織名またはチーム名に設定することを推奨します。
4. Duo ポータルの `Entity ID` の値をコピーし、Windsurf ポータルの `IdP Entity ID` フィールドに貼り付けます。
5. Duo ポータルの `Single Sign-On URL` の値をコピーし、Windsurf ポータルの `SSO URL` フィールドに貼り付けます。
6. Duo ポータルの証明書の値をコピーし、Windsurf ポータルの `X509 Certificate` フィールドに貼り付けます
 7. Windsurf ポータルの `SP Identity ID` の値をコピーし、Duo ポータルの `Entity ID` フィールドに貼り付けます。
8. Windsurf ポータルの `Callback URL (Assertion Consumer Service URL)` をコピーし、Duo ポータルの `Assertion Consumer Service (ACS) URL` フィールドに貼り付けます。
9. Duo ポータルで、次のとおり属性ステートメントを構成します:
7. Windsurf ポータルの `SP Identity ID` の値をコピーし、Duo ポータルの `Entity ID` フィールドに貼り付けます。
8. Windsurf ポータルの `Callback URL (Assertion Consumer Service URL)` をコピーし、Duo ポータルの `Assertion Consumer Service (ACS) URL` フィールドに貼り付けます。
9. Duo ポータルで、次のとおり属性ステートメントを構成します:
 10. Windsurf ポータルで SAML ログインを有効化し、テストできるようにします。
**注意: この時点でログアウトしたり、ウィンドウを閉じたりしないでください。**
エラーやタイムアウトが発生した場合は設定をトラブルシュートしてください。さもないと、Windsurf ポータルで SAML 設定を無効化する必要があります。
**テストの成功を確認せずにログアウトするかウィンドウを閉じると、アカウントにアクセスできなくなる可能性があります。**
11. テストが正常に完了したら、ログアウトして構いません。これで、ステップ 3 で設定した SSO ID を使い、チーム/組織ページにアクセスする際に SSO でサインインできます。
[https://www.codeium.com/yourssoid/login](https://www.codeium.com/yourssoid/login)
## 前提条件
このガイドは、PingID が構成されており組織の IdP として機能している、または外部 IdP が構成されていることを前提としています。
PingID と Windsurf の両方のアカウントで管理者権限が必要です。
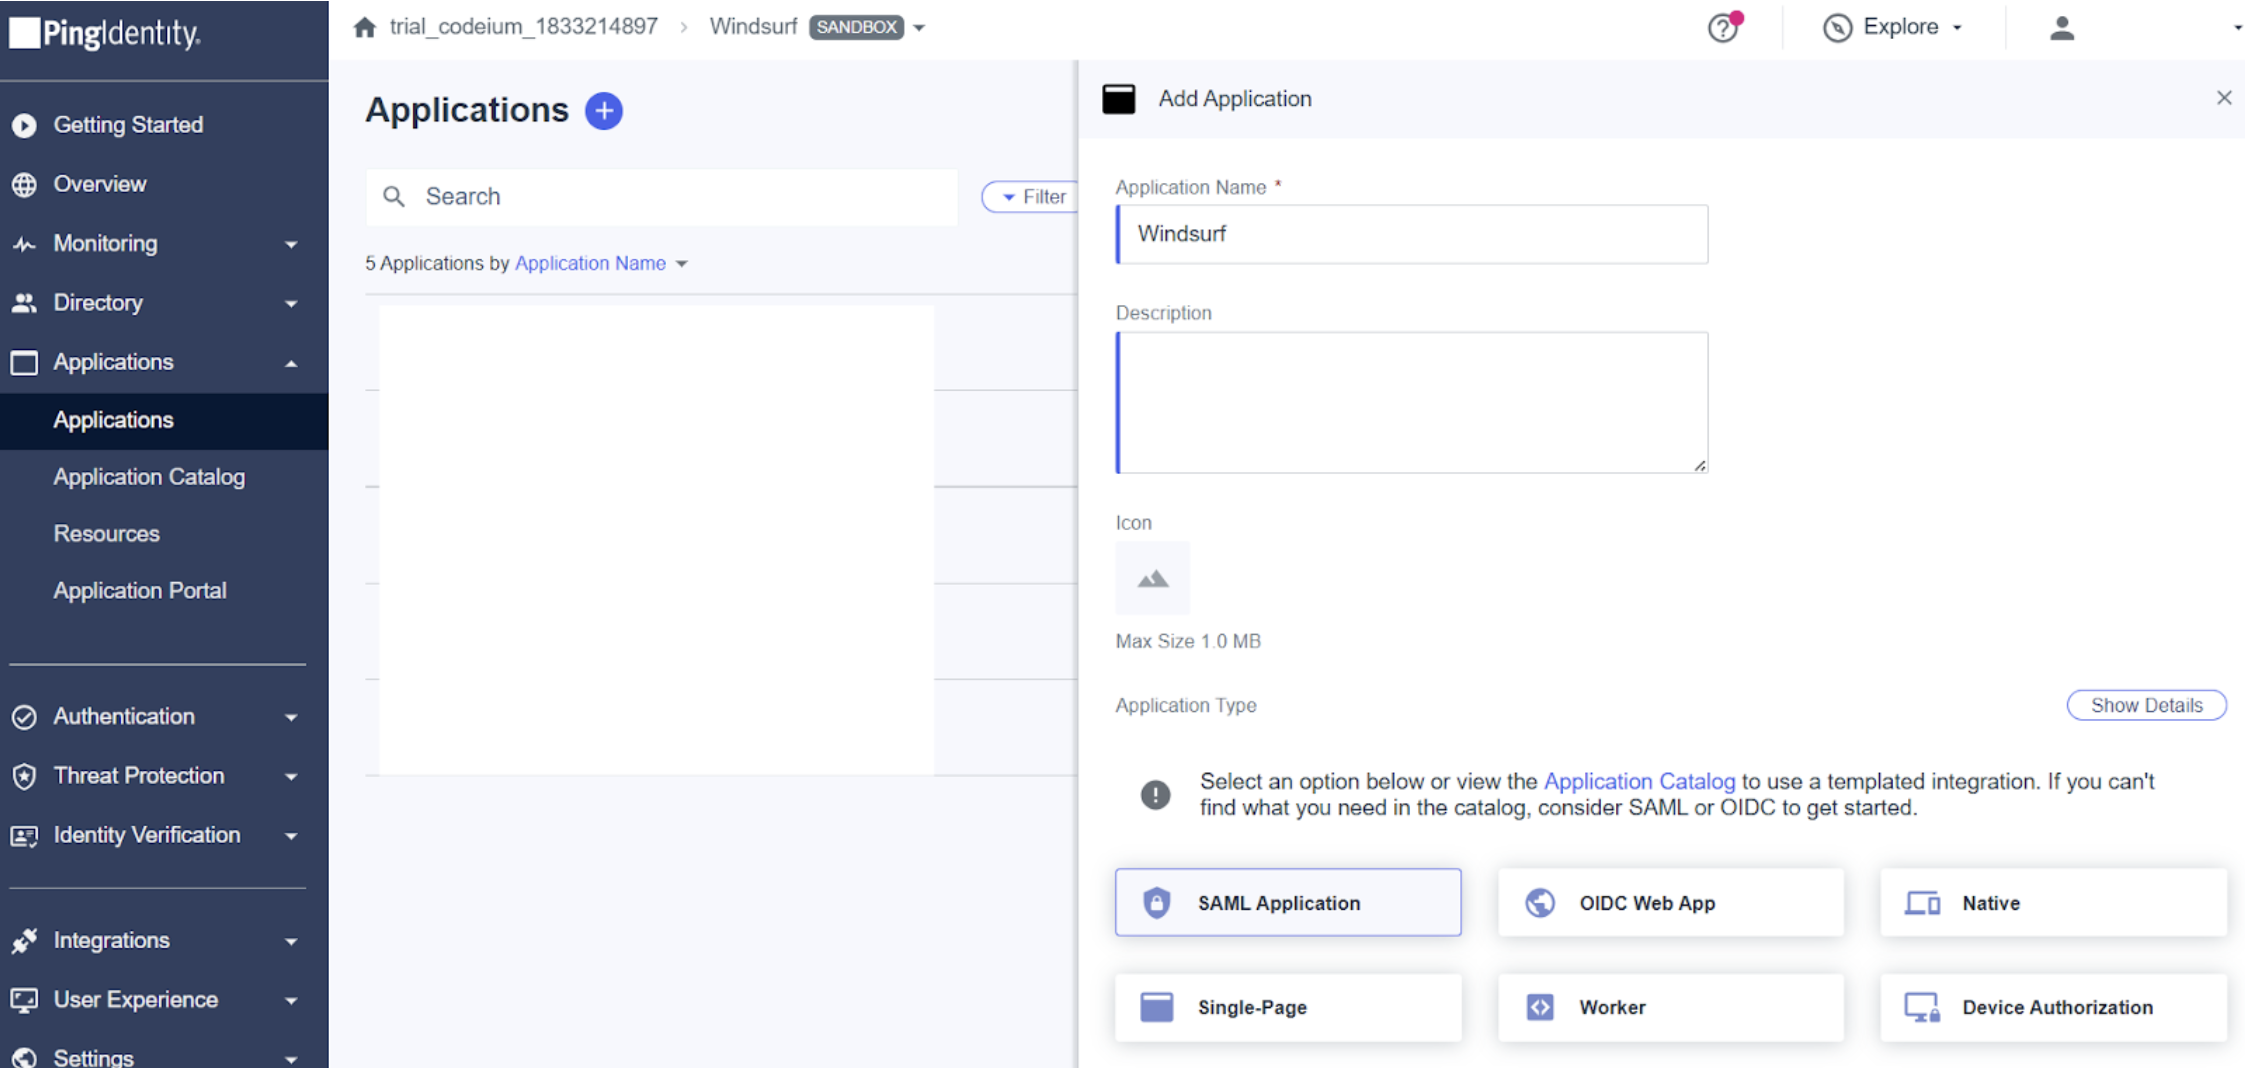
## Windsurf 用に PingID を構成する
1. Applications に移動し、Windsurf を SAML Application として追加します
10. Windsurf ポータルで SAML ログインを有効化し、テストできるようにします。
**注意: この時点でログアウトしたり、ウィンドウを閉じたりしないでください。**
エラーやタイムアウトが発生した場合は設定をトラブルシュートしてください。さもないと、Windsurf ポータルで SAML 設定を無効化する必要があります。
**テストの成功を確認せずにログアウトするかウィンドウを閉じると、アカウントにアクセスできなくなる可能性があります。**
11. テストが正常に完了したら、ログアウトして構いません。これで、ステップ 3 で設定した SSO ID を使い、チーム/組織ページにアクセスする際に SSO でサインインできます。
[https://www.codeium.com/yourssoid/login](https://www.codeium.com/yourssoid/login)
## 前提条件
このガイドは、PingID が構成されており組織の IdP として機能している、または外部 IdP が構成されていることを前提としています。
PingID と Windsurf の両方のアカウントで管理者権限が必要です。
## Windsurf 用に PingID を構成する
1. Applications に移動し、Windsurf を SAML Application として追加します
 2. Team Settings の SSO に移動します
3. 初めて SAML を有効化する場合、SSO ID の設定が必要です。**後から変更できません。**
英数字のみで、組織名またはチーム名を設定することを推奨します。
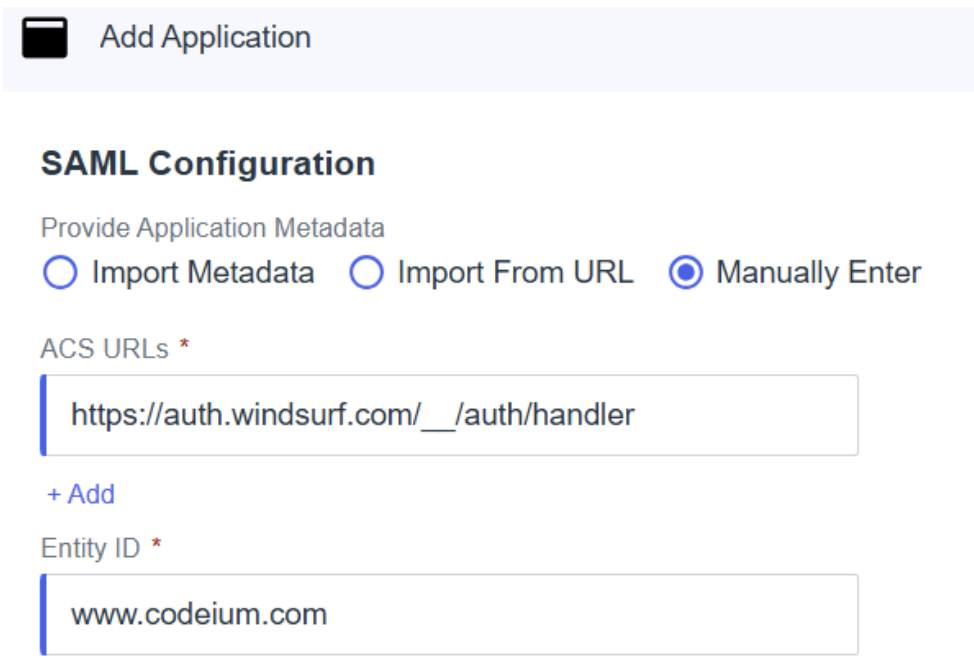
4. PingID で「手動で構成を入力」を選択し、以下の値で各フィールドを入力します:
* ACS URLs - Windsurf ポータルの `Callback URL (Assertion Consumer Service URL)`。
* Entity ID - Windsurf ポータルの `SP Entity ID`。
2. Team Settings の SSO に移動します
3. 初めて SAML を有効化する場合、SSO ID の設定が必要です。**後から変更できません。**
英数字のみで、組織名またはチーム名を設定することを推奨します。
4. PingID で「手動で構成を入力」を選択し、以下の値で各フィールドを入力します:
* ACS URLs - Windsurf ポータルの `Callback URL (Assertion Consumer Service URL)`。
* Entity ID - Windsurf ポータルの `SP Entity ID`。
 5. PingID の `Issuer ID` を Windsurf ポータルの `IdP Entity ID` にコピーします。
6. PingID の `Single Signon Service` の値を Windsurf ポータルの `SSO URL` にコピーします。
7. PingID から Signing Certificate を X509 PEM (.crt) 形式でダウンロードし、ファイルを開いて内容を Windsurf ポータルの `X509 Certificate` に貼り付けます。
**注意**: 先頭と末尾の行がダッシュ(-)5 個で構成されていることを確認し、他の文字が混入していないことを必ず確認してください。
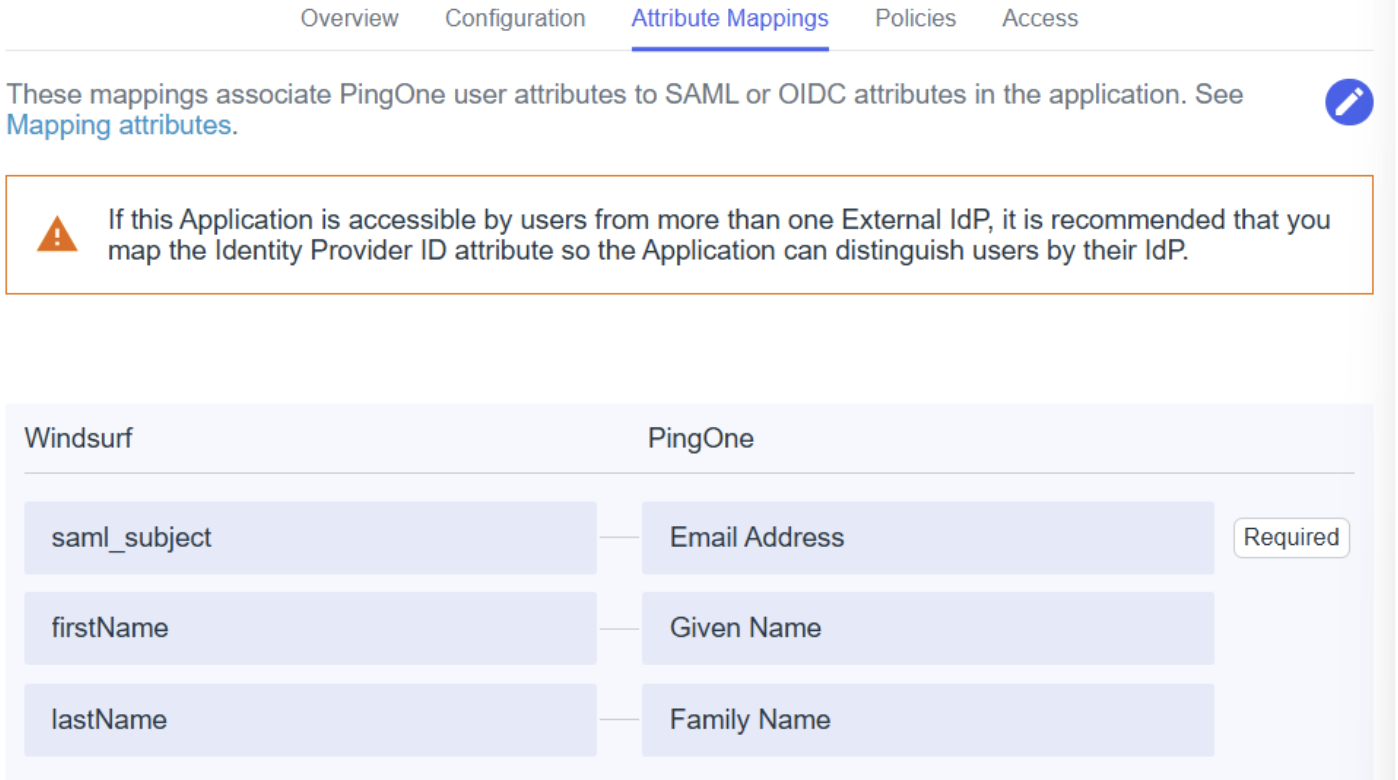
8. 属性マッピングでは、以下を確実にマッピングしてください:
* `saml_subject` - Email Address
* `firstName` - Given Name
* `lastName` - Family Name
5. PingID の `Issuer ID` を Windsurf ポータルの `IdP Entity ID` にコピーします。
6. PingID の `Single Signon Service` の値を Windsurf ポータルの `SSO URL` にコピーします。
7. PingID から Signing Certificate を X509 PEM (.crt) 形式でダウンロードし、ファイルを開いて内容を Windsurf ポータルの `X509 Certificate` に貼り付けます。
**注意**: 先頭と末尾の行がダッシュ(-)5 個で構成されていることを確認し、他の文字が混入していないことを必ず確認してください。
8. 属性マッピングでは、以下を確実にマッピングしてください:
* `saml_subject` - Email Address
* `firstName` - Given Name
* `lastName` - Family Name
 9. セットアップ/組織の要件に応じて、その他のポリシーやアクセスを追加/編集します。
10. Windsurf ポータルで SAML ログインを有効化し、テストできるようにします。
**注意: この時点ではログアウトしたりウィンドウを閉じたりしないでください。**
エラーやタイムアウトが発生した場合は設定をトラブルシュートしてください。そうしないと、Windsurf ポータルで SAML 設定を無効化する必要があります。
**テストの成功を確認せずにログアウトするかウィンドウを閉じると、アカウントにアクセスできなくなる可能性があります。**
11. テストが正常に完了したらログアウトできます。これで、手順 3 で設定した SSO ID を使い、チーム/組織ページにアクセスする際に SSO サインインを利用できます。
[https://www.codeium.com/yourssoid/login](https://www.codeium.com/yourssoid/login)
9. セットアップ/組織の要件に応じて、その他のポリシーやアクセスを追加/編集します。
10. Windsurf ポータルで SAML ログインを有効化し、テストできるようにします。
**注意: この時点ではログアウトしたりウィンドウを閉じたりしないでください。**
エラーやタイムアウトが発生した場合は設定をトラブルシュートしてください。そうしないと、Windsurf ポータルで SAML 設定を無効化する必要があります。
**テストの成功を確認せずにログアウトするかウィンドウを閉じると、アカウントにアクセスできなくなる可能性があります。**
11. テストが正常に完了したらログアウトできます。これで、手順 3 で設定した SSO ID を使い、チーム/組織ページにアクセスする際に SSO サインインを利用できます。
[https://www.codeium.com/yourssoid/login](https://www.codeium.com/yourssoid/login)